A simple plugin for GCC – Part 2
In the last post we set up everything in order to write a GCC plugin. Before we can go on we need to understand a bit how GCC compiles your files.
How to compile a file
For a lot of people, compilers are a bit like operating systems: magical. But they do not have to be!
When you do g++ -o my_program my_file.cc to compile a file, there are lots of steps involved in order to end with a my_program that you can run:
- The compiler parses your C++ file
my_file.ccand emits assembler code, usually in a temporary file - The assembler takes the assembler code and generates an object code file (a
.oor.objfile) - The linker takes all object code files and puts them all together to generate an executable file
my_programthat you can run
All these steps are performed by a tool that knows everything about the compilation process called the driver. In our case the driver is g++.
g++ invokes internally the compiler. The C++ compiler is called, for historical reasons, cc1. You can retrieve the path of the actual C++ compiler by calling g++ -print-prog-name=cc1. The compiler parses the code, optimizes it and then emits assembler code. This assembler is then linked using your system assembler (usually GNU as). This generates an object code file (a file ended in .o or .obj). These files are finally gathered by the linker (usually GNU ld) to generate an executable (or a shared library in the case of our plugin).
When writing plugins we are interested only about the compiler itself. What does exactly the compiler do?
- Parse the code and verify that is valid according to the rules of the source language, in our case C++
- Represent the input code in a more abstract way but respecting the semantics of the source language
- Analyze (and reason) about that representation in order to transform it (preserving the semantics) into a better version of it, this is commonly called code optimization although a more appropiate name would be code improvement
- Once the representation is considered optimized enough, emit assembler code from it
Intermediate representation
The representation used by a compiler is commonly called the intermediate representation and is an abstract way of representing the program that is amenable for analysis and optimizations.
The process of compilation is at its core a process of lowering. It starts from a very high level representation (the source code) with very high level semantics (i.e. meaning) in their syntax. The compiler progressively lowers the level of the language, by translating and materializing the high level concepts to lower level concepts. Finally, the lowest level is represented by the assembler code which is just a very thin syntactic layer on top of machine code.
Most compilers do not use a single representation for the compilation process (and even if they do at the level of the representation in memory) it is progressively lowered as well. GCC uses two main intermediate representations called GIMPLE and RTL. GIMPLE is used for language independent optimizations and RTL for platform-specific optimization and code-generation. In addition to these two intermediate representations, the front end (the part of the compiler that directly handles the source code) may use other intermediate representations. For C and C++, the front ends use a representation called GENERIC. The front end of a programming language implemented in GCC can use any intermediate representation at early steps but then it has to lower it to GIMPLE. GIMPLE is supposed to be general enough to be able to accommodate the semantics of any programming language.
Passes of the compiler
The lowering process performed by a compiler is usually defined by passes (or phases). Each pass computes just one thing or transforms the code in some specific way. This way, if needed, passes can be executed as many times as needed. For instance, it is not unusual that a transformation phase breaks some invariant of the compiler during the transformation. A pass run right after the transformation pass can then be used to restore the invariant property.
The control flow graph
Most programming languages feature some form of control structures like if, while, for, etc. Working with them is a bit unwieldy and it is easier to abstract them away by using a structure called the control flow graph.
A control flow graph is a graph where nodes, called basic blocks, represent sequences of code that run consecutively as a whole (i.e. the program flow cannot change inside a basic block). Basic blocks have edges connecting them according the the control flow. For instance, an if-statement will have three basic blocks: a first one that evaluates the condition and two more representing the then and the else cases. There are two outgoing edges from the condition basic block to the then and else blocks and two outgoing edges from the then and the else block to the basic block after the whole if-statement. Similarly, a loop will have an outgoing edge from the last block of the loop body to the condition block of the loop (these edges are called latches).
Let's draw the CFG
In order to make this post less abstract, let's modify our plugin so it prints the control flow graph using the Graphviz syntax, a very simple language to draw graphs.
First we need to change the initialization of our plugin so it registers a callback and a new pass.
117
118
119
120
121
122
123
124
125
126
127
128
129
130
131
132
133
134
135
136
137
138
139
140
141
142
143
144
145
146
147
148
int plugin_init(struct plugin_name_args *plugin_info,
                struct plugin_gcc_version *version)
{
  if(!plugin_default_version_check(version, &gcc_version))
  {
    std::cerr << "This GCC plugin is for version " << GCCPLUGIN_VERSION_MAJOR
              << "." << GCCPLUGIN_VERSION_MINOR << "\n";
    return 1;
  }

  register_callback(plugin_info->base_name,
                    /* event */ PLUGIN_INFO,
                    /* callback */ NULL,
                    /* user_data */
                    &my_gcc_plugin_info);

  // Register the phase right after cfg
  struct register_pass_info pass_info;

  pass_info.pass = new my_first_pass(g); // "g" is a global gcc::context pointer
  pass_info.reference_pass_name = "cfg";
  pass_info.ref_pass_instance_number = 1;
  pass_info.pos_op = PASS_POS_INSERT_AFTER;

  register_callback(plugin_info->base_name, PLUGIN_PASS_MANAGER_SETUP, NULL,
                    &pass_info);
  register_callback(plugin_info->base_name, PLUGIN_FINISH, finish_gcc, NULL);

  start_graph();

  return 0;
}
In the code above, we start checking the GCC version and then we proceed to register a new pass to the GCC's plugin manager (line 141). The new pass is registered right after the cfg pass, which is the responsible of creating the control flow graph in GCC. Before this phase the CFG is not available. The pass is a class and we create an instance of it at this point (line 136), later we will see the definition of this class.
We also register a callback that will be called when GCC ends (line 143) we need this to end the graph. We immediately initialize the graph (line 145). Functions start_graph and finish_gcc are defined as follows.
97
98
99
100
101
102
103
104
105
106
107
108
109
110
111
112
113
114
namespace {

void start_graph()
{
  std::cerr << "digraph cfg {\n";
}

void end_graph()
{
  std::cerr << "}\n";
}

void finish_gcc(void *gcc_data, void *user_data)
{
  end_graph();
}

}
The only thing these functions do is printing on the standard error the start and end of a directed graph (digraph) in the Graphviz language. Nothing fancy.
A pass is represented as a class that inherits from a GCC class called opt_pass. Since our class will work on GIMPLE, it will inherit from gimple_opt_pass.
32
33
34
35
36
37
struct my_first_pass : gimple_opt_pass
{
  my_first_pass(gcc::context * ctx) :
    gimple_opt_pass(my_first_pass_data, ctx)
  {
  }
GCC is currently transitioning from C to C++. In order to not to break much of the existing code, there are some remnants and alternative ways to do the same things. It is expected that this will be progressively migrated to a more full-C++ approach. One of the elements that still retains this old structure is the pass_data, which defines some properties of the pass. We have to define it before the definition of our class, and pass it to the constructor of gimple_opt_pass.
18
19
20
21
22
23
24
25
26
27
28
29
30
namespace {
const pass_data my_first_pass_data =
{
  GIMPLE_PASS,
  "my_first_pass",	/* name */
  OPTGROUP_NONE,	/* optinfo_flags */
  TV_NONE,		/* tv_id */
  PROP_gimple_any,	/* properties_required */
  0,			/* properties_provided */
  0,			/* properties_destroyed */
  0,			/* todo_flags_start */
  0			/* todo_flags_finish */
};
Lots of these fields do not make sense now since they are very internal to the pass manager itself. For now we can leave as they are.
The virtual method execute (line 49) of a pass will be called by GCC for each function being compiled. The function itself is received as a pointer of type function. At this point we can start emitting the control flow graph of the function in Graphviz syntax.
39
40
41
42
43
44
45
46
47
48
49
50
51
52
53
54
55
56
57
58
59
60
61
62
63
64
65
66
67
68
69
70
71
72
73
74
75
76
77
78
79
80
81
82
83
84
85
86
  virtual unsigned int execute(function * fun) override
  {
    basic_block bb;

    std::cerr << "subgraph fun_" << fun << " {\n";

    FOR_ALL_BB_FN(bb, fun)
    {
      gimple_bb_info *bb_info = &bb->il.gimple;

      std::cerr << "bb_" << fun << "_" << bb->index << "[label=\"";
      if (bb->index == 0)
      {
        std::cerr << "ENTRY: "
                  << function_name(fun) << "\n"
                  << (LOCATION_FILE(fun->function_start_locus) ? : "<unknown>")
                  << ":" << LOCATION_LINE(fun->function_start_locus);
      }
      else if (bb->index == 1)
      {
        std::cerr << "EXIT: "
                  << function_name(fun) << "\n"
                  << (LOCATION_FILE(fun->function_end_locus) ? : "<unknown>") <<
                  ":" << LOCATION_LINE(fun->function_end_locus);
      }
      else
      {
        print_gimple_seq(stderr, bb_info->seq, 0, 0);
      }
      std::cerr << "\"];\n";

      edge e;
      edge_iterator ei;

      FOR_EACH_EDGE(e, ei, bb->succs)
      {
        basic_block dest = e->dest;
        std::
        cerr << "bb_" << fun << "_" << bb->index << " -> bb_" << fun <<
             "_" << dest->index << ";\n";
      }
    }

    std::cerr << "}\n";

    // Nothing special todo
    return 0;
  }
For each function, we will emit a subgraph for it. In order to avoid name clashes, we will name the subgraph using the address of fun (e.g. we will emit things like subgraph fun_0x1234 {). Then we proceed to iterate each of the basic blocks of the function. GCC provides a handy macro for this called FOR_ALL_BB_FN(bb, fun) that will iterate for all the basic blocks bb of the function fun (line 45). Once we have the basic block we want its gimple basic block info gimple_bb_info (line 47).
Each basic block in a function has an index starting from 0. There are two special basic blocks: 0 and 1. The basic block number 0 is the entry of the function and the basic block number 1 is the exit of the function. These basic blocks exist for every function (even if it is empty). They exist because they make the analysis much more regular: there is always a single entry and a single exit block for every function rather than several exits, or entries (the latter would be terrible!). These two basic blocks do not have code inside, so we handle them in a special way, clearly labeling them as ENTRY and EXIT respectively. We complete the label with the location of the beginning and exit of the function respectively (lines 50 to 63).
All other blocks have their content simply dumped. GCC provides several debugging functions and here we just call print_gimple_seq because the code of a basic block is a gimple sequence (gimple_seq). Every element of a gimple_seq is a gimple statement (gimple_stmt) but we will not be handling them today. Gimple statements are printed in a pseudo-C syntax, so it is easy for the compiler writer to see what is going on (line 66).
Basic blocks have outgoing and ingoing edges. In order to draw the graph it is enough to use the outgoing edges (or the ingoing edges, but not both unless we want repeated arrows). Similar to the iterator of basic blocks, there is a macro to iterate the edges of a basic block (line 63). We iterate the successors of the current basic block bb, bb->succs, and then we emit an edge from the current basic block to the target basic block. Two things to note here: the Graphviz syntax does not care if a node has not yet been defined when defining an edge (this is important when we have forward edges) and the names of the nodes are global to the graph, this is why our nodes (see lines 43 and 77) are of the form bb_<<fun>>_<<index>>.
The pass class still needs another method, but we will give it a bogus implementation for now.
88
89
90
91
92
93
94
  virtual my_first_pass *clone() override
  {
    // We do not clone ourselves
    return this;
  }
};
}
Finally, to complete the code, there are some required headers and declarations at the beginning of the file.
1
2
3
4
5
6
7
8
9
10
11
12
13
14
15
16
#include <iostream>

// This is the first gcc header to be included
#include "gcc-plugin.h"
#include "plugin-version.h"

#include "tree-pass.h"
#include "context.h"
#include "basic-block.h"
#include "gimple-pretty-print.h"

// We must assert that this plugin is GPL compatible
int plugin_is_GPL_compatible;

static struct plugin_info my_gcc_plugin_info =
{ "1.0", "This is a very simple plugin" };
Testing the plugin
Before we can test the plugin, we need to make sure the Graphviz package is installed in our system (in most Linux distributions the package is just called graphviz). We will be using the tool dot. Make sure you have it available.
$ dot -V
dot - graphviz version 2.38.0 (20140413.2041)
In order to ease testing, we will change the check rule of our Makefile into this. Note if your system lacks xdg-open or it does not work, call the appropiate PDF viewer (usually evince or okular).
check: warn_unused.so test.cc
	$(CXX) -fplugin=./warn_unused.so -c test.cc -o /dev/null 2> test.dot
	dot -Tpdf test.dot > test.pdf
	xdg-open test.pdf
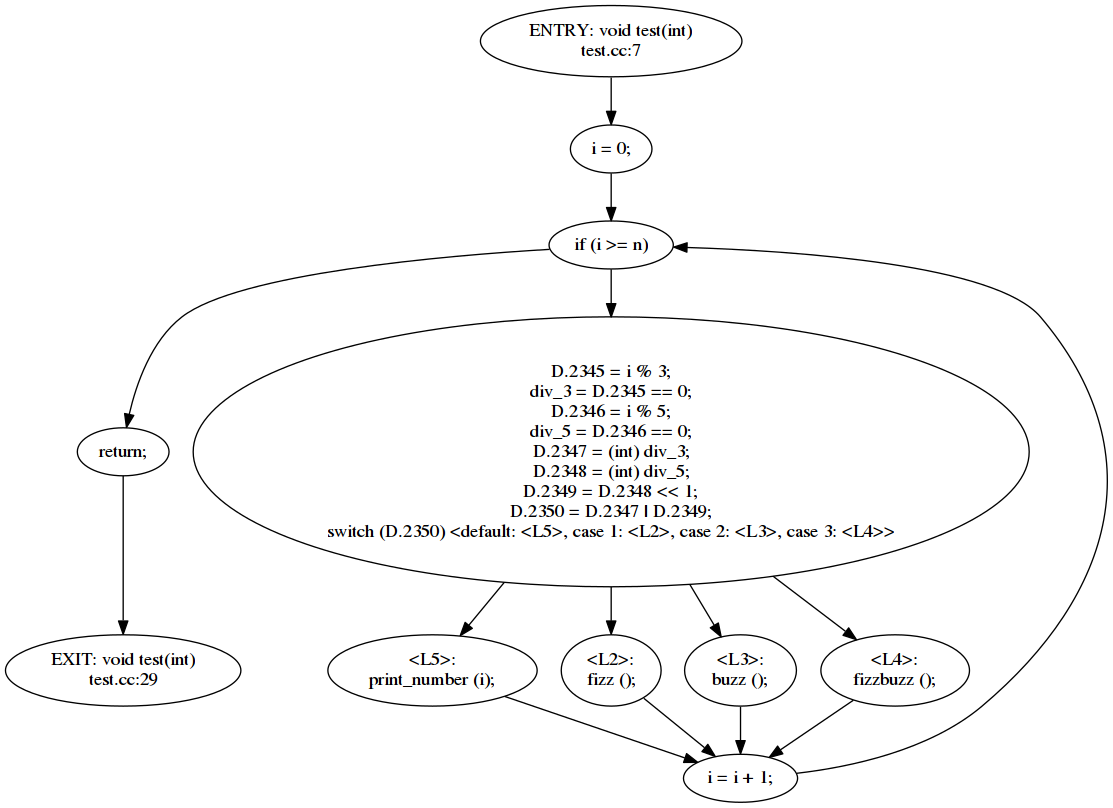
By changing test.cc we will generate a test.pdf containing a forest of control flow graphs, one for each function in the code. As an example, let's consider a very simplified version of the famous Fizz buzz.
void fizz();
void buzz();
void fizzbuzz();
void print_number(int n);

void test(int n)
{
    for (int i = 0; i < n; i++)
    {
        bool div_3 = i % 3 == 0;
        bool div_5 = i % 5 == 0;
        if (div_3 && div_5)
            fizzbuzz();
        else if (div_3)
            fizz();
        else if (div_5)
            buzz();
        else
            print_number(i);
    }
}
Let's run make check
$ /some/path/gcc-install/bin/g++ -fplugin=./warn_unused.so -c test.cc -o /dev/null 2> test.dot
dot -Tpdf test.dot > test.pdf
xdg-open test.pdf
You should see something like this:

You may want to try this fancier version (only the test function is shown below, the remainder of the source code is the same).
void test(int n)
{
    for (int i = 0; i < n; i++)
    {
        bool div_3 = i % 3 == 0;
        bool div_5 = i % 5 == 0;

#define BITMAP2(x, y) ((x) | ((y) << 1))

        switch (BITMAP2(div_3, div_5))
        {
            case BITMAP2(1, 0): // 3
                fizz();
                break;
            case BITMAP2(0, 1): // 5
                buzz();
                break;
            case BITMAP2(1, 1): // 15
                fizzbuzz();
                break;
            default:
                print_number(i);
        }

#undef BITMAP2
    }
}
You should something like this
Next steps
Now it is a great moment to test with different codes and get familiar with the shapes of the CFG. Next time we will address our original intent of writing a GCC plugin: emitting a diagnostic for unused result of functions returning class types with trivial destructors.
You can find the supporting code for this post here. Make sure you fix the GCCDIR variable in the Makefile.