<?xml version="1.0" encoding="utf-8"?><feed xmlns="http://www.w3.org/2005/Atom" ><generator uri="https://jekyllrb.com/" version="4.3.4">Jekyll</generator><link href="https://thinkingeek.com/feed.xml" rel="self" type="application/atom+xml" /><link href="https://thinkingeek.com/" rel="alternate" type="text/html" /><updated>2025-08-14T17:19:57+00:00</updated><id>https://thinkingeek.com/feed.xml</id><title type="html">Think In Geek</title><subtitle>In geek we trust</subtitle><entry><title type="html">Migrate from VirtualBox to libvirt</title><link href="https://thinkingeek.com/2025/08/13/2025-08-13-migrate-to-libvirt/" rel="alternate" type="text/html" title="Migrate from VirtualBox to libvirt" /><published>2025-08-13T00:00:00+00:00</published><updated>2025-08-13T00:00:00+00:00</updated><id>https://thinkingeek.com/2025/08/13/2025-08-13-migrate-to-libvirt</id><content type="html" xml:base="https://thinkingeek.com/2025/08/13/2025-08-13-migrate-to-libvirt/"><![CDATA[<p>In my day job sometimes I need to edit documents using tools that are only
available on Windows. As such, I have a virtual machine with Windows 10 running
on VirtualBox.</p>

<p>Recently I upgraded to Debian 13 and I took the opportunity to migrate to a
libvirt-based solution. I explain here the steps that I followed.</p>

<!--more-->

<h1>VirtualBox</h1>

<p>Being able to emulate a computer (the virtual computer, or the guest computer)
within another computer (the host computer) is always a very amazing thing to
see.  Virtualisation technology has gone a long way since its inception,
decades ago in the context of big, expensive mainframes. It is now commonly
used by cloud providers to efficiently offer computational resources and it is
also available in personal computers.</p>

<p>“Virtual machine” is a key concept of virtualisation. This is a very broad and
generic term and in this context I mean something that emulates a computer (the
virtual computer).  A virtual computer will have virtual hardware and such
hardware is typically handled by a virtual machine manager or hypervisor.
Hypervisors range from relatively low level ones (such as Xen) which act like
if they were an operating system devoted only to manage virtual machines, to
higher-level ones (such as <code class="language-plaintext highlighter-rouge">qemu</code>), which, in its default operation mode, can
emulate a computer, including its virtual hardware, purely in software.</p>

<p>VirtualBox is one of those hypervisors and it is paired with a rich offering of
command-line tools and a graphical user interface. This makes it very intuitive
to manage virtual machines. VirtualBox also uses hardware extensions provided
by most modern CPUs, such as Intel-VT or AMD-V, and paravirtualisation (virtual
hardware that is efficiently implemented by the hypervisor) for a more
efficient virtualisation.</p>

<h2>Why migrate?</h2>

<p>VirtualBox is all good and fine but, for me, has two downsides:</p>

<ul>
  <li>it needs an out-of-tree Linux module. These days, Linux distributions,
including Debian, provide mechanisms to automatically build the Linux module
against the installed Linux kernels. This makes this less a problem but it
may get in the way when updating the operating system.</li>
  <li>some (arguably) basic functionality is only available through the VirtualBox
Extension Pack. This extension has a different licencing to the rest of
VirtualBox and in practice, except for personal use, requires purchasing a
licence.</li>
</ul>

<p>I suggest to stay with VirtualBox if none of the above are problematic.</p>

<p>There are other, less technical and more philosophical and/or moral, reasons to
not use VirtualBox but I will not discuss them here.</p>

<h1>KVM</h1>

<p>KVM (Kernel-based Virtual Machine), is a Linux module that makes the Linux
kernel to function as a hypervisor and allows it to use hardware virtualisation
extensions along with paravirtualisation.</p>

<p>KVM itself is a low-level mechanism that emulators, such as <code class="language-plaintext highlighter-rouge">qemu</code>, can use for
a more efficient virtualisation. Because <code class="language-plaintext highlighter-rouge">qemu</code> is a generic system emulator
which can emulate CPUs of different architectures as the host architecture,
<code class="language-plaintext highlighter-rouge">qemu/kvm</code> (<code class="language-plaintext highlighter-rouge">qemu</code> using KVM) only makes sense when emulating a computer of the
same architecture as the host. The dominant architecture these days is x86-64,
so KVM is useful if you are on Linux and you want to run another OS on x86-64
such as, say, Linux itself (for instance another distribution), FreeBSD,
Windows, etc.</p>

<h1>libvirt and virt-manager</h1>

<p>I earlier mentioned that VirtualBox provides command-line tools and a graphical
user interface. None of these are provided by KVM itself, so while it is
possible to run qemu/kvm manually, it quickly gets old and one ends
reinventing the wheel, especially of there is a need to manage different
virtual machines or virtual hardware (such as virtual storage), etc.</p>

<p>The <code class="language-plaintext highlighter-rouge">libvirt</code> project aims at filling the gap of common needs among all the
virtualisation technologies. It provides a set of tools and libraries to manage
virtual machines from different virtualisation providers (including qemu/kvm)
and it serves as a building block for further tooling.</p>

<p>One of those tools built on top of <code class="language-plaintext highlighter-rouge">libvirt</code> is <code class="language-plaintext highlighter-rouge">virt-manager</code>. <code class="language-plaintext highlighter-rouge">virt-manager</code>
is a graphical interface to handle virtual machines and virtual hardware
conveniently.</p>

<p><code class="language-plaintext highlighter-rouge">virt-manager</code>, along with <code class="language-plaintext highlighter-rouge">libvirt</code> and <code class="language-plaintext highlighter-rouge">qemu/kvm</code>, seems a good candidate
to replace VirtualBox.</p>

<h1>Migrating a Windows 10 VM on Debian 13</h1>

<p>In my case I want to migrate a Windows 10 VM. At the time of writing this blog
post, there is no VirtualBox yet for Debian 13, so some of the operations were
carried out in a Debian 12, and resumed after Debian 13 was fully upgraded.</p>

<h2>Preparation</h2>

<p>I suggest to clone the VM, fully, so you have a backup in case things go wrong.
You can do that in the VirtualBox interface (look for the sheep icon, which is
a late-90s reference to cloning things).</p>

<p>Though not needed, for hygiene, we will uninstall the VirtualBox Guest
Additions in our Windows 10 guest. This is not mandatory but will make things
less noisy when booting Windows 10 under <code class="language-plaintext highlighter-rouge">virt-manager</code> for the first time.</p>

<p>Also make sure you remove any disk snapshots. Later on we will convert the disk
image from VirtualBox to qemu’s native qcow2 format and I think it may get
confused by the presence snapshots.</p>

<h2>Installation of virt-manager</h2>

<p>As <code class="language-plaintext highlighter-rouge">root</code>, install <code class="language-plaintext highlighter-rouge">virt-manager</code> which should install all the rest.</p>

<div class="language-bash highlighter-rouge"><div class="highlight"><pre class="highlight"><code>apt <span class="nb">install </span>virt-manager
</code></pre></div></div>

<p>Add your user <code class="language-plaintext highlighter-rouge">&lt;user-id&gt;</code> to the groups <code class="language-plaintext highlighter-rouge">kvm</code> and <code class="language-plaintext highlighter-rouge">libvirt</code> so you can access
<code class="language-plaintext highlighter-rouge">kvm</code> and <code class="language-plaintext highlighter-rouge">libvirt</code> components that require elevated privileges.</p>

<div class="language-bash highlighter-rouge"><div class="highlight"><pre class="highlight"><code>usermod <span class="nt">-a</span> <span class="nt">-G</span> kvm,libvirt &lt;user-id&gt;
</code></pre></div></div>

<p>The group information is only read during login. The easiest way is to reboot
your system (logging out and logging in again does not seem to be enough). You
can also attempt a <code class="language-plaintext highlighter-rouge">systemctl soft-reboot</code>. Use <code class="language-plaintext highlighter-rouge">id</code> in a terminal to confirm
your user is part of these two groups.</p>

<h2>Convert the virtual disk</h2>

<p>Convert your <code class="language-plaintext highlighter-rouge">.vdi</code> disk into <code class="language-plaintext highlighter-rouge">.qcow2</code> format using <code class="language-plaintext highlighter-rouge">qemu-img</code>. Assuming your
<code class="language-plaintext highlighter-rouge">.vdi</code> disk is called <code class="language-plaintext highlighter-rouge">Windows 10.vdi</code> this is a way to convert it to qcow2 into
 a file named <code class="language-plaintext highlighter-rouge">Windows 10.qcow2</code>.</p>

<div class="language-bash highlighter-rouge"><div class="highlight"><pre class="highlight"><code>qemu-img convert <span class="nt">-f</span> vdi <span class="nt">-O</span> qcow2 <span class="s1">'Windows 10.vdi'</span> <span class="s1">'Windows 10.qcow2'</span>
</code></pre></div></div>

<p>I suggest you move the qcow2 disk in its own directory and add that directory
to a storage pool in <code class="language-plaintext highlighter-rouge">virt-manager</code>.</p>

<h2>Import the image in virt-manager</h2>

<p>Now create a new virtual machine in <code class="language-plaintext highlighter-rouge">virt-manager</code> choosing <em>Import existing disk image</em>. Set up
the virtual memory and virtual CPUs.</p>

<p><strong>Note:</strong> if your Windows 10 VM boots with UEFI, make sure you choose
<em>Customise configuration before install</em> so you can change that in Overview
section. Change the Firmware, which will default to <code class="language-plaintext highlighter-rouge">BIOS</code> to <code class="language-plaintext highlighter-rouge">UEFI</code>. Failing
to do this will render an unbootable machine and this cannot be changed once
the machine has been created. You will have to delete the VM and start anew.</p>

<p>Now your Windows should boot for the first time. It will reconfigure some
devices and your machine will be annoying to use: no mouse integration, no
screen automatic resize, no clipboard with the host. This is expected.</p>

<h2>Install the paravirtualised drivers for VirtIO</h2>

<p>Download, in the Windows 10 VM, <a href="https://fedorapeople.org/groups/virt/virtio-win/direct-downloads/latest-virtio/virtio-win-guest-tools.exe">this
installer</a>
and install all of the drivers. Mouse and screen integration should start
shortly. You may need to reboot Windows at this point.</p>

<h2>Extras</h2>

<p>This may be enough for you, but there are number of goodies that can be worth
considering.</p>

<h3>Change the ethernet to VirtIO</h3>

<p>Paravirtualised devices should have less overhead than actual emulated hardware
so, in <code class="language-plaintext highlighter-rouge">virt-manager</code> change your NIC to have <code class="language-plaintext highlighter-rouge">virtio</code> as its Device model. The
drivers we installed earlier will allow Windows to recognise the device without
problems.</p>

<h3>Add a shared folder</h3>

<p>This one is a bit involved.</p>

<ol>
  <li>On the Debian 13 host install <code class="language-plaintext highlighter-rouge">virtiofsd</code>.
    <div class="language-bash highlighter-rouge"><div class="highlight"><pre class="highlight"><code>apt <span class="nb">install </span>virtiofsd
</code></pre></div>    </div>
  </li>
  <li>Now go to <code class="language-plaintext highlighter-rouge">virt-manager</code> and in the Memory section of your VM enable the
checkbox <em>Enable shared memory</em>.</li>
  <li>Now press <em>Add Hardware</em> and choose <em>Filesystem</em>. Set the <em>Driver</em> to
<code class="language-plaintext highlighter-rouge">virtiofs</code>. <em>Source path</em> is a path of your host (for instance,
<code class="language-plaintext highlighter-rouge">/home/&lt;user-id&gt;</code>) and <em>Target path</em> is a name that will be displayed on
Windows (for instance <code class="language-plaintext highlighter-rouge">host_&lt;user-id&gt;</code>).</li>
  <li>Start the VM.</li>
  <li>Now in the Windows 10 VM, install <a href="https://winfsp.dev/rel">WinFSP</a>
(the default options are fine).</li>
  <li>Type <code class="language-plaintext highlighter-rouge">Services</code> in the start menu of Windows and open the <em>Services</em> applet.
Search for <em>VirtIO-FS Service</em>, double click it and change its <em>Startup Type</em>
to <em>Automatic</em>. Also press the <em>Start</em> button to start the service now.
Now go to the File Explorer, a new disk in <code class="language-plaintext highlighter-rouge">Z:</code> should have appeared
with your files from the host.</li>
</ol>

<h3>Change the boot disk to VirtIO</h3>

<p>Your disk is probably still a SATA device. It is possible to move it to VirtIO
as well, but the process is a bit complex as we need to make sure the boot
phase of Windows loads the VirtIO driver for disks and so it encounters the
system disk.</p>

<ol>
  <li>Boot Windows normally.</li>
  <li>Run as administrator <code class="language-plaintext highlighter-rouge">cmd.exe</code> and type
    <div class="language-plaintext highlighter-rouge"><div class="highlight"><pre class="highlight"><code>bcdedit /set "{current}" safeboot minimal
</code></pre></div>    </div>
  </li>
  <li>Shutdown the VM machine</li>
  <li>Add a dummy disk (a small one will do) on the VirtIO bus. This is <code class="language-plaintext highlighter-rouge">VirtIO Disk 1</code></li>
  <li>Boot Windows, it should be in safe boot mode.</li>
  <li>Shutdown Windows.</li>
  <li>Remove the SATA disk but <strong>be careful not to remove the backing file!</strong>.</li>
  <li>Add a new disk on the VirtIO bus using the backing file of the previous step. This disk will now be <code class="language-plaintext highlighter-rouge">VirtIO Disk 2</code></li>
  <li>Fix the boot mode so it boots on <code class="language-plaintext highlighter-rouge">VirtIO Disk 2</code> instead of <code class="language-plaintext highlighter-rouge">VirtIO Disk 1</code>.</li>
  <li>Boot Windows, it should boot correctly, still in safe mode.</li>
  <li>Run as administrator <code class="language-plaintext highlighter-rouge">cmd.exe</code> and type
    <div class="language-plaintext highlighter-rouge"><div class="highlight"><pre class="highlight"><code>bcdedit /deletevalue "{current}" safeboot
</code></pre></div>    </div>
  </li>
  <li>Shutdown the VM</li>
  <li>Remove the dummy disk <code class="language-plaintext highlighter-rouge">VirtIO Disk 1</code> (now <code class="language-plaintext highlighter-rouge">VirtIO Disk 2</code> becomes <code class="language-plaintext highlighter-rouge">VirtIO Disk 1</code>). You probably want to the remove the backing file now.</li>
  <li>Boot Windows again, it should boot normally.</li>
</ol>]]></content><author><name>Roger Ferrer Ibáñez</name></author><category term="linux" /><category term="virtual machine" /><category term="vm" /><category term="libvirt" /><category term="qemu" /><category term="virtualbox" /><summary type="html"><![CDATA[In my day job sometimes I need to edit documents using tools that are only available on Windows. As such, I have a virtual machine with Windows 10 running on VirtualBox. Recently I upgraded to Debian 13 and I took the opportunity to migrate to a libvirt-based solution. I explain here the steps that I followed.]]></summary></entry><entry><title type="html">A caveat with statically linked language runtimes</title><link href="https://thinkingeek.com/2025/01/31/caveat-with-statically-linked-language-runtimes/" rel="alternate" type="text/html" title="A caveat with statically linked language runtimes" /><published>2025-01-31T20:12:00+00:00</published><updated>2025-01-31T20:12:00+00:00</updated><id>https://thinkingeek.com/2025/01/31/caveat-with-statically-linked-language-runtimes</id><content type="html" xml:base="https://thinkingeek.com/2025/01/31/caveat-with-statically-linked-language-runtimes/"><![CDATA[<p>Most programming languages, including C and C++, provide language runtime
libraries that implement parts of the language itself. These libraries must
be linked in the final program or shared library.</p>

<p>Today we are going to see how an unfortunate default in the way shared
libraries work in Linux can make our lives a bit more complicated than they
have to if the language runtimes are in static libraries.</p>

<!--more-->

<h1>Quick recap of the C compilation model</h1>

<h2>Object files</h2>

<p>The C compilation model, which is also used in other programming languages such
as C++ or Fortran, enables separated compilation and is based on the following
strategy:</p>

<ul>
  <li>each source code file (<em>translation unit</em> in the C lingo) is compiled
separatedly into what we could call compiled units</li>
  <li>all compiled units are linked together to form the program</li>
</ul>

<p>However, this leaves lots of details up in the air, so in Linux (and many other
UNIX-like environments), it looks like this:</p>

<ul>
  <li>each source code file is compiled into a <em>relocatable object file</em> or simply
<em>object file</em> (typically a file whose name ends in <code class="language-plaintext highlighter-rouge">.o</code>)</li>
  <li>all object files are linked together to create a program
(typically all object files would be part of the final program, this is a
simplified view though)</li>
</ul>

<p>Language runtimes could, of course, use this simple model. For instance, for C
we could have a <code class="language-plaintext highlighter-rouge">stdlibc.o</code> file with all the functions and global variables of
the C standard library as specified by Standard C. We would include this
hypothetical <code class="language-plaintext highlighter-rouge">stdlibc.o</code> when linking a C program.</p>

<p>For the sake of the writing, I am going to refer to functions and global
variables collectively as <em>symbols</em>: these are the low level names that the
compiler and the linker use to identify these program entities.</p>

<div style="display: flow-root; background-color: #efe; padding: 1em; padding-bottom: 0px; margin-bottom: 1em;">
  <p>The link step conveys the idea that all the symbols used (referenced) by a
program are ultimately connected (linked) to its actual defining entity.</p>
</div>

<h2>Archives (aka static libraries)</h2>

<p>However, because of the 1-to-1 mapping of source code file to objects, it would
be inconvenient to have all the C library into a single source file. Several
source files are easier to handle so one would get several object files and
those should have to be included in the link step.</p>

<p>How the language runtime library is split into source files is a detail
that the user of the runtime library should not care about. Thus, naturally, it
emerges the idea of grouping several object files. This grouping of object
files typically called an <em>archive</em> (typically a file whose name ends in <code class="language-plaintext highlighter-rouge">.a</code>).</p>

<p>These archives are often called <em>static libraries</em> but they are nothing more
than a collection of objects and an index.</p>

<div style="display: flow-root; background-color: #efe; padding: 1em; padding-bottom: 0px; margin-bottom: 1em;">
  <p>This is accidental and not fundamental to the question: archives also allow
saving some time during linking. Typically object files are handled as a whole
during linking (this is a simplified explanation, there is more nuance here).</p>

  <p>Because archives are collections of objects, library authors can make the
object files as fine-grained as possible to favour the linking step so only the
required object files end being part of the program. A symbol referenced by the
program that is defined in an object file found inside an archive will make
that object file required. Conceptually the object file is extracted from the
archive and added to the link process as if it were another object file.</p>

  <p>This also makes the linking process unavoidably order-sensitive: the order in
which the archives get examined impacts on how the linking is performed.</p>

  <p>Most of these quirky behaviours of linkers with archives are due to the way
they were implemented in the first UNIX systems, where memory was scarce and
computation was slow.</p>
</div>

<p>Archives complicate a bit the compilation model as we may no longer be
generating a program. We may be generating an archive. So the compilation
model looks like this:</p>

<ul>
  <li>When generating an archive:
    <ul>
      <li>each source code file is compiled into a <em>relocatable object file</em> or simply
<em>object file</em> (typically a file whose name ends in <code class="language-plaintext highlighter-rouge">.o</code>)</li>
      <li>each object file is grouped into an archive file. In UNIX this is typically
done with the <code class="language-plaintext highlighter-rouge">ar</code> tool.</li>
    </ul>
  </li>
  <li>When generating a program:
    <ul>
      <li>each source code file is compiled into a <em>relocatable object file</em> or simply
<em>object file</em> (typically a file whose name ends in <code class="language-plaintext highlighter-rouge">.o</code>)</li>
      <li>all object files are linked together to create a program (typically all
object files would be part of the final program, this is a simplified view
though). When a symbol is not in the object files but is found in an object
file in an archive, the object file is extracted and included in the link
step.</li>
    </ul>
  </li>
</ul>

<div style="display: flow-root; background-color: #efe; padding: 1em; padding-bottom: 0px; margin-bottom: 1em;">
  <p>Another accident of archives and not fundamental to the way they work, is that
to speed up linking step archives are only examined once (and in the order they are
provided) during the link process.</p>

  <p>So, all the symbols that are expected to be defined in an archive (more
precisely in one of its object files) should be known in advance before
processing the archive. Current linkers have flags to change this default
behaviour if needed.</p>
</div>

<h2>Shared objects (aka dynamic libraries)</h2>

<p>Libraries, embodied in archives, enable reuse of code between programs but at
expense of replicating the compiled code in every single program. This is,
any C program that uses <code class="language-plaintext highlighter-rouge">puts</code> would include a copy of the code required
to implement <code class="language-plaintext highlighter-rouge">puts</code>.</p>

<p>Because repeating code throughout our programs has an impact on the installed
system (our binaries are larger), naturally it emerges the idea of being able
to reuse this code without actually having to embed it in the program. This
is the core idea of dynamic libraries. In Linux, and other UNIX systems, they
are called <em>shared objects</em> (typically in files whose name ends in <code class="language-plaintext highlighter-rouge">.so</code>).</p>

<div style="display: flow-root; background-color: #efe; padding: 1em; padding-bottom: 0px; margin-bottom: 1em;">
  <p>Shared objects complicate a lot the whole compilation model. These days shared
objects are often shunned. There are a number of reasons for that and they span
from ease of deployment, safety and performance. Discussing these reasons is out
of scope of this post.</p>

  <p>If you wonder why program binaries are relatively large these days, avoiding
shared libraries is one of the reasons. Modern systems provide now plenty of
storage and we can accomodate this increase in size but the bloat is definitely
there.</p>

</div>

<p>In contrast to the previous cases when only using object files or archives, the
use of shared objects in our programs implies the program is incomplete. At
runtime, a mechanism must exist to complete the program doing what is known as
<em>dynamic linking</em>. This may fully happen as part of the loading of the program
(which may be slow for large applications) or on demand (lazily) throughout the
execution of the program. A special program, called the <em>dynamic linker</em> or
<em>runtime linker</em>, is responsible to make this possible.</p>

<p>The compilation now looks like this:</p>

<ul>
  <li>When generating an archive:
    <ul>
      <li>each source code file is compiled into a <em>relocatable object file</em> or simply
<em>object file</em> (typically a file whose name ends in <code class="language-plaintext highlighter-rouge">.o</code>)</li>
      <li>each object file is grouped into an archive file. In UNIX this is typically
done with the <code class="language-plaintext highlighter-rouge">ar</code> tool.</li>
    </ul>
  </li>
  <li>When generating a program:
    <ul>
      <li>each source code file is compiled into a <em>relocatable object file</em> or simply
<em>object file</em> (typically a file whose name ends in <code class="language-plaintext highlighter-rouge">.o</code>)</li>
      <li>all object files are linked together to create a program
(typically all object files would be part of the final program, this is a
simplified view though). Symbols used by the program may add to the link step additional
object files extracted from archives. Shared objects can be used
when linking a program. The linker only establishes a dependence with the
shared object that will be used by the dynamic linker to complete the
program at runtime.</li>
    </ul>
  </li>
  <li>When generating a shared object:
    <ul>
      <li>each source code file is compiled into a <em>relocatable object file</em> or simply
<em>object file</em> (typically a file whose name ends in <code class="language-plaintext highlighter-rouge">.o</code>)</li>
      <li>all object files are linked together to create a program
(typically all object files would be part of the final program, this is a
simplified view though). Symbols used by the shared object may add to the link step additional
object files extracted from archives. A shared object can use other
shared objects.  The linker only establishes a dependence with the
shared object that will be used by the dynamic linker when the shared
object is loaded (either because it is needed by the program or another
shared object).</li>
    </ul>
  </li>
</ul>

<h1>Shared objects exports</h1>

<p>Shared objects are a bit special because in them there is a list of symbols
that they export. These are the symbols that can be used during the dynamic
linking that happens at runtime. The (static) linker only establishes a
dependence with the shared object, for the dynamic linker to use, but it does
not specify what shared object provides a symbol.</p>

<div style="display: flow-root; background-color: #efe; padding: 1em; padding-bottom: 0px; margin-bottom: 1em;">
  <p>The static linker only ensures that all the symbols can be resolved. For those
appearing defined in object files and archives, the linker will also link to
them. For the rest of the symbols, they must be exported by at least one shared
object and this is all what the linker checks in practice. The bulk of the
linking for those symbols is offloaded to the dynamic linker.</p>
</div>

<p>Finding what shared object provides a definition of a symbol is the task of the
dynamic linker. This enables a number of features like interposition or
versioning. While these features are useful they also can cause inefficiencies
(any symbol might be interposed) or safety risks (it may be possible to provide
an evil version of the function or global variable).</p>

<p>For reasons that go beyond the scope of this post (mostly historical), when
creating a shared object <strong>all external (i.e., non-local) defined symbols in
object files or objects extracted from archives are exported by default</strong>. Now,
there are mechanisms to control what symbols get exported: it often happens
that not all the symbols used by the different objects that make up a shared
object are to be used outside of the library.  This mechanism is called
visibility control and can be enabled by different ways. In the case of GNU ld
linker: a version script or additional linker flags can be used.</p>

<h1>The case of Flang</h1>

<div style="display: flow-root; background-color: #efe; padding: 1em; padding-bottom: 0px; margin-bottom: 1em;">
  <p>I want to make clear that this is <strong>not</strong> a criticism of flang. The status quo
may change and the problem go away.</p>

  <p>That said, it shows an issue that may impact language implementations that use
the same approach as the one used by flang described at the time of writing.</p>
</div>

<p>The flang compiler, is the new Fortran frontend of the LLVM project. The
Fortran language is rich and a number of features must be implemented in a
runtime, mostly I/O and math support.</p>

<p>Flang chose to use static libraries to implement that runtime. Flang has two
libraries that are considered part of its runtime <code class="language-plaintext highlighter-rouge">libFortranRuntime.a</code> and
<code class="language-plaintext highlighter-rouge">libFortranDecimal.a</code> (for decimal floating point which to be fair is a bit of a
niche thing).</p>

<h2>A small shared object</h2>

<p>Consider the following small testcase.</p>

<figure class="highlight"><figcaption>test.f90</figcaption><pre class="with_line_numbers"><code class="language-fortran" data-lang="fortran"><table class="rouge-table"><tbody><tr><td class="gutter gl"><pre class="lineno">1
2
3
4
5
6
7
8
9
10
</pre></td><td class="code"><pre><span class="k">module</span><span class="w"> </span><span class="n">moo</span><span class="w">
  </span><span class="c1">! Global variables</span><span class="w">
  </span><span class="kt">integer</span><span class="w"> </span><span class="p">::</span><span class="w"> </span><span class="n">var_init</span><span class="w"> </span><span class="o">=</span><span class="w"> </span><span class="mi">12</span><span class="w">
  </span><span class="kt">integer</span><span class="w"> </span><span class="p">::</span><span class="w"> </span><span class="n">var_uninit</span><span class="w">
  </span><span class="k">contains</span><span class="w">
    </span><span class="c1">! A subroutine that is also a module procedure</span><span class="w">
    </span><span class="k">subroutine</span><span class="w"> </span><span class="n">sub</span><span class="p">()</span><span class="w">
      </span><span class="k">print</span><span class="w"> </span><span class="o">*</span><span class="p">,</span><span class="w"> </span><span class="s2">"hello!"</span><span class="p">,</span><span class="w"> </span><span class="n">var_init</span><span class="p">,</span><span class="w"> </span><span class="n">var_zeroed</span><span class="w">
    </span><span class="k">end</span><span class="w"> </span><span class="k">subroutine</span><span class="w"> </span><span class="n">sub</span><span class="w">
</span><span class="k">end</span><span class="w"> </span><span class="k">module</span><span class="w"> </span><span class="n">moo</span>
</pre></td></tr></tbody></table></code></pre></figure>

<p>Let’s make a shared object using the <code class="language-plaintext highlighter-rouge">flang</code> driver.</p>

<div class="language-plaintext highlighter-rouge"><div class="highlight"><pre class="highlight"><code>$ flang -c -o t.o -fPIC test.f90
$ flang -shared -o libmylib.so t.o
</code></pre></div></div>

<p>Now let’s check the list of exported symbols. We can use <code class="language-plaintext highlighter-rouge">nm -D</code> for that. The
list is very long and just its final part is shown below.</p>

<div class="language-plaintext highlighter-rouge"><div class="highlight"><pre class="highlight"><code>$ nm -D libmylib.so
…
000000000003bbc0 W _ZNK7Fortran7runtime2io17RealOutputEditingILi8EE6IsZeroEv
000000000006b500 T _ZNK7Fortran7runtime2io20NonTbpDefinedIoTable4FindERKNS0_8typeInfo11DerivedTypeENS_6common9DefinedIoE
0000000000021ee0 W _ZNK7Fortran7runtime2io21ChildIoStatementStateILNS1_9DirectionE0EE19GetExternalFileUnitEv
0000000000022350 W _ZNK7Fortran7runtime2io21ChildIoStatementStateILNS1_9DirectionE1EE19GetExternalFileUnitEv
0000000000054490 W _ZNK7Fortran7runtime2io22InternalDescriptorUnitILNS1_9DirectionE0EE10descriptorEv
0000000000053a80 W _ZNK7Fortran7runtime2io22InternalDescriptorUnitILNS1_9DirectionE0EE13CurrentRecordEv
0000000000053dc0 W _ZNK7Fortran7runtime2io22InternalDescriptorUnitILNS1_9DirectionE0EE17ViewBytesInRecordERPKcb
0000000000054f10 W _ZNK7Fortran7runtime2io22InternalDescriptorUnitILNS1_9DirectionE1EE10descriptorEv
00000000000549b0 W _ZNK7Fortran7runtime2io22InternalDescriptorUnitILNS1_9DirectionE1EE13CurrentRecordEv
0000000000054bd0 W _ZNK7Fortran7runtime2io22InternalDescriptorUnitILNS1_9DirectionE1EE17ViewBytesInRecordERPKcb
0000000000021710 W _ZNK7Fortran7runtime2io24ExternalIoStatementStateILNS1_9DirectionE0EE17ViewBytesInRecordERPKcb
0000000000021930 W _ZNK7Fortran7runtime2io24ExternalIoStatementStateILNS1_9DirectionE1EE17ViewBytesInRecordERPKcb
0000000000024e30 T _ZNK7Fortran7runtime2io25FormattedIoStatementStateILNS1_9DirectionE1EE22GetEditDescriptorCharsEv
0000000000044a50 T _ZNK7Fortran7runtime2io8OpenFile15InquirePositionEv
000000000002b140 T _ZNK7Fortran7runtime8TypeCode18GetCategoryAndKindEv
000000000006bee0 T _ZNK7Fortran7runtime8typeInfo11DerivedType13GetParentTypeEv
000000000006bf00 T _ZNK7Fortran7runtime8typeInfo11DerivedType17FindDataComponentEPKcm
000000000006c210 T _ZNK7Fortran7runtime8typeInfo11DerivedType4DumpEP8_IO_FILE
000000000006cda0 T _ZNK7Fortran7runtime8typeInfo14SpecialBinding4DumpEP8_IO_FILE
000000000006b7c0 T _ZNK7Fortran7runtime8typeInfo5Value8GetValueEPKNS0_10DescriptorE
000000000006b8a0 T _ZNK7Fortran7runtime8typeInfo9Component11GetElementsERKNS0_10DescriptorE
000000000006b9f0 T _ZNK7Fortran7runtime8typeInfo9Component11SizeInBytesERKNS0_10DescriptorE
000000000006b820 T _ZNK7Fortran7runtime8typeInfo9Component18GetElementByteSizeERKNS0_10DescriptorE
000000000006bb00 T _ZNK7Fortran7runtime8typeInfo9Component19EstablishDescriptorERNS0_10DescriptorERKS3_RNS0_10TerminatorE
000000000006bdf0 T _ZNK7Fortran7runtime8typeInfo9Component23CreatePointerDescriptorERNS0_10DescriptorERKS3_RNS0_10TerminatorEPKl
000000000006cac0 T _ZNK7Fortran7runtime8typeInfo9Component4DumpEP8_IO_FILE
0000000000020210 T _ZNSt3__122__libcpp_verbose_abortEPKcz
000000000009f1e0 V _ZZNK7Fortran7decimal27BigRadixFloatingPointNumberILi113ELi16EE16ConvertToDecimalEPcmNS0_22DecimalConversionFlagsEiE3lut
000000000009eea0 V _ZZNK7Fortran7decimal27BigRadixFloatingPointNumberILi11ELi16EE16ConvertToDecimalEPcmNS0_22DecimalConversionFlagsEiE3lut
000000000009ef70 V _ZZNK7Fortran7decimal27BigRadixFloatingPointNumberILi24ELi16EE16ConvertToDecimalEPcmNS0_22DecimalConversionFlagsEiE3lut
000000000009f040 V _ZZNK7Fortran7decimal27BigRadixFloatingPointNumberILi53ELi16EE16ConvertToDecimalEPcmNS0_22DecimalConversionFlagsEiE3lut
000000000009f110 V _ZZNK7Fortran7decimal27BigRadixFloatingPointNumberILi64ELi16EE16ConvertToDecimalEPcmNS0_22DecimalConversionFlagsEiE3lut
000000000009edd0 V _ZZNK7Fortran7decimal27BigRadixFloatingPointNumberILi8ELi16EE16ConvertToDecimalEPcmNS0_22DecimalConversionFlagsEiE3lut
</code></pre></div></div>

<p>What is all this, you wonder?  Let’s demangle these symbols as they look like C++ symbols. We can use the <code class="language-plaintext highlighter-rouge">-C</code> flag of <code class="language-plaintext highlighter-rouge">nm</code>.</p>

<div class="language-plaintext highlighter-rouge"><div class="highlight"><pre class="highlight"><code>$ nm -D -C libmylib.so
…
000000000003de80 W Fortran::runtime::io::RealOutputEditing&lt;10&gt;::IsZero() const
00000000000407b0 W Fortran::runtime::io::RealOutputEditing&lt;16&gt;::IsZero() const
0000000000034e80 W Fortran::runtime::io::RealOutputEditing&lt;2&gt;::IsZero() const
00000000000374e0 W Fortran::runtime::io::RealOutputEditing&lt;3&gt;::IsZero() const
0000000000039770 W Fortran::runtime::io::RealOutputEditing&lt;4&gt;::IsZero() const
000000000003bbc0 W Fortran::runtime::io::RealOutputEditing&lt;8&gt;::IsZero() const
000000000006b500 T Fortran::runtime::io::NonTbpDefinedIoTable::Find(Fortran::runtime::typeInfo::DerivedType const&amp;, Fortran::common::DefinedIo) const
0000000000021ee0 W Fortran::runtime::io::ChildIoStatementState&lt;(Fortran::runtime::io::Direction)0&gt;::GetExternalFileUnit() const
0000000000022350 W Fortran::runtime::io::ChildIoStatementState&lt;(Fortran::runtime::io::Direction)1&gt;::GetExternalFileUnit() const
0000000000054490 W Fortran::runtime::io::InternalDescriptorUnit&lt;(Fortran::runtime::io::Direction)0&gt;::descriptor() const
0000000000053a80 W Fortran::runtime::io::InternalDescriptorUnit&lt;(Fortran::runtime::io::Direction)0&gt;::CurrentRecord() const
0000000000053dc0 W Fortran::runtime::io::InternalDescriptorUnit&lt;(Fortran::runtime::io::Direction)0&gt;::ViewBytesInRecord(char const*&amp;, bool) const
0000000000054f10 W Fortran::runtime::io::InternalDescriptorUnit&lt;(Fortran::runtime::io::Direction)1&gt;::descriptor() const
00000000000549b0 W Fortran::runtime::io::InternalDescriptorUnit&lt;(Fortran::runtime::io::Direction)1&gt;::CurrentRecord() const
0000000000054bd0 W Fortran::runtime::io::InternalDescriptorUnit&lt;(Fortran::runtime::io::Direction)1&gt;::ViewBytesInRecord(char const*&amp;, bool) const
0000000000021710 W Fortran::runtime::io::ExternalIoStatementState&lt;(Fortran::runtime::io::Direction)0&gt;::ViewBytesInRecord(char const*&amp;, bool) const
0000000000021930 W Fortran::runtime::io::ExternalIoStatementState&lt;(Fortran::runtime::io::Direction)1&gt;::ViewBytesInRecord(char const*&amp;, bool) const
0000000000024e30 T Fortran::runtime::io::FormattedIoStatementState&lt;(Fortran::runtime::io::Direction)1&gt;::GetEditDescriptorChars() const
0000000000044a50 T Fortran::runtime::io::OpenFile::InquirePosition() const
000000000002b140 T Fortran::runtime::TypeCode::GetCategoryAndKind() const
000000000006bee0 T Fortran::runtime::typeInfo::DerivedType::GetParentType() const
000000000006bf00 T Fortran::runtime::typeInfo::DerivedType::FindDataComponent(char const*, unsigned long) const
000000000006c210 T Fortran::runtime::typeInfo::DerivedType::Dump(_IO_FILE*) const
000000000006cda0 T Fortran::runtime::typeInfo::SpecialBinding::Dump(_IO_FILE*) const
000000000006b7c0 T Fortran::runtime::typeInfo::Value::GetValue(Fortran::runtime::Descriptor const*) const
000000000006b8a0 T Fortran::runtime::typeInfo::Component::GetElements(Fortran::runtime::Descriptor const&amp;) const
000000000006b9f0 T Fortran::runtime::typeInfo::Component::SizeInBytes(Fortran::runtime::Descriptor const&amp;) const
000000000006b820 T Fortran::runtime::typeInfo::Component::GetElementByteSize(Fortran::runtime::Descriptor const&amp;) const
000000000006bb00 T Fortran::runtime::typeInfo::Component::EstablishDescriptor(Fortran::runtime::Descriptor&amp;, Fortran::runtime::Descriptor const&amp;, Fortran::runtime::Terminator&amp;) const
000000000006bdf0 T Fortran::runtime::typeInfo::Component::CreatePointerDescriptor(Fortran::runtime::Descriptor&amp;, Fortran::runtime::Descriptor const&amp;, Fortran::runtime::Terminator&amp;, long const*) const
000000000006cac0 T Fortran::runtime::typeInfo::Component::Dump(_IO_FILE*) const
0000000000020210 T std::__1::__libcpp_verbose_abort(char const*, ...)
000000000009f1e0 V Fortran::decimal::BigRadixFloatingPointNumber&lt;113, 16&gt;::ConvertToDecimal(char*, unsigned long, Fortran::decimal::DecimalConversionFlags, int) const::lut
000000000009eea0 V Fortran::decimal::BigRadixFloatingPointNumber&lt;11, 16&gt;::ConvertToDecimal(char*, unsigned long, Fortran::decimal::DecimalConversionFlags, int) const::lut
000000000009ef70 V Fortran::decimal::BigRadixFloatingPointNumber&lt;24, 16&gt;::ConvertToDecimal(char*, unsigned long, Fortran::decimal::DecimalConversionFlags, int) const::lut
000000000009f040 V Fortran::decimal::BigRadixFloatingPointNumber&lt;53, 16&gt;::ConvertToDecimal(char*, unsigned long, Fortran::decimal::DecimalConversionFlags, int) const::lut
000000000009f110 V Fortran::decimal::BigRadixFloatingPointNumber&lt;64, 16&gt;::ConvertToDecimal(char*, unsigned long, Fortran::decimal::DecimalConversionFlags, int) const::lut
000000000009edd0 V Fortran::decimal::BigRadixFloatingPointNumber&lt;8, 16&gt;::ConvertToDecimal(char*, unsigned long, Fortran::decimal::DecimalConversionFlags, int) const::lut
</code></pre></div></div>

<p>Indeed, this is a bunch of symbols coming from the flang runtime. Why are we exporting them?</p>

<p>The reason, as exposed above, is by default we will export all the symbols that
are part of the objects and objects extracted from archives during linking. The
<code class="language-plaintext highlighter-rouge">PRINT</code> statement involves a number of I/O routines which (possibly by
accident) are pulling in a bunch of C++ code from the library as well.</p>

<p>There is no need to export so many symbols, so let’s find ways to avoid this
problem.</p>

<div style="display: flow-root; background-color: #efe; padding: 1em; padding-bottom: 0px; margin-bottom: 1em;">
  <p>gfortran, the Fortran compiler of GCC, does not have this issue because its
runtime, <code class="language-plaintext highlighter-rouge">libgfortran.so</code>, is a shared object already.</p>
</div>

<h2>Why is this a problem?</h2>

<p>This may seem a petty problem. After all if all the libraries used when linking
our programs and shared libraries are consistent (i.e. the same libraries or
compatible) this does not introduce any complication.</p>

<ol>
  <li>We risk by accident linking to symbols that are exported by shared objects
   that have nothing to do with those symbols. For instance, when using OpenMPI a shared
   object is built using flang. This shared object will accidentally export those flang runtime symbols.
   Our program symbols will not be linked against <code class="language-plaintext highlighter-rouge">libFortranRuntime.a</code> but instead against the
   exports in <code class="language-plaintext highlighter-rouge">libmpi_usempif08.so</code> (a shared object of OpenMPI to be used by Fortran programs)</li>
  <li>A crash in the runtime will be actually reported by the debugger in the
   shared object (in the example above, the crash looks to the debugger that it
   happens in <code class="language-plaintext highlighter-rouge">libmpi_usempif08.so</code>) even if the error was caused by the main
   program and not by the OpenMPI library.</li>
  <li>The more symbols are exported, the slower is the dynamic linking process
   at runtime. Reducing those, thus, reduces that runtime cost.</li>
  <li>Symbols linked against exports of shared objects use a less efficient
   mechanism than when they are directly linked to an object.</li>
</ol>

<p>Regarding the last point, consider the following Fortran program.</p>

<figure class="highlight"><figcaption>program.f90</figcaption><pre class="with_line_numbers"><code class="language-fortran" data-lang="fortran"><table class="rouge-table"><tbody><tr><td class="gutter gl"><pre class="lineno">1
2
3
</pre></td><td class="code"><pre><span class="k">program</span><span class="w"> </span><span class="n">main</span><span class="w">
      </span><span class="k">print</span><span class="w"> </span><span class="o">*</span><span class="p">,</span><span class="w"> </span><span class="s2">"hello!"</span><span class="w">
</span><span class="k">end</span><span class="w"> </span><span class="k">program</span><span class="w"> </span><span class="n">main</span>
</pre></td></tr></tbody></table></code></pre></figure>

<p>When linked alone, the runtime symbols are directly resolved using the symbols
in <code class="language-plaintext highlighter-rouge">libFortranRuntime.a</code>. We can see this in the <code class="language-plaintext highlighter-rouge">objdump</code> of the final binary,
check the references in the <code class="language-plaintext highlighter-rouge">call</code> instructions.</p>

<div class="language-plaintext highlighter-rouge"><div class="highlight"><pre class="highlight"><code>$ flang -O2 -o program -fPIC program.o
$ objdump  --section=.text --disassemble=_QQmain program

program:     file format elf64-x86-64


Disassembly of section .text:

0000000000002540 &lt;_QQmain&gt;:
    2540:	53                   	push   %rbx
    2541:	48 8d 35 c8 7a 07 00 	lea    0x77ac8(%rip),%rsi        # 7a010 &lt;_QQclXd32e6f2d1ab4707a5800ed1a42e135c0&gt;
    2548:	bf 06 00 00 00       	mov    $0x6,%edi
    254d:	ba 02 00 00 00       	mov    $0x2,%edx
    2552:	e8 79 00 00 00       	call   25d0 &lt;_FortranAioBeginExternalListOutput&gt;
    2557:	48 89 c3             	mov    %rax,%rbx
    255a:	48 8d 35 ea 7a 07 00 	lea    0x77aea(%rip),%rsi        # 7a04b &lt;_QQclX68656C6C6F21&gt;
    2561:	ba 06 00 00 00       	mov    $0x6,%edx
    2566:	48 89 c7             	mov    %rax,%rdi
    2569:	e8 b2 0f 00 00       	call   3520 &lt;_FortranAioOutputAscii&gt;
    256e:	48 89 df             	mov    %rbx,%rdi
    2571:	5b                   	pop    %rbx
    2572:	e9 89 04 00 00       	jmp    2a00 &lt;_FortranAioEndIoStatement&gt;
</code></pre></div></div>

<p>But if we link against <code class="language-plaintext highlighter-rouge">libmylib.so</code> those Fortran runtime symbols are linked
against the shared object exports. In this case the symbols must go through the
procedure linkage table (PLT), which is a more involved process of linking
symbols (check the <code class="language-plaintext highlighter-rouge">call</code> instructions, now they go through the <code class="language-plaintext highlighter-rouge">@plt</code> symbol)
as it must happen at runtime.  None of this was intended when using the Fortran
runtime.</p>

<div class="language-plaintext highlighter-rouge"><div class="highlight"><pre class="highlight"><code>$ flang -O2 -o program -fPIC program.o -L. -lmylib
$ objdump  --section=.text --disassemble=_QQmain program

program:     file format elf64-x86-64


Disassembly of section .text:

00000000000012d0 &lt;_QQmain&gt;:
    12d0:	53                   	push   %rbx
    12d1:	48 8d 35 38 0d 00 00 	lea    0xd38(%rip),%rsi        # 2010 &lt;_QQclXd32e6f2d1ab4707a5800ed1a42e135c0&gt;
    12d8:	bf 06 00 00 00       	mov    $0x6,%edi
    12dd:	ba 02 00 00 00       	mov    $0x2,%edx
    12e2:	e8 99 fd ff ff       	call   1080 &lt;_FortranAioBeginExternalListOutput@plt&gt;
    12e7:	48 89 c3             	mov    %rax,%rbx
    12ea:	48 8d 35 5a 0d 00 00 	lea    0xd5a(%rip),%rsi        # 204b &lt;_QQclX68656C6C6F21&gt;
    12f1:	ba 06 00 00 00       	mov    $0x6,%edx
    12f6:	48 89 c7             	mov    %rax,%rdi
    12f9:	e8 12 fe ff ff       	call   1110 &lt;_FortranAioOutputAscii@plt&gt;
    12fe:	48 89 df             	mov    %rbx,%rdi
    1301:	5b                   	pop    %rbx
    1302:	e9 c9 fd ff ff       	jmp    10d0 &lt;_FortranAioEndIoStatement@plt&gt;
</code></pre></div></div>

<h2>Controlling exports</h2>

<p>Typically what symbols get exported or not is defined by the visibility
attribute of symbols. In C and C++, <a href="https://gcc.gnu.org/onlinedocs/gcc/Common-Function-Attributes.html#index-visibility-function-attribute">compilers have extensions to define this
attribute</a>.
Fortran doesn’t typically have syntax for that. So we need to use other
approaches.</p>

<h3>Excluding libraries</h3>

<p>The simplest, in my opinion, is to pass <code class="language-plaintext highlighter-rouge">--exclude-libs</code> which is supported by
both GNU ld and LLVM lld. This is a flag for the linker, so we need to tell
the flang driver to pass the flag onto the linker using <code class="language-plaintext highlighter-rouge">-Wl,</code>.</p>

<p>Let’s try linking again.</p>

<div class="language-plaintext highlighter-rouge"><div class="highlight"><pre class="highlight"><code>$ flang -shared -o libmylib.so t.o \
   -Wl,--exclude-libs=libFortranRuntime.a \
   -Wl,--exclude-libs=libFortranDecimal.a
</code></pre></div></div>

<div style="display: flow-root; background-color: #efe; padding: 1em; padding-bottom: 0px; margin-bottom: 1em;">
  <p>According to the GNU ld manual
<code class="language-plaintext highlighter-rouge">-Wl,--exclude-libs=libFortranRuntime.a,libFortranDecimal.a</code> should work as
well but it didn’t in my system: <code class="language-plaintext highlighter-rouge">ld</code> complained that the library
<code class="language-plaintext highlighter-rouge">libFortranDecimal.a</code> was not found.</p>
</div>

<p>Now the list of symbols is much shorter and we can list it all.</p>

<div class="language-plaintext highlighter-rouge"><div class="highlight"><pre class="highlight"><code>$ nm -C -D libmylib.so
                 U abort@GLIBC_2.2.5
                 U access@GLIBC_2.2.5
                 U __assert_fail@GLIBC_2.2.5
                 U bcmp@GLIBC_2.2.5
                 U close@GLIBC_2.2.5
                 U __ctype_toupper_loc@GLIBC_2.3
                 U __cxa_atexit@GLIBC_2.2.5
                 w __cxa_finalize@GLIBC_2.2.5
                 U __environ@GLIBC_2.2.5
                 U environ@GLIBC_2.2.5
                 U __errno_location@GLIBC_2.2.5
                 U feraiseexcept@GLIBC_2.2.5
                 U fflush@GLIBC_2.2.5
                 U fprintf@GLIBC_2.2.5
                 U fputc@GLIBC_2.2.5
                 U free@GLIBC_2.2.5
                 U fstat@GLIBC_2.33
                 U ftruncate@GLIBC_2.2.5
                 U fwrite@GLIBC_2.2.5
                 U getenv@GLIBC_2.2.5
                 w __gmon_start__
                 U isatty@GLIBC_2.2.5
                 w _ITM_deregisterTMCloneTable
                 w _ITM_registerTMCloneTable
                 U lseek64@GLIBC_2.2.5
                 U malloc@GLIBC_2.2.5
                 U memchr@GLIBC_2.2.5
                 U memcpy@GLIBC_2.14
                 U memmove@GLIBC_2.2.5
                 U memset@GLIBC_2.2.5
                 U mkstemp@GLIBC_2.2.5
                 U open@GLIBC_2.2.5
                 U pread@GLIBC_2.2.5
                 U pthread_mutex_destroy@GLIBC_2.2.5
                 U pthread_mutex_init@GLIBC_2.2.5
                 U pthread_mutex_lock@GLIBC_2.2.5
                 U pthread_mutex_unlock@GLIBC_2.2.5
                 U pthread_self@GLIBC_2.2.5
                 U pwrite@GLIBC_2.2.5
0000000000092198 D _QMmooEvar_init
000000000009246c B _QMmooEvar_uninit
00000000000024b0 T _QMmooPsub
0000000000079000 V _QQclX43688a1c5df271c4b78af31a16dbe815
000000000007902e V _QQclX68656C6C6F21
                 U read@GLIBC_2.2.5
                 U realloc@GLIBC_2.2.5
                 U setenv@GLIBC_2.2.5
                 U snprintf@GLIBC_2.2.5
                 U stat@GLIBC_2.33
                 U stderr@GLIBC_2.2.5
                 U strcmp@GLIBC_2.2.5
                 U strcpy@GLIBC_2.2.5
                 U strerror@GLIBC_2.2.5
                 U strerror_r@GLIBC_2.2.5
                 U strlen@GLIBC_2.2.5
                 U strtol@GLIBC_2.2.5
                 U strtoul@GLIBC_2.2.5
                 U unlink@GLIBC_2.2.5
                 U vfprintf@GLIBC_2.2.5
                 U vsnprintf@GLIBC_2.2.5
                 U write@GLIBC_2.2.5
</code></pre></div></div>

<p>There is a bunch of symbols from the C Standard Library (glibc in this case)
but these will be linked to a shared object, so not a problem.</p>

<p>We can see how our global (module) variables <code class="language-plaintext highlighter-rouge">var_init</code> and <code class="language-plaintext highlighter-rouge">var_uninit</code> along
with the module procedure <code class="language-plaintext highlighter-rouge">sub</code> are exported (the names are mangled by
<code class="language-plaintext highlighter-rouge">flang</code>). We also see some internal symbols that we could just not export them
(they contain the <code class="language-plaintext highlighter-rouge">hello!</code> string and the name of the file) but this is much
better than the status quo.</p>

<p>I think it would be a good thing if the flang driver could pass these flags to
the linker (only flang knows exactly what libraries are runtime libraries).
Alternatively, build systems such as cmake or meson (when they know the Fortran
compiler is flang) could pass these flags when building shared objects.</p>

<h3>Using a version script</h3>

<p>If we are serious about symbol visibility, we can use a <a href="https://sourceware.org/binutils/docs/ld/VERSION.html">version
script</a>. A version script
will allow us to be more precise naming things. For this example we will use
the fact that all symbols emitted by flang in a module start with <code class="language-plaintext highlighter-rouge">_QM</code>. Of
course we can be more fine-grained if we want.</p>

<figure class="highlight"><figcaption>mylib.exports</figcaption><pre class="with_line_numbers"><code class="language-text" data-lang="text"><table class="rouge-table"><tbody><tr><td class="gutter gl"><pre class="lineno">1
2
3
4
</pre></td><td class="code"><pre>{
  global: _QM*;
  local: *;
};
</pre></td></tr></tbody></table></code></pre></figure>

<div class="language-plaintext highlighter-rouge"><div class="highlight"><pre class="highlight"><code>$ flang -shared -o libmylib.so t.o -Wl,--version-script=mylib.exports
</code></pre></div></div>

<div class="language-plaintext highlighter-rouge"><div class="highlight"><pre class="highlight"><code>$ nm -C -D libmylib.so
                 U abort@GLIBC_2.2.5
                 U access@GLIBC_2.2.5
                 U __assert_fail@GLIBC_2.2.5
                 U bcmp@GLIBC_2.2.5
                 U close@GLIBC_2.2.5
                 U __ctype_toupper_loc@GLIBC_2.3
                 U __cxa_atexit@GLIBC_2.2.5
                 w __cxa_finalize@GLIBC_2.2.5
                 U __environ@GLIBC_2.2.5
                 U environ@GLIBC_2.2.5
                 U __errno_location@GLIBC_2.2.5
                 U feraiseexcept@GLIBC_2.2.5
                 U fflush@GLIBC_2.2.5
                 U fprintf@GLIBC_2.2.5
                 U fputc@GLIBC_2.2.5
                 U free@GLIBC_2.2.5
                 U fstat@GLIBC_2.33
                 U ftruncate@GLIBC_2.2.5
                 U fwrite@GLIBC_2.2.5
                 U getenv@GLIBC_2.2.5
                 w __gmon_start__
                 U isatty@GLIBC_2.2.5
                 w _ITM_deregisterTMCloneTable
                 w _ITM_registerTMCloneTable
                 U lseek64@GLIBC_2.2.5
                 U malloc@GLIBC_2.2.5
                 U memchr@GLIBC_2.2.5
                 U memcpy@GLIBC_2.14
                 U memmove@GLIBC_2.2.5
                 U memset@GLIBC_2.2.5
                 U mkstemp@GLIBC_2.2.5
                 U open@GLIBC_2.2.5
                 U pread@GLIBC_2.2.5
                 U pthread_mutex_destroy@GLIBC_2.2.5
                 U pthread_mutex_init@GLIBC_2.2.5
                 U pthread_mutex_lock@GLIBC_2.2.5
                 U pthread_mutex_unlock@GLIBC_2.2.5
                 U pthread_self@GLIBC_2.2.5
                 U pwrite@GLIBC_2.2.5
0000000000092198 D _QMmooEvar_init
000000000009246c B _QMmooEvar_uninit
00000000000024b0 T _QMmooPsub
                 U read@GLIBC_2.2.5
                 U realloc@GLIBC_2.2.5
                 U setenv@GLIBC_2.2.5
                 U snprintf@GLIBC_2.2.5
                 U stat@GLIBC_2.33
                 U stderr@GLIBC_2.2.5
                 U strcmp@GLIBC_2.2.5
                 U strcpy@GLIBC_2.2.5
                 U strerror@GLIBC_2.2.5
                 U strerror_r@GLIBC_2.2.5
                 U strlen@GLIBC_2.2.5
                 U strtol@GLIBC_2.2.5
                 U strtoul@GLIBC_2.2.5
                 U unlink@GLIBC_2.2.5
                 U vfprintf@GLIBC_2.2.5
                 U vsnprintf@GLIBC_2.2.5
                 U write@GLIBC_2.2.5
</code></pre></div></div>

<p>One downside of version scripts is that they are more artisan and currently
there is no good tooling around them. Also, each Fortran compiler mangles
symbols differently so potentially we may need one version per supported
Fortran compiler.</p>

<h2>What about the C++ standard library?</h2>

<p>The same issue happens if the C++ standard library is linked statically. This
is not a common scenario but sometimes, for ease of deploy or performance, it
is done. Typically the flag <code class="language-plaintext highlighter-rouge">-static-libstdc++</code> is used to achieve that
(<code class="language-plaintext highlighter-rouge">-static</code> is also possible but means that no shared object will be used when
linking the program).</p>

<p>For these cases, the techniques shown above still hold.</p>

<p>For the libstdc++ library of GCC:</p>
<div class="language-plaintext highlighter-rouge"><div class="highlight"><pre class="highlight"><code>-Wl,--exclude-libs=libstdc++.a
</code></pre></div></div>

<p>For the libc++ library of LLVM:</p>
<div class="language-plaintext highlighter-rouge"><div class="highlight"><pre class="highlight"><code>-Wl,--exclude-libs=libc++.a
</code></pre></div></div>

<p>Again, using a version script is also the most precise way to handle this issue
of “everything gets exported by default” when building shared objects.</p>

<p>Version scripts can also be used to fine-grain define a backwards-compatible
evolution of a library, but that would be a topic for another day.</p>]]></content><author><name>Roger Ferrer Ibáñez</name></author><category term="linux" /><category term="libraries" /><category term="language" /><category term="runtime" /><summary type="html"><![CDATA[Most programming languages, including C and C++, provide language runtime libraries that implement parts of the language itself. These libraries must be linked in the final program or shared library. Today we are going to see how an unfortunate default in the way shared libraries work in Linux can make our lives a bit more complicated than they have to if the language runtimes are in static libraries.]]></summary></entry><entry><title type="html">Subtleties with loops</title><link href="https://thinkingeek.com/2024/02/11/subtleties-with-loops/" rel="alternate" type="text/html" title="Subtleties with loops" /><published>2024-02-11T09:50:00+00:00</published><updated>2024-02-11T09:50:00+00:00</updated><id>https://thinkingeek.com/2024/02/11/subtleties-with-loops</id><content type="html" xml:base="https://thinkingeek.com/2024/02/11/subtleties-with-loops/"><![CDATA[<p>A common task in imperative programming languages is writing a loop. A loop
that can terminate requires a way to check the terminating condition and a way
to repeatedly execute some part of the code. These two mechanisms exists in
many forms: from the crudest approach of using an <code class="language-plaintext highlighter-rouge">if</code> and a <code class="language-plaintext highlighter-rouge">goto</code> (that must
jump backwards in the code) to higher-level structured constructs like <code class="language-plaintext highlighter-rouge">for</code>
and <code class="language-plaintext highlighter-rouge">while</code> ending in very high-level constructs built around higher-order
functions in <code class="language-plaintext highlighter-rouge">for_each</code>-like constructs and more recently, in the context of
GPU programming, the idea of a kernel function instantiated over a
n-dimensional domain (where typically n ≤ 3 but most of the time n = 1).</p>

<p>These more advanced mechanisms make writing loops a commonplace task and
typically regarded as uneventful. Yet, there are situations when things get
subtler than we would like.</p>

<!--more-->

<h2>A ranged-loop over integers</h2>

<p>Let’s consider a construct like this in some sort of pseudo-Pascal:</p>

<div class="language-pascal highlighter-rouge"><div class="highlight"><pre class="highlight"><code><span class="k">for</span> <span class="n">i</span> <span class="p">:=</span> <span class="n">lower</span> <span class="k">to</span> <span class="n">upper</span> <span class="k">do</span>
  <span class="n">S</span><span class="p">(</span><span class="n">i</span><span class="p">)</span>
</code></pre></div></div>

<p>in which the statement <code class="language-plaintext highlighter-rouge">S(i)</code> is repeatedly executed with the value of the
variable <code class="language-plaintext highlighter-rouge">i</code> starting with a value <code class="language-plaintext highlighter-rouge">lower</code>. Between each repetition we increase
<code class="language-plaintext highlighter-rouge">i</code> by one. We stop repeating <code class="language-plaintext highlighter-rouge">S(i)</code> when <code class="language-plaintext highlighter-rouge">i</code> has the value <code class="language-plaintext highlighter-rouge">upper</code>. This is,
<code class="language-plaintext highlighter-rouge">S(upper)</code> is executed but <code class="language-plaintext highlighter-rouge">S(upper+1)</code> is not.</p>

<p>As an example:</p>

<div class="language-pascal highlighter-rouge"><div class="highlight"><pre class="highlight"><code><span class="k">for</span> <span class="n">i</span> <span class="p">:=</span> <span class="m">1</span> <span class="k">to</span> <span class="m">5</span> <span class="k">do</span>
  <span class="k">writeln</span><span class="p">(</span><span class="n">i</span><span class="p">);</span>
</code></pre></div></div>

<p>will print</p>

<div class="language-plaintext highlighter-rouge"><div class="highlight"><pre class="highlight"><code>1
2
3
4
5
</code></pre></div></div>

<h3>A possible implementation</h3>

<p>Let’s imagine how this could be compiled to a lower level representation. Imagine
we only have <code class="language-plaintext highlighter-rouge">goto</code> and <code class="language-plaintext highlighter-rouge">if + goto</code> (as a way to mimick a bit how current computers
work).</p>

<p>Back to our loop:</p>

<div class="language-pascal highlighter-rouge"><div class="highlight"><pre class="highlight"><code><span class="k">for</span> <span class="n">i</span> <span class="p">:=</span> <span class="n">lower</span> <span class="k">to</span> <span class="n">upper</span> <span class="k">do</span>
  <span class="n">S</span><span class="p">(</span><span class="n">i</span><span class="p">)</span>
</code></pre></div></div>

<p>could be implemented like</p>

<div class="language-pascal highlighter-rouge"><div class="highlight"><pre class="highlight"><code><span class="n">i</span> <span class="p">:=</span> <span class="n">lower</span><span class="p">;</span>
<span class="n">loop</span><span class="p">:</span>
  <span class="k">if</span> <span class="n">i</span> <span class="p">&lt;=</span> <span class="n">upper</span> <span class="k">then</span> <span class="k">goto</span> <span class="n">repeated</span><span class="p">;</span>
  <span class="k">goto</span> <span class="n">after_loop</span><span class="p">;</span>
<span class="n">repeated</span><span class="p">:</span>
  <span class="n">S</span><span class="p">(</span><span class="n">i</span><span class="p">);</span>
  <span class="n">i</span> <span class="p">:=</span> <span class="n">i</span> <span class="p">+</span> <span class="m">1</span><span class="p">;</span>
  <span class="k">goto</span> <span class="n">loop</span><span class="p">;</span>
<span class="n">after_loop</span><span class="p">:</span>
  <span class="cm">{ ... }</span>
</code></pre></div></div>

<h2>Iterating a whole range of integers</h2>

<p>Now consider that, for some reason, we want to iterate over all the integers
of, say, 32-bit. For simplicity, we will assume unsigned integers but signed
integers face similar issues.</p>

<div class="language-pascal highlighter-rouge"><div class="highlight"><pre class="highlight"><code><span class="k">for</span> <span class="n">i</span> <span class="p">:=</span> <span class="m">0</span> <span class="k">to</span> <span class="m">4294967295</span> <span class="k">do</span>
  <span class="n">S</span><span class="p">(</span><span class="n">i</span><span class="p">)</span>
</code></pre></div></div>

<p>It still seems not to be a big deal. But look at <code class="language-plaintext highlighter-rouge">i</code>, what type should it have?</p>

<p>If we use the implementation above, consider the last iteration. This is, when,
<code class="language-plaintext highlighter-rouge">i = 4294967295</code>. The <code class="language-plaintext highlighter-rouge">i</code> variable has to be able to represent <code class="language-plaintext highlighter-rouge">4294967295</code> so
it has to be at least 32-bit. If it is exactly 32-bit it will overflow when we
compute <code class="language-plaintext highlighter-rouge">i := i + 1;</code>.</p>

<p>Here each system may behave differently: some system will simply wrap-around
and <code class="language-plaintext highlighter-rouge">i</code> will become <code class="language-plaintext highlighter-rouge">0</code>. Which is bad because <code class="language-plaintext highlighter-rouge">0 ≤ 4294967295</code> which is the
condition we use to check whether we have to keep repeating so we will never
terminate. Some other machine may trap, which is slightly better (we do
terminate!) but prevents our correct program from running.</p>

<p>Now if you’re on a 64-bit system (or a system where the CPU provides efficient
64-bit integer arithmetic), this is easy to address, just make <code class="language-plaintext highlighter-rouge">i</code> to be 64-bit
and you’re done.</p>

<p>But this is a bit of an unsatisfying answer and further questions may arise
at this point.</p>

<p>What if we want to iterate all the 64-bit? Granted, this is a very large number
of iterations and so we’re probably never going to terminate in a reasonable
amount of time.</p>

<p>What if our CPU does not provide 32-bit integers and
representing 64-bit magnitudes is expensive? The reality is that nowadays
additions (and subtractions) are cheap for a CPU. For instance, on most 32-bit
systems, adding or subtracting a 64-bit integer can be done with two
instructions (rather than one if 64-bit were natively supported).</p>

<p>What if we chose to use a 64-bit integer (no matter if supported or not) but
our loop has an unknown upper bound. If N is less than 4294967295 it would be
fine to use a 32-bit integer.</p>

<div class="language-pascal highlighter-rouge"><div class="highlight"><pre class="highlight"><code><span class="k">for</span> <span class="n">i</span> <span class="p">:=</span> <span class="m">0</span> <span class="k">to</span> <span class="n">N</span> <span class="k">do</span>
  <span class="n">S</span><span class="p">(</span><span class="n">i</span><span class="p">)</span>
</code></pre></div></div>

<p>This leaves us with a bit of an uneasy feeling and while modern machines could
use a larger integer, we probably want a solution that always works.</p>

<h3>A safer, but less nice, implementation</h3>

<p>Can we implement the loop in a way so this issue is a non-problem?
The answer is yes, but the loop will not look as nice.</p>

<div class="language-pascal highlighter-rouge"><div class="highlight"><pre class="highlight"><code><span class="k">if</span> <span class="n">lower</span> <span class="p">&gt;</span> <span class="n">upper</span> <span class="k">then</span> <span class="k">goto</span> <span class="n">after_loop</span><span class="p">;</span>
<span class="n">i</span> <span class="p">:=</span> <span class="n">lower</span><span class="p">;</span>
<span class="n">repeated</span><span class="p">:</span>
  <span class="n">S</span><span class="p">(</span><span class="n">i</span><span class="p">);</span>
  <span class="k">if</span> <span class="n">i</span> <span class="p">=</span> <span class="n">upper</span> <span class="k">then</span> <span class="k">goto</span> <span class="n">after_loop</span><span class="p">;</span>
  <span class="n">i</span> <span class="p">:=</span> <span class="n">i</span> <span class="p">+</span> <span class="m">1</span><span class="p">;</span>
  <span class="k">goto</span> <span class="n">repeated</span><span class="p">;</span>
<span class="n">after_loop</span><span class="p">:</span>
  <span class="cm">{ ... }</span>
</code></pre></div></div>

<p>Let’s be honest, this construction does not look very nice but it avoids any
overflow. So <code class="language-plaintext highlighter-rouge">i</code> only has to be as large as <code class="language-plaintext highlighter-rouge">lower</code> and <code class="language-plaintext highlighter-rouge">upper</code>. In other
words, there is no need to make it larger “just in case”.</p>

<h3>Impact on optimisation</h3>

<p>Compilers these days are very smart and the two loops can be compiled
efficiently (they will emit almost the same code for both), so the less safe
version has no particular performance advantage over the safer one.</p>

<p>From a teaching perspective, though, the less safe version is probably easier
to explain.</p>

<h2>What about C and C++?</h2>

<p>But then, if we may overflow, what about a loop like this?</p>

<div class="language-cpp highlighter-rouge"><div class="highlight"><pre class="highlight"><code><span class="c1">// Assume N is int</span>
<span class="k">for</span> <span class="p">(</span><span class="kt">int</span> <span class="n">i</span> <span class="o">=</span> <span class="mi">0</span><span class="p">;</span> <span class="n">i</span> <span class="o">&lt;=</span> <span class="n">N</span><span class="p">;</span> <span class="n">i</span><span class="o">++</span><span class="p">)</span>
  <span class="n">S</span><span class="p">(</span><span class="n">i</span><span class="p">);</span>
</code></pre></div></div>

<p>According to the spec, the loop above is equivalent to the following code:</p>

<div class="language-cpp highlighter-rouge"><div class="highlight"><pre class="highlight"><code><span class="p">{</span>
  <span class="kt">int</span> <span class="n">i</span> <span class="o">=</span> <span class="mi">0</span><span class="p">;</span>
  <span class="k">while</span> <span class="p">(</span><span class="n">i</span> <span class="o">&lt;=</span> <span class="n">N</span><span class="p">)</span> <span class="p">{</span>
    <span class="n">S</span><span class="p">(</span><span class="n">i</span><span class="p">);</span>
    <span class="n">i</span><span class="o">++</span><span class="p">;</span>
  <span class="p">}</span>
<span class="p">}</span>
</code></pre></div></div>

<p>The C++ standard also tells us that signed integer overflow is undefined
behaviour (UB) in C and C++.</p>

<p>Our loop is incorrect when <code class="language-plaintext highlighter-rouge">N</code> is <code class="language-plaintext highlighter-rouge">2147483647</code> (<code class="language-plaintext highlighter-rouge">2147483647</code> is <code class="language-plaintext highlighter-rouge">INT_MAX</code>,
assuming <code class="language-plaintext highlighter-rouge">int</code> is a 32-bit integer, which typically is) because it triggers UB
in <code class="language-plaintext highlighter-rouge">i++</code>.</p>

<p>When a program triggers UB all bets are off in terms of its mandated behaviour.
The observed behaviour becomes typically platform and/or compiler dependent.
For example, in clang on x86-64 a loop like the above will loop forever at
<code class="language-plaintext highlighter-rouge">-O0</code> but it seems to work at <code class="language-plaintext highlighter-rouge">-O1</code> or higher optimisation levels, in GCC on
x86-64 it is likely to not to terminate at any optimisation level.</p>

<p>In contrast, a loop like this</p>

<div class="language-cpp highlighter-rouge"><div class="highlight"><pre class="highlight"><code><span class="c1">// Assume N is unsigned</span>
<span class="k">for</span> <span class="p">(</span><span class="kt">unsigned</span> <span class="n">i</span> <span class="o">=</span> <span class="mi">0</span><span class="p">;</span> <span class="n">i</span> <span class="o">&lt;=</span> <span class="n">N</span><span class="p">;</span> <span class="n">i</span><span class="o">++</span><span class="p">)</span>
  <span class="n">S</span><span class="p">(</span><span class="n">i</span><span class="p">);</span>
</code></pre></div></div>

<p>will never terminate when <code class="language-plaintext highlighter-rouge">N = 4294967295</code>. In C and C++, overflow of unsigned
integers is well-defined as wrapping-around.</p>

<p>Based on the approach seen above, a way to correctly implement either case is
as follows:</p>

<div class="language-cpp highlighter-rouge"><div class="highlight"><pre class="highlight"><code><span class="c1">// Example for the signed case.</span>
<span class="kt">int</span> <span class="n">i</span> <span class="o">=</span> <span class="mi">0</span><span class="p">;</span>
<span class="k">if</span> <span class="p">(</span><span class="o">!</span><span class="p">(</span><span class="n">i</span> <span class="o">==</span> <span class="n">N</span><span class="p">))</span> <span class="p">{</span>      <span class="c1">// i != N</span>
  <span class="k">for</span> <span class="p">(;;</span> <span class="n">i</span><span class="o">++</span><span class="p">)</span> <span class="p">{</span>
    <span class="n">S</span><span class="p">(</span><span class="n">i</span><span class="p">);</span>
    <span class="k">if</span> <span class="p">(</span><span class="n">i</span> <span class="o">==</span> <span class="n">N</span><span class="p">)</span> <span class="k">break</span><span class="p">;</span>
  <span class="p">}</span>
<span class="p">}</span>
</code></pre></div></div>

<p>or similarly</p>

<div class="language-cpp highlighter-rouge"><div class="highlight"><pre class="highlight"><code><span class="kt">int</span> <span class="n">i</span> <span class="o">=</span> <span class="mi">0</span><span class="p">;</span>
<span class="k">if</span> <span class="p">(</span><span class="o">!</span><span class="p">(</span><span class="n">i</span> <span class="o">==</span> <span class="n">N</span><span class="p">))</span> <span class="p">{</span>      <span class="c1">// i != N</span>
  <span class="k">do</span> <span class="p">{</span>
    <span class="n">S</span><span class="p">(</span><span class="n">i</span><span class="p">);</span>
    <span class="n">i</span><span class="o">++</span><span class="p">;</span>
  <span class="p">}</span> <span class="k">while</span> <span class="p">(</span><span class="o">!</span><span class="p">(</span><span class="n">i</span> <span class="o">==</span> <span class="n">N</span><span class="p">));</span> <span class="c1">// i != N</span>
<span class="p">}</span>
</code></pre></div></div>

<p>Again, it does not look great but it is always correct.</p>]]></content><author><name>Roger Ferrer Ibáñez</name></author><category term="loops" /><category term="compilers" /><category term="programming" /><category term="overflow" /><summary type="html"><![CDATA[A common task in imperative programming languages is writing a loop. A loop that can terminate requires a way to check the terminating condition and a way to repeatedly execute some part of the code. These two mechanisms exists in many forms: from the crudest approach of using an if and a goto (that must jump backwards in the code) to higher-level structured constructs like for and while ending in very high-level constructs built around higher-order functions in for_each-like constructs and more recently, in the context of GPU programming, the idea of a kernel function instantiated over a n-dimensional domain (where typically n ≤ 3 but most of the time n = 1). These more advanced mechanisms make writing loops a commonplace task and typically regarded as uneventful. Yet, there are situations when things get subtler than we would like.]]></summary></entry><entry><title type="html">Mitigate runaway processes</title><link href="https://thinkingeek.com/2024/01/05/mitigate-runaway-processes/" rel="alternate" type="text/html" title="Mitigate runaway processes" /><published>2024-01-05T10:34:00+00:00</published><updated>2024-01-05T10:34:00+00:00</updated><id>https://thinkingeek.com/2024/01/05/mitigate-runaway-processes</id><content type="html" xml:base="https://thinkingeek.com/2024/01/05/mitigate-runaway-processes/"><![CDATA[<p>Sometimes I find myself running testsuites that typically, in order to make
the most of the several cores available in the system, spawn many processes
so the tests can run in parallel. This allows running the testsuites much
faster.</p>

<p>One side-effect, though, of these mechanisms is that they may not be able
to handle correctly cancellation, say pressing <code class="language-plaintext highlighter-rouge">Ctrl-C</code>.</p>

<p>Today we are going to see a way to mitigate this problem using <code class="language-plaintext highlighter-rouge">systemd-run</code>.</p>

<!--more-->

<h2>Systemd</h2>

<p><a href="https://systemd.io/">Systemd</a> is the system and service manager used in Linux
these days in replacement of existing solutions based on shell scripts. In
contrast to loosely coupled scripts, systemd is a more integrated solution.
In that sense it has pros and cons but the former seem to outweigh the latter
and most Linux distributions have migrated to use systemd.</p>

<p>Systemd uses the concept of
<a href="https://www.freedesktop.org/software/systemd/man/latest/systemd.unit.html">units</a>,
of which there are different kinds, and we are interested in the
<a href="https://www.freedesktop.org/software/systemd/man/latest/systemd.service.html">service</a>
unit type.</p>

<p>Typically units are described by files on the disk so we can start, stop, etc. using
the <code class="language-plaintext highlighter-rouge">systemctl</code> command.</p>

<h3>systemd-run</h3>

<p>The tool <code class="language-plaintext highlighter-rouge">systemd-run</code> allows us to create service units on the fly for ad-hoc
purposes. By default <code class="language-plaintext highlighter-rouge">systemd-run</code> will try to use the global (system-wide)
<code class="language-plaintext highlighter-rouge">systemd</code> session, but we can tell it to use the systemd session created when
the user logged on (e.g. via <code class="language-plaintext highlighter-rouge">ssh</code>) using the command option <code class="language-plaintext highlighter-rouge">--user</code>.</p>

<p>One interesting flag is the <code class="language-plaintext highlighter-rouge">--shell</code> flag, which allows us to run <code class="language-plaintext highlighter-rouge">$SHELL</code> as
a systemd service. This means that systemd is in control of the processes
created in there.</p>

<div class="language-bash highlighter-rouge"><div class="highlight"><pre class="highlight"><code><span class="nv">$ </span>systemd-run <span class="nt">--user</span> <span class="nt">--shell</span>
Running as unit: run-u100.service
Press ^] three <span class="nb">times </span>within 1s to disconnect TTY.
<span class="nv">$ </span><span class="nb">uname</span> <span class="nt">-a</span>
Linux mybox 6.1.0-17-amd64 <span class="c">#1 SMP PREEMPT_DYNAMIC Debian 6.1.69-1 (2023-12-30) x86_64 GNU/Linux</span>
<span class="nv">$ </span><span class="nb">exit
exit
</span>Finished with result: success
Main processes terminated with: <span class="nv">code</span><span class="o">=</span>exited/status<span class="o">=</span>0
Service runtime: 2.715s
CPU <span class="nb">time </span>consumed: 10ms
</code></pre></div></div>

<p>The flag <code class="language-plaintext highlighter-rouge">--shell</code> according the
<a href="https://www.freedesktop.org/software/systemd/man/latest/systemd-run.html">documentation</a>
is a shortcut for the command options <code class="language-plaintext highlighter-rouge">--pty --same-dir --wait --collect --service-type=exec $SHELL</code>.</p>

<h2>Use case</h2>

<p>As part of my dayjob I often run the LLVM
<a href="https://llvm.org/docs/TestingGuide.html#unit-tests">unit</a> and <a href="https://llvm.org/docs/TestingGuide.html#regression-tests">regression
tests</a>. Once we have
built LLVM, along with other projects such as <code class="language-plaintext highlighter-rouge">clang</code>, <code class="language-plaintext highlighter-rouge">flang</code> and <code class="language-plaintext highlighter-rouge">lld</code>, there
is a target in the build system called <code class="language-plaintext highlighter-rouge">check</code>. Check will build the necessary
infrastructure for unit tests and invoke
<a href="https://llvm.org/docs/CommandGuide/lit.html"><code class="language-plaintext highlighter-rouge">lit</code></a></p>

<div class="language-plaintext highlighter-rouge"><div class="highlight"><pre class="highlight"><code># Build LLVM and all the projects
user:~/llvm-build$ cmake --build .
# Run the unit and regression tests
user:~/llvm-build$ cmake --build . --target check
</code></pre></div></div>

<p><code class="language-plaintext highlighter-rouge">lit</code> is implemented in Python and in order to exploit parallelism uses the
<a href="https://docs.python.org/3/library/multiprocessing.html">multiprocessing</a>
module.  Unfortunately if for some reason you need to cancel early the
testsuite execution (e.g., you realised you forgot to add a test), say,
pressing <code class="language-plaintext highlighter-rouge">Ctrl-C</code>, if your machine has lots of threads, you will end with a
large number of runaway processes. This is easy to observe when LLVM is build
in Debug mode as everything runs much slower, including tests. I have not dug
further but I assume this is a limitation of the <code class="language-plaintext highlighter-rouge">multiprocessing</code> module.</p>

<p>Following is an example of what typically happens if we press Ctrl-C on a
machine with 16 cores (32 threads):</p>

<div class="language-plaintext highlighter-rouge"><div class="highlight"><pre class="highlight"><code>user:~/llvm-build$ cmake --build . --target check
[2/3] cd /home/user/soft/llvm-build... /usr/bin/python3 -m unittest discover
.................................................................................................................................
----------------------------------------------------------------------
Ran 129 tests in 1.403s

OK
[2/3] Running all regression tests
llvm-lit: /home/user/llvm-src/llvm/utils/lit/lit/llvm/config.py:488: note: using clang: /home/user/llvm-build/bin/clang
^C  interrupted by user, skipping remaining tests

Testing Time: 4.53s

Total Discovered Tests: 74509
  Skipped: 74509 (100.00%)
ninja: build stopped: interrupted by user.
</code></pre></div></div>

<p>If right after cancelling we check <code class="language-plaintext highlighter-rouge">ps -x -f</code>, we will see a large number of
processes that have been detached from the <code class="language-plaintext highlighter-rouge">lit</code> process.</p>

<div class="language-plaintext highlighter-rouge"><div class="highlight"><pre class="highlight"><code>user:~/llvm-build$ ps -x -f
  …
  16574 pts/2    S      0:00  \_ /bin/bash /home/user/llvm-build/test/CodeGen/AMDGPU/Output/memory-legalizer-global-agent.ll.script
  16575 pts/2    R      0:10  |   \_ /home/user/llvm-build/bin/llc -mtriple=amdgcn-amd-amdhsa -mcpu=gfx600 -verify-machineinstrs
  16576 pts/2    S      0:00  |   \_ /home/user/llvm-build/bin/FileCheck --check-prefixes=GFX6 /home/user/llvm-src/llvm/test/CodeGen/AMDGPU/memory-legalizer-global-agent.ll
  16577 pts/2    S      0:00  \_ /bin/bash /home/user/llvm-build/test/CodeGen/AMDGPU/Output/memory-legalizer-local-singlethread.ll.script
  16578 pts/2    R      0:10  |   \_ /home/user/llvm-build/bin/llc -mtriple=amdgcn-amd-amdhsa -mcpu=gfx600 -verify-machineinstrs
  16579 pts/2    S      0:00  |   \_ /home/user/llvm-build/bin/FileCheck --check-prefixes=GFX6 /home/user/llvm-src/llvm/test/CodeGen/AMDGPU/memory-legalizer-local-singlethread.ll
  16580 pts/2    S      0:00  \_ /bin/bash /home/user/llvm-build/test/CodeGen/AMDGPU/Output/sched-group-barrier-pipeline-solver.mir.script
  16612 pts/2    R      0:10  |   \_ /home/user/llvm-build/bin/llc -march=amdgcn -mcpu=gfx908 -amdgpu-igrouplp-exact-solver -run-pass=machine-scheduler -o - /home/user/llvm-src/llvm/test/CodeGen/AMDGPU/sched-group-barrier-pipeline-solver.mir
  16613 pts/2    S      0:00  |   \_ /home/user/llvm-build/bin/FileCheck -check-prefix=EXACT /home/user/llvm-src/llvm/test/CodeGen/AMDGPU/sched-group-barrier-pipeline-solver.mir
  16583 pts/2    S      0:00  \_ /bin/bash /home/user/llvm-build/test/CodeGen/AMDGPU/Output/memory-legalizer-global-system.ll.script
  16584 pts/2    R      0:10  |   \_ /home/user/llvm-build/bin/llc -mtriple=amdgcn-amd-amdhsa -mcpu=gfx600 -verify-machineinstrs
  16585 pts/2    S      0:00  |   \_ /home/user/llvm-build/bin/FileCheck --check-prefixes=GFX6 /home/user/llvm-src/llvm/test/CodeGen/AMDGPU/memory-legalizer-global-system.ll
  16586 pts/2    S      0:00  \_ /bin/bash /home/user/llvm-build/test/CodeGen/AMDGPU/Output/memory-legalizer-flat-agent.ll.script
  16587 pts/2    R      0:10  |   \_ /home/user/llvm-build/bin/llc -mtriple=amdgcn-amd-amdhsa -mcpu=gfx700 -verify-machineinstrs
  16588 pts/2    S      0:00  |   \_ /home/user/llvm-build/bin/FileCheck --check-prefixes=GFX7 /home/user/llvm-src/llvm/test/CodeGen/AMDGPU/memory-legalizer-flat-agent.ll
  16590 pts/2    S      0:00  \_ /bin/bash /home/user/llvm-build/test/CodeGen/AMDGPU/Output/memory-legalizer-flat-singlethread.ll.script
  16591 pts/2    R      0:10  |   \_ /home/user/llvm-build/bin/llc -mtriple=amdgcn-amd-amdhsa -mcpu=gfx700 -verify-machineinstrs
  16592 pts/2    S      0:00  |   \_ /home/user/llvm-build/bin/FileCheck --check-prefixes=GFX7 /home/user/llvm-src/llvm/test/CodeGen/AMDGPU/memory-legalizer-flat-singlethread.ll
  16593 pts/2    S      0:00  \_ /bin/bash /home/user/llvm-build/test/CodeGen/AMDGPU/Output/memory-legalizer-flat-system.ll.script
  16594 pts/2    R      0:10  |   \_ /home/user/llvm-build/bin/llc -mtriple=amdgcn-amd-amdhsa -mcpu=gfx700 -verify-machineinstrs
  16595 pts/2    S      0:00  |   \_ /home/user/llvm-build/bin/FileCheck --check-prefixes=GFX7 /home/user/llvm-src/llvm/test/CodeGen/AMDGPU/memory-legalizer-flat-system.ll
  16596 pts/2    S      0:00  \_ /bin/bash /home/user/llvm-build/test/CodeGen/AMDGPU/Output/memory-legalizer-flat-wavefront.ll.script
  16597 pts/2    R      0:10  |   \_ /home/user/llvm-build/bin/llc -mtriple=amdgcn-amd-amdhsa -mcpu=gfx700 -verify-machineinstrs
  16598 pts/2    S      0:00  |   \_ /home/user/llvm-build/bin/FileCheck --check-prefixes=GFX7 /home/user/llvm-src/llvm/test/CodeGen/AMDGPU/memory-legalizer-flat-wavefront.ll
  16600 pts/2    S      0:00  \_ /bin/bash /home/user/llvm-build/tools/clang/test/CodeGen/X86/Output/x86_64-xsave.c.script
  16658 pts/2    R      0:04  |   \_ /home/user/llvm-build/bin/clang -cc1 -internal-isystem /home/user/llvm-build/lib/clang/18/include -nostdsysteminc /home/user/llvm-src/clang/test/CodeGen/X86/x86_64-xsave.c -DTEST_XSAVE -O0 
  16659 pts/2    S      0:00  |   \_ /home/user/llvm-build/bin/FileCheck /home/user/llvm-src/clang/test/CodeGen/X86/x86_64-xsave.c --check-prefix=XSAVE
  16603 pts/2    S      0:00  \_ /bin/bash /home/user/llvm-build/test/CodeGen/AMDGPU/Output/memory-legalizer-flat-workgroup.ll.script
  16607 pts/2    R      0:10  |   \_ /home/user/llvm-build/bin/llc -mtriple=amdgcn-amd-amdhsa -mcpu=gfx700 -verify-machineinstrs
  16608 pts/2    S      0:00  |   \_ /home/user/llvm-build/bin/FileCheck --check-prefixes=GFX7 /home/user/llvm-src/llvm/test/CodeGen/AMDGPU/memory-legalizer-flat-workgroup.ll
  16609 pts/2    S      0:00  \_ /bin/bash /home/user/llvm-build/tools/clang/test/CodeGen/X86/Output/rot-intrinsics.c.script
  16646 pts/2    R      0:05  |   \_ /home/user/llvm-build/bin/clang -cc1 -internal-isystem /home/user/llvm-build/lib/clang/18/include -nostdsysteminc -x c -ffreestanding -triple x86_64--linux -no-enable-noundef-analysis -emit-llvm /home/roge
  16647 pts/2    S      0:00  |   \_ /home/user/llvm-build/bin/FileCheck /home/user/llvm-src/clang/test/CodeGen/X86/rot-intrinsics.c --check-prefixes CHECK,CHECK-64BIT-LONG
  16621 pts/2    S      0:00  \_ /bin/bash /home/user/llvm-build/tools/clang/test/Headers/Output/opencl-builtins.cl.script
  16642 pts/2    R      0:09  |   \_ /home/user/llvm-build/bin/clang -cc1 -internal-isystem /home/user/llvm-build/lib/clang/18/include -nostdsysteminc -include /home/user/llvm-src/clang/test/Headers/opencl-builtins.cl /home/ro
  16622 pts/2    S      0:00  \_ /bin/bash /home/user/llvm-build/tools/clang/test/CodeGen/PowerPC/Output/ppc-smmintrin.c.script
  16652 pts/2    R      0:04  |   \_ /home/user/llvm-build/bin/clang -S -emit-llvm -target powerpc64-unknown-linux-gnu -mcpu=pwr8 -ffreestanding -DNO_WARN_X86_INTRINSICS /home/user/llvm-src/clang/test/CodeGen/PowerPC/ppc-smmintrin.c -fno-discard-
  16623 pts/2    S      0:00  \_ /bin/bash /home/user/llvm-build/tools/clang/test/CodeGen/X86/Output/x86_32-xsave.c.script
  16656 pts/2    R      0:04  |   \_ /home/user/llvm-build/bin/clang -cc1 -internal-isystem /home/user/llvm-build/lib/clang/18/include -nostdsysteminc /home/user/llvm-src/clang/test/CodeGen/X86/x86_32-xsave.c -DTEST_XSAVE -O0 
  16657 pts/2    S      0:00  |   \_ /home/user/llvm-build/bin/FileCheck /home/user/llvm-src/clang/test/CodeGen/X86/x86_32-xsave.c --check-prefix=XSAVE
  16624 pts/2    S      0:00  \_ /bin/bash /home/user/llvm-build/test/CodeGen/AMDGPU/GlobalISel/Output/fdiv.f16.ll.script
  16627 pts/2    R      0:10  |   \_ /home/user/llvm-build/bin/llc -global-isel -march=amdgcn -mcpu=tahiti -denormal-fp-math=ieee -verify-machineinstrs
  16629 pts/2    S      0:00  |   \_ /home/user/llvm-build/bin/FileCheck -check-prefixes=GFX6,GFX6-IEEE /home/user/llvm-src/llvm/test/CodeGen/AMDGPU/GlobalISel/fdiv.f16.ll
  16625 pts/2    S      0:00  \_ /bin/bash /home/user/llvm-build/tools/clang/test/Headers/Output/opencl-c-header.cl.script
  16648 pts/2    R      0:05  |   \_ /home/user/llvm-build/bin/clang -cc1 -internal-isystem /home/user/llvm-build/lib/clang/18/include -nostdsysteminc -O0 -triple spir-unknown-unknown -internal-isystem ../../lib/Headers -include opencl-c.h -e
  16649 pts/2    S      0:00  |   \_ /home/user/llvm-build/bin/FileCheck /home/user/llvm-src/clang/test/Headers/opencl-c-header.cl
  16636 pts/2    S      0:00  \_ /bin/bash /home/user/llvm-build/test/CodeGen/AMDGPU/Output/mad-mix.ll.script
  16650 pts/2    R      0:05      \_ /home/user/llvm-build/bin/llc -march=amdgcn -mcpu=gfx900 -verify-machineinstrs
  16651 pts/2    S      0:00      \_ /home/user/llvm-build/bin/FileCheck -check-prefixes=GFX900,SDAG-GFX900 /home/user/llvm-src/llvm/test/CodeGen/AMDGPU/mad-mix.ll
  …
</code></pre></div></div>

<p>Granted, given enough time, those processes will eventually finish silently.
But given that tests sometimes use deterministic intermediate files, if we run
them again immediately we risk having spurious failures caused by two processes
writing to the same file (i.e. kind of a a filesystem data race).</p>

<h3>Running inside systemd-run</h3>

<p>One of the downsides of running something as a service using systemd-run is
that it won’t inherit the environment but instead will use the environment of
the systemd session. Luckily this can be addressed using the <code class="language-plaintext highlighter-rouge">-p
EnvironmentFile=&lt;file&gt;</code> option.</p>

<p>With all this, we can build a convenient shell script.</p>

<figure class="highlight"><figcaption>confine.sh</figcaption><pre class="with_line_numbers"><code class="language-bash" data-lang="bash"><table class="rouge-table"><tbody><tr><td class="gutter gl"><pre class="lineno">1
2
3
4
5
6
7
8
9
10
11
12
13
14
</pre></td><td class="code"><pre><span class="c">#!/usr/bin/env bash</span>
<span class="nb">set</span> <span class="nt">-euo</span> pipefail

<span class="k">function </span>cleanup<span class="o">()</span> <span class="o">{</span>
  <span class="o">[</span> <span class="nt">-n</span> <span class="s2">"</span><span class="k">${</span><span class="nv">ENV_FILE</span><span class="k">}</span><span class="s2">"</span> <span class="o">]</span> <span class="o">&amp;&amp;</span> <span class="nb">rm</span> <span class="nt">-f</span> <span class="s2">"</span><span class="k">${</span><span class="nv">ENV_FILE</span><span class="k">}</span><span class="s2">"</span>
<span class="o">}</span>

<span class="nv">ENV_FILE</span><span class="o">=</span><span class="s2">"</span><span class="si">$(</span><span class="nb">mktemp</span><span class="si">)</span><span class="s2">"</span>
<span class="nb">trap </span>cleanup EXIT

<span class="nb">env</span> <span class="o">&gt;</span> <span class="s2">"</span><span class="k">${</span><span class="nv">ENV_FILE</span><span class="k">}</span><span class="s2">"</span>

systemd-run <span class="nt">--user</span> <span class="nt">--pty</span> <span class="nt">--same-dir</span> <span class="nt">--wait</span> <span class="nt">--collect</span> <span class="nt">--service-type</span><span class="o">=</span><span class="nb">exec</span> <span class="nt">-q</span> <span class="se">\</span>
            <span class="nt">-p</span> <span class="s2">"EnvironmentFile=</span><span class="k">${</span><span class="nv">ENV_FILE</span><span class="k">}</span><span class="s2">"</span> <span class="nt">--</span> <span class="s2">"</span><span class="nv">$@</span><span class="s2">"</span>
</pre></td></tr></tbody></table></code></pre></figure>

<p>The flag <code class="language-plaintext highlighter-rouge">-q</code> silences the informational messages emitted <code class="language-plaintext highlighter-rouge">systemd-run</code> on
start and end.</p>

<p>Now we can run the regression tests using this convenient script, and even
if we abort the execution by pressing Ctrl-C, systemd will kill all the process
tree.</p>

<div class="language-bash highlighter-rouge"><div class="highlight"><pre class="highlight"><code>user:~/llvm-build<span class="nv">$ </span>confine.sh cmake <span class="nt">--build</span> <span class="nb">.</span> <span class="nt">--target</span> check
<span class="o">[</span>2/3] <span class="nb">cd</span> /home/user/llvm-src/clang/bindings/python <span class="o">&amp;&amp;</span> /usr/bin/cmake <span class="nt">-E</span> <span class="nb">env </span><span class="nv">CLANG_NO_DEFAULT_CONFIG</span><span class="o">=</span>1 <span class="nv">CLANG_LIBRARY_PATH</span><span class="o">=</span>/home/user/llvm-build/lib /usr/bin/python3 <span class="nt">-m</span> unittest discover
.................................................................................................................................
<span class="nt">----------------------------------------------------------------------</span>
Ran 129 tests <span class="k">in </span>1.410s

OK
<span class="o">[</span>2/3] Running all regression tests
llvm-lit: /home/user/llvm-src/llvm/utils/lit/lit/llvm/config.py:488: note: using clang: /home/user/llvm-build/bin/clang
^C  interrupted by user, skipping remaining tests

Testing Time: 18.81s

Total Discovered Tests: 74509
  Skipped: 74509 <span class="o">(</span>100.00%<span class="o">)</span>
ninja: build stopped: interrupted by user.
user:~/llvm-build<span class="nv">$ </span>ps <span class="nt">-x</span> <span class="nt">-f</span> | <span class="nb">grep</span> <span class="s2">"bash.*</span><span class="se">\.</span><span class="s2">script"</span> | <span class="nb">wc</span> <span class="nt">-l</span>
0
</code></pre></div></div>

<p>Hope this is useful :)</p>]]></content><author><name>Roger Ferrer Ibáñez</name></author><category term="systemd" /><category term="linux" /><category term="processes" /><summary type="html"><![CDATA[Sometimes I find myself running testsuites that typically, in order to make the most of the several cores available in the system, spawn many processes so the tests can run in parallel. This allows running the testsuites much faster. One side-effect, though, of these mechanisms is that they may not be able to handle correctly cancellation, say pressing Ctrl-C. Today we are going to see a way to mitigate this problem using systemd-run.]]></summary></entry><entry><title type="html">Locally testing API Gateway Docker based Lambdas</title><link href="https://thinkingeek.com/2023/12/24/testing-api-gateway-docker-lambdas/" rel="alternate" type="text/html" title="Locally testing API Gateway Docker based Lambdas" /><published>2023-12-24T00:00:00+00:00</published><updated>2023-12-24T00:00:00+00:00</updated><id>https://thinkingeek.com/2023/12/24/testing-api-gateway-docker-lambdas</id><content type="html" xml:base="https://thinkingeek.com/2023/12/24/testing-api-gateway-docker-lambdas/"><![CDATA[<p>AWS Lambda is one of those technologies that makes the distinction between infrastructure and application code quite blurry. There are many frameworks out there, some of them quite popular, such as <a href="https://aws.amazon.com/amplify/">AWS Amplify</a> and the <a href="https://www.serverless.com">Serverless Framework</a>, which will allow you to define your Lambda, your application code, and will provide tools that will package and provision, and then deploy those Lambdas (using <a href="https://aws.amazon.com/cloudformation/">CloudFormation</a> under the hood). They also provide tools to locally run the functions for local testing, which is particularly useful if they are invoked using technologies such as <a href="https://aws.amazon.com/api-gateway/">API Gateway</a>. Sometimes, however, especially if your organisation has adopted other Infrastructure as Code tools such as <a href="https://www.terraform.io">Terraform</a>, you might want to just provision a function with simpler IaC tools, and keep the application deployment steps separate. Let us explore an alternative method to still be able to run and test API Gateway based Lambdas locally without the need to bring in big frameworks such as the ones mentioned earlier.</p>

<!--more-->

<p>We will make some assumptions before moving forward:</p>

<ul>
  <li>Our Lambda will be designed to be invoked by AWS API Gateway, using the <a href="https://docs.aws.amazon.com/apigateway/latest/developerguide/http-api-develop-integrations-lambda.html">Proxy Integration</a>.</li>
  <li>Our Lambda will be Docker based.</li>
  <li>Our Lambda has already been provisioned by another tool, so our only concern here is how to locally build it and run it the same way any other client would do via API Gateway.</li>
</ul>

<h2>Lambda code and Docker image</h2>

<p>Let us follow the <a href="https://docs.aws.amazon.com/lambda/latest/dg/python-image.html">AWS Documentation</a> and write a very simple function in Python which we can use throughout this project.</p>

<p>The Python code for our handler will be straightforward:</p>

<figure class="highlight"><figcaption>lambda_function.py</figcaption><pre><code class="language-python" data-lang="python"><span class="kn">import</span> <span class="nn">json</span>

<span class="k">def</span> <span class="nf">handler</span><span class="p">(</span><span class="n">event</span><span class="p">,</span> <span class="n">context</span><span class="p">):</span>
    <span class="k">return</span> <span class="p">{</span>
        <span class="s">"isBase64Encoded"</span><span class="p">:</span> <span class="bp">False</span><span class="p">,</span>
        <span class="s">"statusCode"</span><span class="p">:</span> <span class="mi">200</span><span class="p">,</span>
        <span class="s">"body"</span><span class="p">:</span> <span class="n">json</span><span class="p">.</span><span class="n">dumps</span><span class="p">(</span><span class="n">event</span><span class="p">),</span>
        <span class="s">"headers"</span><span class="p">:</span> <span class="p">{</span><span class="s">"content-type"</span><span class="p">:</span> <span class="s">"application/json"</span><span class="p">},</span>
    <span class="p">}</span></code></pre></figure>

<p>This handler will simply return a 200 response code with the Lambda event as its body, in JSON format.</p>

<p>In order to package this function so that the AWS runtime can execute it, we will make use of the provided AWS base Docker image, and add our code to it (at the time of writing this article Python’s latest version was 3.12). The dockerfile below assumes that our code is written on a file named <code class="language-plaintext highlighter-rouge">lambda_function.py</code> and that we have a <code class="language-plaintext highlighter-rouge">requirements.txt</code> file with our dependencies on it (in our case the file can be empty).</p>

<figure class="highlight"><figcaption>dockerfile</figcaption><pre><code class="language-docker" data-lang="docker"><span class="k">FROM</span><span class="s"> public.ecr.aws/lambda/python:3.12</span>

<span class="c"># Copy requirements.txt</span>
<span class="k">COPY</span><span class="s"> requirements.txt ${LAMBDA_TASK_ROOT}</span>

<span class="c"># Install the specified packages</span>
<span class="k">RUN </span>pip <span class="nb">install</span> <span class="nt">-r</span> requirements.txt

<span class="c"># Copy function code</span>
<span class="k">COPY</span><span class="s"> lambda_function.py ${LAMBDA_TASK_ROOT}</span>

<span class="c"># Set the CMD to your handler (could also be done as a parameter override outside of the Dockerfile)</span>
<span class="k">CMD</span><span class="s"> [ "lambda_function.handler" ]</span></code></pre></figure>

<h2>Running and testing the Lambda function</h2>

<p>In order to test that this all works as expected, we need to build that Docker image and run it:</p>

<figure class="highlight"><pre><code class="language-bash" data-lang="bash">docker build <span class="nt">-t</span> docker-image:test <span class="nb">.</span>
docker run <span class="nt">-p</span> 9000:8080 docker-image:test</code></pre></figure>

<p>The above commands will do exactly that, and map the container port 8080 to the local port 9000.</p>

<p>As per the documentation, in order to test this function and see an HTTP response, it is not sufficient to just make an HTTP request to <code class="language-plaintext highlighter-rouge">http://localhost:9000</code>. If we were to do this, we would simply get back a 404 response. After all, our function could be triggered in the real world not just by HTTP requests but by many other events, such as a change to an S3 bucket, or a message being pulled from an SQS queue.</p>

<p>Behind the scenes, any invocation of a Lambda function eventually happens via an <a href="https://boto3.amazonaws.com/v1/documentation/api/latest/reference/services/lambda/client/invoke.html">API call</a>. When we make an HTTP request that is eventually served by a Lambda function, what is happening is that some other service (for example AWS API Gateway, or an AWS ALB) transforms that HTTP request into an event, then that event is passed to the Lambda <code class="language-plaintext highlighter-rouge">Invoke</code> method as a parameter, and the Lambda response gets mapped back to an HTTP response.</p>

<p>The AWS provided base Docker images already come with something called the <em>Runtime Interface Client</em> which takes care of acting as that proxy for you, allowing the invocation of the function via an HTTP API call.</p>

<p>In order to get our local Lambda to reply with a response, this is what we need to do instead:</p>

<div class="language-bash highlighter-rouge"><div class="highlight"><pre class="highlight"><code>curl <span class="s2">"http://localhost:9000/2015-03-31/functions/function/invocations"</span> <span class="nt">-d</span> <span class="s1">'{}'</span>
</code></pre></div></div>

<p>This will invoke the Lambda with an empty event. If our Lambda is to be behind AWS API Gateway using a Proxy Integration, the real event it would receive would look like this:</p>

<div class="language-json highlighter-rouge"><div class="highlight"><pre class="highlight"><code><span class="p">{</span><span class="w">
  </span><span class="nl">"request_uri"</span><span class="p">:</span><span class="w"> </span><span class="s2">"/"</span><span class="p">,</span><span class="w">
  </span><span class="nl">"request_headers"</span><span class="p">:</span><span class="w"> </span><span class="p">{</span><span class="w">
    </span><span class="nl">"user-agent"</span><span class="p">:</span><span class="w"> </span><span class="s2">"curl/8.1.2"</span><span class="p">,</span><span class="w">
    </span><span class="nl">"content-type"</span><span class="p">:</span><span class="w"> </span><span class="s2">"application/json"</span><span class="p">,</span><span class="w">
    </span><span class="nl">"accept"</span><span class="p">:</span><span class="w"> </span><span class="s2">"*/*"</span><span class="p">,</span><span class="w">
    </span><span class="nl">"host"</span><span class="p">:</span><span class="w"> </span><span class="s2">"localhost:8000"</span><span class="w">
  </span><span class="p">},</span><span class="w">
  </span><span class="nl">"request_method"</span><span class="p">:</span><span class="w"> </span><span class="s2">"GET"</span><span class="p">,</span><span class="w">
  </span><span class="nl">"request_uri_args"</span><span class="p">:</span><span class="w"> </span><span class="p">{}</span><span class="w">
</span><span class="p">}</span><span class="w">
</span></code></pre></div></div>

<p>In some cases testing our Lambda locally by carefully crafting curl commands with JSON payloads might be a good option, but sometimes it is necessary to be able to locally hit our Lambda just like we would do if we had the AWS API Gateway Proxy Integration in place. A good example of this might be if we want to test locally how our Lambda would interact with other services we are also running locally, such as a web browser making a GET HTTP request. This is where big footprint frameworks come in handy, since they have those tools built in.</p>

<h2>Kong API Gateway to the rescue</h2>

<p>An alternative way to gain the same behaviour we would get with frameworks such as Amplify or the Serverless Framework when it comes to testing Lambdas locally is to make use of an open source API Gateway tool called <a href="https://konghq.com/products/kong-gateway">Kong</a>. Kong is a big API Gateway product and offers many features, but in a nutshell what it does is take an incoming HTTP Request, optionally transform it, send it to a downstream service, optionally transform the response, and send that back to the client. One of the many downstream services Kong supports out of the box through a plugin are AWS Lambda functions. One could argue that using something like Kong just to test our Lambda is no different than going the Framework route, however, there are a couple of things I find particularly relevant here:</p>

<ul>
  <li>Kong can be run via Docker, which we already need to package and run our Lambda. This means we do not have to install any new tool in our local setup.</li>
  <li>This solution allows us to keep our Lambda setup small and simple, and we are not forced to follow any Framework ways of organising our source code.</li>
</ul>

<p>So our final setup is going to look like this:</p>

<figure>
    <img src="/assets/images/lambda-kong.png" alt="Life cycle of an HTTP request in our solution" />
    <figcaption>
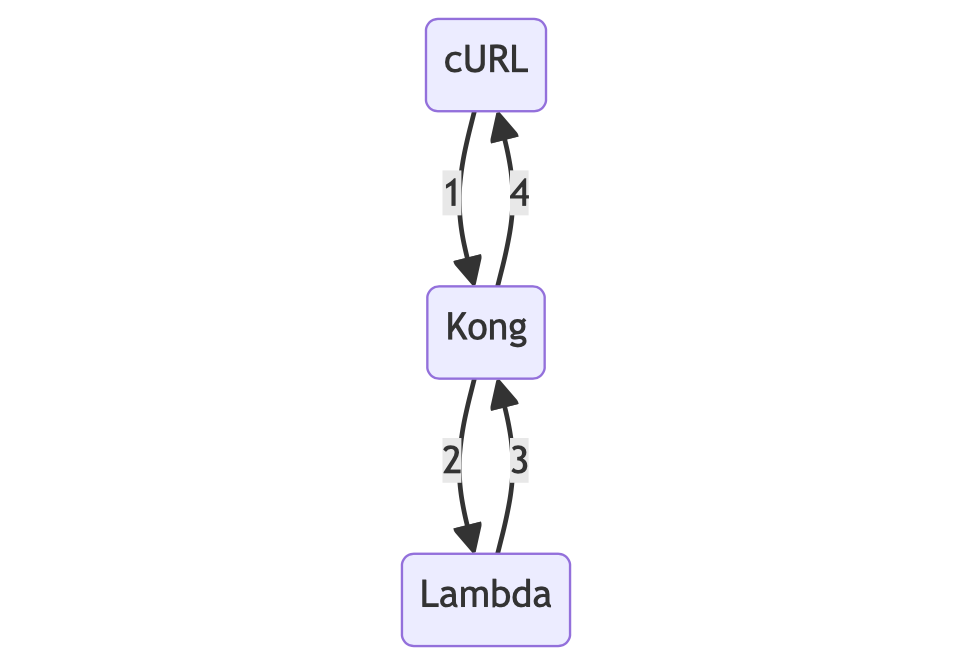
The HTTP request will be sent to Kong, then Kong will transform that request into a Lambda API call, the Lambda will receive that call with an HTTP event, and will respond with a JSON payload, which Kong will transform again and send back to the HTTP client.
</figcaption>
</figure>

<p>In order for this to work, we need to configure Kong to proxy HTTP requests to our Lambda. We can do this by using a declarative configuration that uses the <code class="language-plaintext highlighter-rouge">aws-lambda</code> plugin on the <code class="language-plaintext highlighter-rouge">/</code> route.</p>

<p>We can achieve this using this <code class="language-plaintext highlighter-rouge">kong.yml</code> configuration file:</p>

<figure class="highlight"><figcaption>kong.yml</figcaption><pre><code class="language-yaml" data-lang="yaml"><span class="na">_format_version</span><span class="pi">:</span> <span class="s2">"</span><span class="s">3.0"</span>
<span class="na">_transform</span><span class="pi">:</span> <span class="no">true</span>

<span class="na">routes</span><span class="pi">:</span>
<span class="pi">-</span> <span class="na">name</span><span class="pi">:</span> <span class="s">lambda</span>
  <span class="na">paths</span><span class="pi">:</span> <span class="pi">[</span> <span class="s2">"</span><span class="s">/"</span> <span class="pi">]</span>

<span class="na">plugins</span><span class="pi">:</span>
<span class="pi">-</span> <span class="na">route</span><span class="pi">:</span> <span class="s">lambda</span>
  <span class="na">name</span><span class="pi">:</span> <span class="s">aws-lambda</span>
  <span class="na">config</span><span class="pi">:</span>
    <span class="na">aws_region</span><span class="pi">:</span> <span class="s">eu-west-1</span>
    <span class="na">aws_key</span><span class="pi">:</span> <span class="s">DUMMY_KEY</span>
    <span class="na">aws_secret</span><span class="pi">:</span> <span class="s">DUMMY_SECRET</span>
    <span class="na">function_name</span><span class="pi">:</span> <span class="s">function</span>
    <span class="na">host</span><span class="pi">:</span> <span class="s">lambda</span>
    <span class="na">port</span><span class="pi">:</span> <span class="m">8080</span>
    <span class="na">disable_https</span><span class="pi">:</span> <span class="no">true</span>
    <span class="na">forward_request_body</span><span class="pi">:</span> <span class="no">true</span>
    <span class="na">forward_request_headers</span><span class="pi">:</span> <span class="no">true</span>
    <span class="na">forward_request_method</span><span class="pi">:</span> <span class="no">true</span>
    <span class="na">forward_request_uri</span><span class="pi">:</span> <span class="no">true</span>
    <span class="na">is_proxy_integration</span><span class="pi">:</span> <span class="no">true</span></code></pre></figure>

<p>A few things worth mentioning:</p>

<ul>
  <li>The <code class="language-plaintext highlighter-rouge">aws_key</code> and <code class="language-plaintext highlighter-rouge">aws_secret</code> are mandatory for the plugin to work, however we do not need to put any real secrets in there, since the invocation will happen locally.</li>
  <li><code class="language-plaintext highlighter-rouge">function_name</code> should stay hardcoded as <code class="language-plaintext highlighter-rouge">function</code>, as this is the name the Runtime Interface Client uses by default.</li>
  <li>The <code class="language-plaintext highlighter-rouge">host</code> and <code class="language-plaintext highlighter-rouge">port</code> values there should point to your local docker container running the Lambda function. In our case we use <code class="language-plaintext highlighter-rouge">lambda</code> and <code class="language-plaintext highlighter-rouge">8080</code> as we will run all this solution in a single Docker Compose setup where the Lambda runs in a container named <code class="language-plaintext highlighter-rouge">lambda</code>.</li>
  <li>We need to set <code class="language-plaintext highlighter-rouge">disable_https</code> to <code class="language-plaintext highlighter-rouge">true</code> as our Lambda container is not able to handle SSL.</li>
  <li>The rest of the configuration options can be tweaked depending on our specific needs. They are all <a href="https://docs.konghq.com/hub/kong-inc/aws-lambda/">documented in the Kong website</a>. The values shown here will work for an AWS Lambda Proxy Integration setup using AWS API Gateway, but the Kong plugin supports other types of integrations.</li>
</ul>

<h2>Putting it all together</h2>

<p>So far we have built a Docker based Lambda function and we are able to run it locally. We have also seen how to configure Kong API Gateway to proxy HTTP requests to that function. We will now look at what a Docker Compose setup might look like to run it all in a single project and command.</p>

<p>The full source code for this can be found in <a href="https://github.com/brafales/docker-lambda-kong">brafales/docker-lambda-kong</a>. I recommend checking it out to see the whole project structure.</p>

<p>We will assume we have the following folders in our root:</p>

<ul>
  <li><code class="language-plaintext highlighter-rouge">lambda</code>: here we will store the Lambda function source code and its Dockerfile.</li>
  <li><code class="language-plaintext highlighter-rouge">kong</code>: here we will store the declarative configuration for Kong which will allow us to set it up as a proxy for our function.</li>
</ul>

<p>And then in the root we can have our <code class="language-plaintext highlighter-rouge">docker-compose.yml</code> file:</p>

<figure class="highlight"><figcaption>docker-compose.yml</figcaption><pre><code class="language-yaml" data-lang="yaml"><span class="na">services</span><span class="pi">:</span>
  <span class="na">lambda</span><span class="pi">:</span>
    <span class="na">build</span><span class="pi">:</span>
      <span class="na">context</span><span class="pi">:</span> <span class="s">lambda</span>
    <span class="na">container_name</span><span class="pi">:</span> <span class="s">lambda</span>
    <span class="na">networks</span><span class="pi">:</span>
      <span class="pi">-</span> <span class="s">lambda-example</span>
  <span class="na">kong</span><span class="pi">:</span>
    <span class="na">image</span><span class="pi">:</span> <span class="s">kong:latest</span>
    <span class="na">container_name</span><span class="pi">:</span> <span class="s">kong</span>
    <span class="na">ports</span><span class="pi">:</span>
      <span class="pi">-</span> <span class="s2">"</span><span class="s">8000:8000"</span>
    <span class="na">environment</span><span class="pi">:</span>
      <span class="na">KONG_DATABASE</span><span class="pi">:</span> <span class="s">off</span>
      <span class="na">KONG_DECLARATIVE_CONFIG</span><span class="pi">:</span> <span class="s">/usr/local/kong/declarative/kong.yml</span>
    <span class="na">volumes</span><span class="pi">:</span>
      <span class="pi">-</span> <span class="s">./kong:/usr/local/kong/declarative</span>
    <span class="na">networks</span><span class="pi">:</span>
      <span class="pi">-</span> <span class="s">lambda-example</span>

<span class="na">networks</span><span class="pi">:</span>
  <span class="na">lambda-example</span><span class="pi">:</span></code></pre></figure>

<p>This file does the following:</p>

<ul>
  <li>Creates a docker network called <code class="language-plaintext highlighter-rouge">lambda-example</code>. This is optional since the default network created by compose would work equally well.</li>
  <li>It defines a Docker container named <code class="language-plaintext highlighter-rouge">lambda</code> and instructs compose to build it using the contents of the <code class="language-plaintext highlighter-rouge">lambda</code> folder.</li>
  <li>It defines a Docker container named <code class="language-plaintext highlighter-rouge">kong</code>, using the Docker image <code class="language-plaintext highlighter-rouge">kong:latest</code>, and mapping our <code class="language-plaintext highlighter-rouge">kong</code> folder to the container path <code class="language-plaintext highlighter-rouge">/usr/local/kong/declarative</code>. This will allow the container to read our declarative config file, which we set as an environment variable <code class="language-plaintext highlighter-rouge">KONG_DECLARATIVE_CONFIG</code>. We also set <code class="language-plaintext highlighter-rouge">KONG_DATABASE</code> to <code class="language-plaintext highlighter-rouge">off</code> to instruct Kong not to search for a database to read its config from, and finally map the container port <code class="language-plaintext highlighter-rouge">8000</code> to our localhost port <code class="language-plaintext highlighter-rouge">8000</code>.</li>
</ul>

<p>With all this in place, we can now simply run the following command to spin it all up:</p>

<div class="language-plaintext highlighter-rouge"><div class="highlight"><pre class="highlight"><code>docker compose up
</code></pre></div></div>

<p>Once all is up and running, we can now reach our Lambda function using curl or any other HTTP client like we would normally do if it was deployed to AWS behind an API Gateway:</p>

<div class="language-plaintext highlighter-rouge"><div class="highlight"><pre class="highlight"><code>➜ curl -s localhost:8000 | jq .
{
  "request_method": "GET",
  "request_body": "",
  "request_body_args": {},
  "request_uri": "/",
  "request_headers": {
    "user-agent": "curl/8.1.2",
    "host": "localhost:8000",
    "accept": "*/*"
  },
  "request_body_base64": true,
  "request_uri_args": {}
}

➜ curl -s -X POST localhost:8000/ | jq .
{
  "request_method": "POST",
  "request_body": "",
  "request_body_args": {},
  "request_uri": "/",
  "request_headers": {
    "user-agent": "curl/8.1.2",
    "host": "localhost:8000",
    "accept": "*/*"
  },
  "request_body_base64": true,
  "request_uri_args": {}
}

➜ curl -s  localhost:8000/?foo=bar | jq .
{
  "request_method": "GET",
  "request_body": "",
  "request_body_args": {},
  "request_uri": "/?foo=bar",
  "request_headers": {
    "user-agent": "curl/8.1.2",
    "host": "localhost:8000",
    "accept": "*/*"
  },
  "request_body_base64": true,
  "request_uri_args": {
    "foo": "bar"
  }
}
</code></pre></div></div>]]></content><author><name>Bernat Ràfales</name></author><category term="aws" /><category term="testing" /><category term="lambda" /><category term="docker" /><summary type="html"><![CDATA[AWS Lambda is one of those technologies that makes the distinction between infrastructure and application code quite blurry. There are many frameworks out there, some of them quite popular, such as AWS Amplify and the Serverless Framework, which will allow you to define your Lambda, your application code, and will provide tools that will package and provision, and then deploy those Lambdas (using CloudFormation under the hood). They also provide tools to locally run the functions for local testing, which is particularly useful if they are invoked using technologies such as API Gateway. Sometimes, however, especially if your organisation has adopted other Infrastructure as Code tools such as Terraform, you might want to just provision a function with simpler IaC tools, and keep the application deployment steps separate. Let us explore an alternative method to still be able to run and test API Gateway based Lambdas locally without the need to bring in big frameworks such as the ones mentioned earlier.]]></summary></entry><entry><title type="html">Graphical notifications for long-running tasks</title><link href="https://thinkingeek.com/2023/09/03/remote-notifications-over-ssh/" rel="alternate" type="text/html" title="Graphical notifications for long-running tasks" /><published>2023-09-03T21:15:00+00:00</published><updated>2023-09-03T21:15:00+00:00</updated><id>https://thinkingeek.com/2023/09/03/remote-notifications-over-ssh</id><content type="html" xml:base="https://thinkingeek.com/2023/09/03/remote-notifications-over-ssh/"><![CDATA[<p>In my dayjob I often have to perform long-running tasks that do not require
constant attention (e.g. compiling a compiler) on Linux systems. When this
happens, it is unavoidable to context switch to other tasks even if experts
advice against it.  Turns out that compilation scrolls are not always very
interesting.</p>

<p>I would like to be able to resume working on the original task as soon as possible.
So the idea is to receive a notification when the task ends.</p>

<!--more-->

<h2>Local notifications</h2>

<p>If the time-consuming task is being run locally and we are using a graphical
environment we can use the tool <code class="language-plaintext highlighter-rouge">notify-send</code> to send ourselves a notification
when the command ends. We can combine this in a convenient script like the one
below.</p>

<figure class="highlight"><figcaption>runot</figcaption><pre class="with_line_numbers"><code class="language-bash" data-lang="bash"><table class="rouge-table"><tbody><tr><td class="gutter gl"><pre class="lineno">1
2
3
4
5
6
7
8
9
10
11
12
13
14
</pre></td><td class="code"><pre><span class="c">#!/usr/bin/env bash</span>

<span class="nv">$*</span>
<span class="nv">result</span><span class="o">=</span><span class="s2">"</span><span class="nv">$?</span><span class="s2">"</span>

<span class="k">if</span> <span class="o">[</span> <span class="s2">"</span><span class="nv">$result</span><span class="s2">"</span> <span class="o">!=</span> <span class="s2">"0"</span> <span class="o">]</span><span class="p">;</span>
<span class="k">then
  </span><span class="nv">icon</span><span class="o">=</span><span class="s2">"dialog-warning"</span>
<span class="k">else
  </span><span class="nv">icon</span><span class="o">=</span><span class="s2">"dialog-information"</span>
<span class="k">fi
</span>notify-send <span class="s2">"--icon=</span><span class="nv">$icon</span><span class="s2">"</span> <span class="s2">"</span><span class="nv">$*</span><span class="s2">"</span>

<span class="nb">exit</span> <span class="s2">"</span><span class="nv">$result</span><span class="s2">"</span>
</pre></td></tr></tbody></table></code></pre></figure>

<p>We execute the command and the we use <code class="language-plaintext highlighter-rouge">notify-send</code> with the executed command
an appropriate icon based on the execution result.</p>

<div class="language-bash highlighter-rouge"><div class="highlight"><pre class="highlight"><code><span class="nv">$ </span>runot very slow thing
&lt; <span class="s2">"very slow thing"</span> runs <span class="o">&gt;</span>
&lt; a notification appears <span class="o">&gt;</span>
</code></pre></div></div>

<h3>How does this work?</h3>

<p>Without entering into too much detail, <code class="language-plaintext highlighter-rouge">notify-send</code> connects to D-Bus and sends
a notification, as specified in the <a href="https://specifications.freedesktop.org/notification-spec/notification-spec-latest.html">Desktop Notifications
Specification</a>.
A daemon configured by your desktop environment is waiting for the
notifications. Upon receiving one it graphically displays the notification.</p>

<h2>Remote notifications</h2>

<p><a href="https://en.wikipedia.org/wiki/D-Bus">D-Bus</a> is really cool technology that
allows different applications to interoperate and is specially useful in a
desktop environment. That said, the typical use case of D-Bus is typically
scoped by user sessions on the same computer and, while not impossible, the
message bus is not meant to span over several computers.</p>

<p>This means that if rather than working locally, we work over SSH on a
<code class="language-plaintext highlighter-rouge">remote-machine</code> we will not be able to send notifications to our
<code class="language-plaintext highlighter-rouge">local-machine</code> desktop straightforwardly. There are two options here that we
can use. Neither is perfect but will allow us to deliver notifications to our
desktop computer from a remote system.</p>

<ul>
  <li>Forward the UNIX socket</li>
  <li>Use a remote notification daemon</li>
</ul>

<h3>Forward the UNIX socket</h3>

<p>D-Bus clients know where to find the message bus by reading the environment
variable <code class="language-plaintext highlighter-rouge">DBUS_SESSION_BUS_ADDRESS</code>. In most systems nowadays it looks like this</p>

<div class="language-bash highlighter-rouge"><div class="highlight"><pre class="highlight"><code><span class="nv">$ </span><span class="nb">echo</span> <span class="nv">$DBUS_SESSION_BUS_ADDRESS</span>
unix:path<span class="o">=</span>/run/user/9999/bus
</code></pre></div></div>

<p>This syntax means the D-Bus server, initiated by some other application upon login,
can be found at the specified path. In this case the specified path is a UNIX
socket, so in principle only accessible to processes in the current machine.</p>

<p>We can forward a UNIX socket using <code class="language-plaintext highlighter-rouge">ssh</code>, like we usually do with TCP ports.</p>

<div class="language-bash highlighter-rouge"><div class="highlight"><pre class="highlight"><code><span class="o">(</span>local-machine<span class="o">)</span> <span class="nv">$ </span>ssh <span class="nt">-R</span> /some/well/known/path/dbus.socket:<span class="k">${</span><span class="nv">DBUS_SESSION_BUS_ADDRESS</span><span class="p">/unix</span>:path<span class="p">=/</span><span class="k">}</span> user@remote-machine
<span class="o">(</span>remote-machine<span class="o">)</span> <span class="nv">$ </span><span class="nb">export </span><span class="nv">DBUS_SESSION_BUS_ADDRESS</span><span class="o">=</span>/some/well/known/path/dbus.socket
<span class="o">(</span>remote-machine<span class="o">)</span> <span class="nv">$ </span>notify-send <span class="s2">"Hello world"</span>
&lt; notification appears <span class="k">in </span>the <span class="nb">local </span>machine as <span class="k">if </span>sent locally <span class="o">&gt;</span>
</code></pre></div></div>

<p>You can use any path for <code class="language-plaintext highlighter-rouge">/some/well/known/path/dbus.socket</code>, including a
subdirectory of your home directory.</p>

<p><strong>Pros</strong></p>

<ul>
  <li>The notification is reported as if it had been sent by a local process, so it
integrates very well with the environment.</li>
</ul>

<p>From a usability point of view this is the strongest point of this approach.</p>

<p><strong>Cons</strong></p>

<ul>
  <li>This only works if <code class="language-plaintext highlighter-rouge">local-machine</code> and <code class="language-plaintext highlighter-rouge">remote-machine</code> share the same UID and
GID. This can be easy to achieve in corporate environments where all systems
use a unified login system based on LDAP or Active Directory.</li>
</ul>

<p>For security reasons, the default configuration of D-Bus only allows processes
of the same user to access the bus. The protocol checks that the <code class="language-plaintext highlighter-rouge">uid</code> and
<code class="language-plaintext highlighter-rouge">gid</code> of the process connecting to the bus match the <code class="language-plaintext highlighter-rouge">uid</code> and <code class="language-plaintext highlighter-rouge">gid</code> of the
process that started the D-Bus daemon. This avoids other local processes, not
belonging to our user, to connect to our D-Bus daemon.</p>

<p>This may be an importation limitations in many systems (e.g. my laptop
at work is not integrated in the LDAP of other systems or, for security
reasons, we have different credentials in development vs production systems).</p>

<ul>
  <li>You need to remove the UNIX socket on the remote machine every time you start a session, but
not in subsequent <code class="language-plaintext highlighter-rouge">ssh</code> connections.</li>
</ul>

<p>This can be mitigated by using a distinguished script to connect
to the remote machine as a way to initiate the “session”. You would run
this only for the first connection, the other ones would just use a regular
<code class="language-plaintext highlighter-rouge">ssh</code> command.</p>

<figure class="highlight"><figcaption>ssh-session</figcaption><pre class="with_line_numbers"><code class="language-bash" data-lang="bash"><table class="rouge-table"><tbody><tr><td class="gutter gl"><pre class="lineno">1
2
3
4
5
</pre></td><td class="code"><pre><span class="c">#!/usr/bin/env bash</span>

<span class="nv">remote</span><span class="o">=</span><span class="s2">"</span><span class="nv">$1</span><span class="s2">"</span>
ssh <span class="s2">"</span><span class="nv">$remote</span><span class="s2">"</span> <span class="s2">"rm -f /some/well/known/path/dbus.socket"</span>
<span class="nb">exec </span>ssh <span class="nt">-R</span> <span class="s2">"/some/well/known/path/dbus.socket:</span><span class="k">${</span><span class="nv">DBUS_SESSION_BUS_ADDRESS</span><span class="p">/unix</span>:path<span class="p">=/</span><span class="k">}</span><span class="s2">"</span> <span class="s2">"</span><span class="nv">$remote</span><span class="s2">"</span>
</pre></td></tr></tbody></table></code></pre></figure>

<div class="language-bash highlighter-rouge"><div class="highlight"><pre class="highlight"><code><span class="o">(</span>local-machine<span class="o">)</span> <span class="nv">$ </span>ssh-session user@remote-machine
</code></pre></div></div>

<p>This script is a bit simplistic and assumes you can remotely execute commands
without having to enter a password (e.g. because you are using a SSH key). I
have not tried it, but perhaps using
<a href="https://linux.die.net/man/5/ssh_config"><code class="language-plaintext highlighter-rouge">ProxyCommand</code></a> this initial script
can be made more convenient without requiring entering the password twice.</p>

<p>Alternatively, if we can configure the SSH server on <code class="language-plaintext highlighter-rouge">remote-machine</code>, we can
add the option <code class="language-plaintext highlighter-rouge">StreamLocalBindUnlink yes</code> to <code class="language-plaintext highlighter-rouge">/etc/ssh/sshd_config</code>. This will
remove (unlink) the <code class="language-plaintext highlighter-rouge">/some/well/known/path/dbus.socket</code> upon exiting so we
don’t have to remove it beforehand.</p>

<p>Note that once you close the ssh connection that forwarded the UNIX socket,
notifications will stop working. So you probably want to close that one the
last in case you’re working with several ssh session to <code class="language-plaintext highlighter-rouge">remote-machine</code> at the
same time.</p>

<ul>
  <li>You need to set the <code class="language-plaintext highlighter-rouge">DBUS_SESSION_BUS_ADDRESS</code> environment variable first.</li>
</ul>

<p>This can be addressed as described in <a href="https://nikhilism.com/post/2023/remote-dbus-notifications/">this post by
Nikhil</a>. We can add
the following to our <code class="language-plaintext highlighter-rouge">.bashrc</code> file.</p>

<figure class="highlight"><figcaption>.bashrc</figcaption><pre><code class="language-bash" data-lang="bash">…
<span class="c"># If the shell is running over SSH, override the session DBus socket to point</span>
<span class="c"># to the one forwarded over SSH.</span>
<span class="k">if</span>  <span class="o">[</span> <span class="nt">-n</span> <span class="nv">$SSH_CONNECTION</span> <span class="o">]</span><span class="p">;</span> <span class="k">then
  </span><span class="nb">export </span><span class="nv">DBUS_SESSION_BUS_ADDRESS</span><span class="o">=</span>/some/well/known/path/dbus.socket
<span class="k">fi</span>
…</code></pre></figure>

<h3>Use a remote notification daemon</h3>

<p>This approach is a bit more involved but basically relies on forwarding X11,
running a notification daemon on <code class="language-plaintext highlighter-rouge">remote-machine</code> that we will activate using
D-Bus itself. The notification daemon will then display the notifications using
X11 which will be displayed on our <code class="language-plaintext highlighter-rouge">local-machine</code> as any other X11 forward
application does.</p>

<p><strong>Note</strong>: this approach assumes the user is not running a graphical session on
<code class="language-plaintext highlighter-rouge">remote-machine</code>. There are chances that this procedure may confuse the
graphical environment when sending notifications.</p>

<p><strong>Pros</strong></p>
<ul>
  <li>Does not need uid/gid synchronisation between <code class="language-plaintext highlighter-rouge">local-machine</code> and <code class="language-plaintext highlighter-rouge">remote-machine</code>.</li>
</ul>

<p>This was the main limitation with the earlier approach.</p>

<p><strong>Cons</strong></p>
<ul>
  <li>Needs X11 forwarding which may not always be available</li>
</ul>

<p>We need to pass <code class="language-plaintext highlighter-rouge">-X</code> when connecting to <code class="language-plaintext highlighter-rouge">remote-machine</code>.</p>

<div class="language-bash highlighter-rouge"><div class="highlight"><pre class="highlight"><code><span class="o">(</span>local-machine<span class="o">)</span> <span class="nv">$ </span>ssh <span class="nt">-X</span> remote-machine
</code></pre></div></div>

<p>Alternatively we can add a configuration entry to the <code class="language-plaintext highlighter-rouge">~/.ssh/config</code> of
<code class="language-plaintext highlighter-rouge">local-machine</code>.</p>

<figure class="highlight"><figcaption>~/.ssh/config</figcaption><pre><code class="language-ssh" data-lang="ssh"><span class="err">…</span>
<span class="k">Host</span> remote-machine
  <span class="k">HostName</span> remote-machine.example.com
  <span class="k">ForwardX11</span> "yes"
<span class="err">…</span></code></pre></figure>

<ul>
  <li>Relies on systemd and D-Bus</li>
</ul>

<p>These two components are present in most distributions these days, so they can
be assumed.</p>

<p>We also assume that a D-Bus session is running when we connect to
<code class="language-plaintext highlighter-rouge">remote-machine</code> (i.e. on <code class="language-plaintext highlighter-rouge">remote-machine</code>, the environment variable
<code class="language-plaintext highlighter-rouge">DBUS_SESSION_BUS_ADDRESS</code> points to some UNIX socket of <code class="language-plaintext highlighter-rouge">remote-machine</code>).
Again, most distributions these days provide this functionality out of the box.
Setting this up is out of scope of this post.</p>

<ul>
  <li>The result is less integrated as we use a notification daemon different to the
one in the graphical environment of <code class="language-plaintext highlighter-rouge">local-machine</code>.</li>
</ul>

<p>There is a number of different notification daemons, some of which can be
configured to suit ones taste. In this example we will use
<code class="language-plaintext highlighter-rouge">notification-daemon</code> which is a reference implementation of the notification protocol and seems to work
fine for our needs. The Arch wiki has a <a href="https://wiki.archlinux.org/title/Desktop_notifications#Notification_servers">a list of notification
daemons</a>.
Recall that the notification daemon runs on <code class="language-plaintext highlighter-rouge">remote-machine</code>.</p>

<h4>Activation via D-Bus</h4>

<p>This means that every time we invoke <code class="language-plaintext highlighter-rouge">notify-send</code>, if no notification daemon
is running, one will be started for us.  If one is running already, that one
will be used by <code class="language-plaintext highlighter-rouge">notify-send</code>.</p>

<p>There are two files that we need to create on <code class="language-plaintext highlighter-rouge">remote-machine</code> to set up
D-Bus activation.</p>

<p>First <code class="language-plaintext highlighter-rouge">~/.local/share/dbus-1/services/org.Notifications.service</code> to tell D-Bus
what is the associated systemd unit and daemon.</p>

<figure class="highlight"><figcaption>~/.local/share/dbus-1/services/org.Notifications.service</figcaption><pre class="with_line_numbers"><code class="language-ini" data-lang="ini"><table class="rouge-table"><tbody><tr><td class="gutter gl"><pre class="lineno">1
2
3
4
</pre></td><td class="code"><pre><span class="nn">[D-BUS Service]</span>
<span class="py">Name</span><span class="p">=</span><span class="s">org.freedesktop.Notifications</span>
<span class="py">Exec</span><span class="p">=</span><span class="s">/usr/lib/notification-daemon/notification-daemon</span>
<span class="py">SystemdService</span><span class="p">=</span><span class="s">my-notification-daemon.service</span>
</pre></td></tr></tbody></table></code></pre></figure>

<p>Change the path of <code class="language-plaintext highlighter-rouge">Exec</code> to the proper location of the <code class="language-plaintext highlighter-rouge">notification-daemon</code>
executable: the one shown corresponds to Ubuntu/Debian systems.</p>

<p>Now we need to create a systemd-unit in <code class="language-plaintext highlighter-rouge">~/.config/systemd/user/my-notification-daemon.service</code></p>

<figure class="highlight"><figcaption>~/.config/systemd/user/my-notification-daemon.service</figcaption><pre class="with_line_numbers"><code class="language-ini" data-lang="ini"><table class="rouge-table"><tbody><tr><td class="gutter gl"><pre class="lineno">1
2
3
4
5
6
7
</pre></td><td class="code"><pre><span class="nn">[Unit]</span>
<span class="py">Description</span><span class="p">=</span><span class="s">My notification daemon</span>

<span class="nn">[Service]</span>
<span class="py">Type</span><span class="p">=</span><span class="s">dbus</span>
<span class="py">BusName</span><span class="p">=</span><span class="s">org.freedesktop.Notifications</span>
<span class="py">ExecStart</span><span class="p">=</span><span class="s">/usr/lib/notification-daemon/notification-daemon</span>
</pre></td></tr></tbody></table></code></pre></figure>

<p>The path of <code class="language-plaintext highlighter-rouge">ExecStart</code> must be the same as <code class="language-plaintext highlighter-rouge">Exec</code> above.</p>

<p>With all this, <code class="language-plaintext highlighter-rouge">notify-send</code> run on <code class="language-plaintext highlighter-rouge">remote-machine</code> will automatically
initiate the <code class="language-plaintext highlighter-rouge">notification-daemon</code> if none is running.</p>

<p>However, this will not work yet because the <code class="language-plaintext highlighter-rouge">notification-daemon</code> is a X11 application and needs some
environment information to proceed. We can do that by running the following command.</p>

<div class="language-bash highlighter-rouge"><div class="highlight"><pre class="highlight"><code><span class="o">(</span>remote-machine<span class="o">)</span> <span class="nv">$ </span>dbus-update-activation-environment <span class="se">\</span>
  <span class="nt">--systemd</span> DBUS_SESSION_BUS_ADDRESS DISPLAY XAUTHORITY
</code></pre></div></div>

<p>This command above can be added to the <code class="language-plaintext highlighter-rouge">.bashrc</code> of <code class="language-plaintext highlighter-rouge">remote-machine</code> so it runs
automatically every time we connect. This must run before we activate the <code class="language-plaintext highlighter-rouge">notification-daemon</code>
for the first time, otherwise the activation will fail.</p>

<p>With all this in place, it should now be possible to send a test notification.</p>

<div class="language-bash highlighter-rouge"><div class="highlight"><pre class="highlight"><code><span class="o">(</span>remote-machine<span class="o">)</span> <span class="nv">$ </span>notify-send <span class="s2">"Hello world"</span>
</code></pre></div></div>

<p>We should see how a new popup appears to the top right of our screen (possibly
with an additional icon to our notification area).</p>

<p>This approach is a bit more involved so you may have to troubleshoot a bit. The following
command will show us the dbus activations.</p>

<div class="language-bash highlighter-rouge"><div class="highlight"><pre class="highlight"><code><span class="o">(</span>remote-machine<span class="o">)</span> <span class="nv">$ </span>journalctl <span class="nt">--user</span> <span class="nt">--follow</span> <span class="nt">-g</span> notif
</code></pre></div></div>

<p>In my experience the most common error is forgetting to run
<code class="language-plaintext highlighter-rouge">dbus-update-activation-environment</code>, so <code class="language-plaintext highlighter-rouge">notification-daemon</code> fails to
start and exits immediately.</p>

<p>Hope this useful :)</p>]]></content><author><name>Roger Ferrer Ibáñez</name></author><category term="ssh" /><category term="notifications" /><category term="dbus" /><category term="systemd" /><category term="linux" /><summary type="html"><![CDATA[In my dayjob I often have to perform long-running tasks that do not require constant attention (e.g. compiling a compiler) on Linux systems. When this happens, it is unavoidable to context switch to other tasks even if experts advice against it. Turns out that compilation scrolls are not always very interesting. I would like to be able to resume working on the original task as soon as possible. So the idea is to receive a notification when the task ends.]]></summary></entry><entry><title type="html">Writing GObjects in C++</title><link href="https://thinkingeek.com/2023/02/04/writing-gobjects-in-cpp/" rel="alternate" type="text/html" title="Writing GObjects in C++" /><published>2023-02-04T21:46:00+00:00</published><updated>2023-02-04T21:46:00+00:00</updated><id>https://thinkingeek.com/2023/02/04/writing-gobjects-in-cpp</id><content type="html" xml:base="https://thinkingeek.com/2023/02/04/writing-gobjects-in-cpp/"><![CDATA[<p>In the last post I discussed about how glibmm, the wrapper of the GLib
library exposes GObjects and we finished about a rationale about why
one would want to write full-fledged GObjects in C++.</p>

<p>Today we are exploring this venue and observing some of the pain points
we are going to face.</p>

<!--more-->

<h1>Quick recap</h1>

<p>GLib is the foundational library on which other technologies like the GTK GUI
toolkit or many components of the GNOME Desktop environment software stack
build upon.  GLib contains GObject, a dynamic type system that implements a
more or less classical OOP paradigm. GLib is written in C and
<a href="https://gitlab.gnome.org/GNOME/glibmm">glibmm</a> is the C++ wrapper of GLib.</p>

<p>GObject type system exposes classes and instances (objects) of classes as
normal C data. Mostly for ergonomic reasons, glibmm focuses on the (GObject)
instances and does not expose as much the (GObject) classes. This means that
our C++ classes will be used to implement behaviour of (GObject) instances and
not so much behaviour of (GObject) classes.</p>

<p>We need a full fledged GObject if we want it to interact with other components
in the GTK/GNOME Desktop stack. In particular I’m interested in being able
to use those C++-written GObjects in <code class="language-plaintext highlighter-rouge">.ui</code> files that describe interfaces.</p>

<h1>Current approach</h1>

<p>Let’s see a simplified version of the <a href="https://gitlab.gnome.org/GNOME/gtkmm-documentation/-/tree/b5614081b11077173d80b40d56ba96742e88a430/examples/book/builder/derived">example</a> in the gtkmm book
on how to use using derived widgets and <code class="language-plaintext highlighter-rouge">.ui</code> files.</p>

<p>First lets define a very simple interface made up of an application
window that includes a box container which has our derived button.</p>

<figure class="highlight"><figcaption>derived.ui</figcaption><pre class="with_line_numbers"><code class="language-xml" data-lang="xml"><table class="rouge-table"><tbody><tr><td class="gutter gl"><pre class="lineno">1
2
3
4
5
6
7
8
9
10
11
12
13
14
15
16
17
18
19
20
21
22
23
24
</pre></td><td class="code"><pre><span class="cp">&lt;?xml version="1.0" encoding="UTF-8"?&gt;</span>
<span class="nt">&lt;interface&gt;</span>
  <span class="nt">&lt;object</span> <span class="na">class=</span><span class="s">"GtkApplicationWindow"</span> <span class="na">id=</span><span class="s">"WindowDerived"</span><span class="nt">&gt;</span>
    <span class="nt">&lt;property</span> <span class="na">name=</span><span class="s">"can_focus"</span><span class="nt">&gt;</span>False<span class="nt">&lt;/property&gt;</span>
    <span class="nt">&lt;property</span> <span class="na">name=</span><span class="s">"title"</span> <span class="na">translatable=</span><span class="s">"yes"</span><span class="nt">&gt;</span>Derived Builder example<span class="nt">&lt;/property&gt;</span>
    <span class="nt">&lt;property</span> <span class="na">name=</span><span class="s">"default_width"</span><span class="nt">&gt;</span>150<span class="nt">&lt;/property&gt;</span>
    <span class="nt">&lt;property</span> <span class="na">name=</span><span class="s">"default_height"</span><span class="nt">&gt;</span>100<span class="nt">&lt;/property&gt;</span>
    <span class="nt">&lt;property</span> <span class="na">name=</span><span class="s">"hide_on_close"</span><span class="nt">&gt;</span>True<span class="nt">&lt;/property&gt;</span>
    <span class="nt">&lt;child&gt;</span>
      <span class="nt">&lt;object</span> <span class="na">class=</span><span class="s">"GtkBox"</span> <span class="na">id=</span><span class="s">"dialog-vbox2"</span><span class="nt">&gt;</span>
        <span class="nt">&lt;property</span> <span class="na">name=</span><span class="s">"orientation"</span><span class="nt">&gt;</span>vertical<span class="nt">&lt;/property&gt;</span>
        <span class="nt">&lt;property</span> <span class="na">name=</span><span class="s">"valign"</span><span class="nt">&gt;</span>center<span class="nt">&lt;/property&gt;</span>
        <span class="nt">&lt;child</span> <span class="na">type=</span><span class="s">"end"</span><span class="nt">&gt;</span>
          <span class="nt">&lt;object</span> <span class="na">class=</span><span class="s">"gtkmm__CustomObject_MyButton"</span> <span class="na">id=</span><span class="s">"quit_button"</span><span class="nt">&gt;</span>
            <span class="nt">&lt;property</span> <span class="na">name=</span><span class="s">"halign"</span><span class="nt">&gt;</span>center<span class="nt">&lt;/property&gt;</span>
            <span class="nt">&lt;property</span> <span class="na">name=</span><span class="s">"label"</span><span class="nt">&gt;</span>Quit<span class="nt">&lt;/property&gt;</span>
            <span class="nt">&lt;property</span> <span class="na">name=</span><span class="s">"button-ustring"</span><span class="nt">&gt;</span>Button with extra properties<span class="nt">&lt;/property&gt;</span>
            <span class="nt">&lt;property</span> <span class="na">name=</span><span class="s">"button-int"</span><span class="nt">&gt;</span>85<span class="nt">&lt;/property&gt;</span>
          <span class="nt">&lt;/object&gt;</span>
        <span class="nt">&lt;/child&gt;</span>
      <span class="nt">&lt;/object&gt;</span>
    <span class="nt">&lt;/child&gt;</span>
  <span class="nt">&lt;/object&gt;</span>
<span class="nt">&lt;/interface&gt;</span>
</pre></td></tr></tbody></table></code></pre></figure>

<p>Line 14 of <code class="language-plaintext highlighter-rouge">derived.ui</code> refers to our custom button class. Because it inherits
from a Gtk.Button it inherits its properties such as <code class="language-plaintext highlighter-rouge">label</code> or <code class="language-plaintext highlighter-rouge">halign</code> (which
is actually inherited from Gtk.Widget). We will define our own custom properties
<code class="language-plaintext highlighter-rouge">button-ustring</code> and <code class="language-plaintext highlighter-rouge">button-int</code> whose initial values are set to the values
in the XML file (<code class="language-plaintext highlighter-rouge">"Button with extra properties"</code> and <code class="language-plaintext highlighter-rouge">85</code>, respectively).</p>

<h2>Custom button with extra properties</h2>

<p>Let’s define now our custom button.</p>

<figure class="highlight"><figcaption>derivedbutton.h</figcaption><pre class="with_line_numbers"><code class="language-cpp" data-lang="cpp"><table class="rouge-table"><tbody><tr><td class="gutter gl"><pre class="lineno">1
2
3
4
5
6
7
8
9
10
11
12
13
14
15
16
17
18
19
20
21
22
23
24
25
</pre></td><td class="code"><pre><span class="cp">#ifndef DERIVED_BUTTON_H
#define DERIVED_BUTTON_H
</span>
<span class="cp">#include</span> <span class="cpf">&lt;gtkmm.h&gt;</span><span class="cp">
</span>
<span class="k">class</span> <span class="nc">DerivedButton</span> <span class="o">:</span> <span class="k">public</span> <span class="n">Gtk</span><span class="o">::</span><span class="n">Button</span> <span class="p">{</span>
<span class="nl">public:</span>
  <span class="n">DerivedButton</span><span class="p">();</span>
  <span class="n">DerivedButton</span><span class="p">(</span><span class="n">BaseObjectType</span> <span class="o">*</span><span class="n">cobject</span><span class="p">,</span> <span class="k">const</span> <span class="n">Glib</span><span class="o">::</span><span class="n">RefPtr</span><span class="o">&lt;</span><span class="n">Gtk</span><span class="o">::</span><span class="n">Builder</span><span class="o">&gt;</span> <span class="o">&amp;</span><span class="p">);</span>
  <span class="k">virtual</span> <span class="o">~</span><span class="n">DerivedButton</span><span class="p">();</span>

  <span class="n">Glib</span><span class="o">::</span><span class="n">PropertyProxy</span><span class="o">&lt;</span><span class="n">Glib</span><span class="o">::</span><span class="n">ustring</span><span class="o">&gt;</span> <span class="n">property_ustring</span><span class="p">()</span> <span class="p">{</span>
    <span class="k">return</span> <span class="n">prop_ustring</span><span class="p">.</span><span class="n">get_proxy</span><span class="p">();</span>
  <span class="p">}</span>
  <span class="n">Glib</span><span class="o">::</span><span class="n">PropertyProxy</span><span class="o">&lt;</span><span class="kt">int</span><span class="o">&gt;</span> <span class="n">property_int</span><span class="p">()</span> <span class="p">{</span> <span class="k">return</span> <span class="n">prop_int</span><span class="p">.</span><span class="n">get_proxy</span><span class="p">();</span> <span class="p">}</span>

<span class="nl">private:</span>
  <span class="n">Glib</span><span class="o">::</span><span class="n">Property</span><span class="o">&lt;</span><span class="n">Glib</span><span class="o">::</span><span class="n">ustring</span><span class="o">&gt;</span> <span class="n">prop_ustring</span><span class="p">;</span>
  <span class="n">Glib</span><span class="o">::</span><span class="n">Property</span><span class="o">&lt;</span><span class="kt">int</span><span class="o">&gt;</span> <span class="n">prop_int</span><span class="p">;</span>

  <span class="kt">void</span> <span class="n">on_ustring_changed</span><span class="p">();</span>
  <span class="kt">void</span> <span class="n">on_int_changed</span><span class="p">();</span>
<span class="p">};</span>

<span class="cp">#endif</span>
</pre></td></tr></tbody></table></code></pre></figure>

<p>Here we define our two custom properties and we define proxies for them. Proxies
will allow us to connect the signal that is emitted when the property changes.</p>

<p>Constructors at lines 8 and 9 deserve some explanation, but first let’s see
the implementation of the class.</p>

<figure class="highlight"><figcaption>derivedbutton.cc</figcaption><pre class="with_line_numbers"><code class="language-cpp" data-lang="cpp"><table class="rouge-table"><tbody><tr><td class="gutter gl"><pre class="lineno">1
2
3
4
5
6
7
8
9
10
11
12
13
14
15
16
17
18
19
20
21
22
23
24
25
26
27
28
29
</pre></td><td class="code"><pre><span class="cp">#include</span> <span class="cpf">"derivedbutton.h"</span><span class="cp">
#include</span> <span class="cpf">&lt;iostream&gt;</span><span class="cp">
</span>
<span class="c1">// For creating a dummy object in main.cc.</span>
<span class="n">DerivedButton</span><span class="o">::</span><span class="n">DerivedButton</span><span class="p">()</span>
    <span class="o">:</span> <span class="n">Glib</span><span class="o">::</span><span class="n">ObjectBase</span><span class="p">(</span><span class="s">"MyButton"</span><span class="p">),</span> <span class="n">prop_ustring</span><span class="p">(</span><span class="o">*</span><span class="k">this</span><span class="p">,</span> <span class="s">"button-ustring"</span><span class="p">),</span>
      <span class="n">prop_int</span><span class="p">(</span><span class="o">*</span><span class="k">this</span><span class="p">,</span> <span class="s">"button-int"</span><span class="p">,</span> <span class="mi">10</span><span class="p">)</span> <span class="p">{}</span>

<span class="kt">void</span> <span class="n">DerivedButton</span><span class="o">::</span><span class="n">on_ustring_changed</span><span class="p">()</span> <span class="p">{</span>
  <span class="n">std</span><span class="o">::</span><span class="n">cout</span> <span class="o">&lt;&lt;</span> <span class="s">"- ustring property changed! new val "</span> <span class="o">&lt;&lt;</span> <span class="n">property_ustring</span><span class="p">()</span>
            <span class="o">&lt;&lt;</span> <span class="n">std</span><span class="o">::</span><span class="n">endl</span><span class="p">;</span>
<span class="p">}</span>

<span class="kt">void</span> <span class="n">DerivedButton</span><span class="o">::</span><span class="n">on_int_changed</span><span class="p">()</span> <span class="p">{</span>
  <span class="n">std</span><span class="o">::</span><span class="n">cout</span> <span class="o">&lt;&lt;</span> <span class="s">"- int property changed! new val "</span> <span class="o">&lt;&lt;</span> <span class="n">property_int</span><span class="p">()</span>
            <span class="o">&lt;&lt;</span> <span class="n">std</span><span class="o">::</span><span class="n">endl</span><span class="p">;</span>
<span class="p">}</span>

<span class="n">DerivedButton</span><span class="o">::</span><span class="n">DerivedButton</span><span class="p">(</span><span class="n">BaseObjectType</span> <span class="o">*</span><span class="n">cobject</span><span class="p">,</span>
                             <span class="k">const</span> <span class="n">Glib</span><span class="o">::</span><span class="n">RefPtr</span><span class="o">&lt;</span><span class="n">Gtk</span><span class="o">::</span><span class="n">Builder</span><span class="o">&gt;</span> <span class="o">&amp;</span><span class="p">)</span>
    <span class="o">:</span> <span class="n">Glib</span><span class="o">::</span><span class="n">ObjectBase</span><span class="p">(</span><span class="s">"MyButton"</span><span class="p">),</span> <span class="n">Gtk</span><span class="o">::</span><span class="n">Button</span><span class="p">(</span><span class="n">cobject</span><span class="p">),</span>
      <span class="n">prop_ustring</span><span class="p">(</span><span class="o">*</span><span class="k">this</span><span class="p">,</span> <span class="s">"button-ustring"</span><span class="p">),</span> <span class="n">prop_int</span><span class="p">(</span><span class="o">*</span><span class="k">this</span><span class="p">,</span> <span class="s">"button-int"</span><span class="p">,</span> <span class="mi">10</span><span class="p">)</span> <span class="p">{</span>
  <span class="n">property_ustring</span><span class="p">().</span><span class="n">signal_changed</span><span class="p">().</span><span class="n">connect</span><span class="p">(</span>
      <span class="n">sigc</span><span class="o">::</span><span class="n">mem_fun</span><span class="p">(</span><span class="o">*</span><span class="k">this</span><span class="p">,</span> <span class="o">&amp;</span><span class="n">DerivedButton</span><span class="o">::</span><span class="n">on_ustring_changed</span><span class="p">));</span>
  <span class="n">property_int</span><span class="p">().</span><span class="n">signal_changed</span><span class="p">().</span><span class="n">connect</span><span class="p">(</span>
      <span class="n">sigc</span><span class="o">::</span><span class="n">mem_fun</span><span class="p">(</span><span class="o">*</span><span class="k">this</span><span class="p">,</span> <span class="o">&amp;</span><span class="n">DerivedButton</span><span class="o">::</span><span class="n">on_int_changed</span><span class="p">));</span>
<span class="p">}</span>

<span class="n">DerivedButton</span><span class="o">::~</span><span class="n">DerivedButton</span><span class="p">()</span> <span class="p">{}</span>
</pre></td></tr></tbody></table></code></pre></figure>

<p>The constructor at line 5 is a dummy constructor that we will need later, when
initialising the application (or widget library). We need it because GLib
distinguishes the registering of a class type in the type system and the
instantiation of objects of such type as two different steps. However, glibmm
combines both, so we need to make sure the class type exists before we can use
it generically from GLib or other libraries using GObject. The only way to do
this in glibmm is to instantiate a C++ object of the C++ class wrapping
the GObject class.</p>

<p>Unfortunately, this also means that any other constructor needs to behave the
same when it comes to registering the class type. So the constructor at line 19
needs to initialise <code class="language-plaintext highlighter-rouge">Glib::ObjectBase</code> and the properties in the same way, to
avoid unexpected inconsistencies. This constructor also has to propagate the C
object (<code class="language-plaintext highlighter-rouge">cobject</code>) to the parent constructor. This object has been generically
built using generic GObject machinery and so we are actually wrapping an object
that already exists (i.e. the GObject instance does not exist because we
instantiated the class <code class="language-plaintext highlighter-rouge">DerivedButton</code> which is another possible scenario).</p>

<h2>Main window</h2>

<p>Now let’s look at the main window. This is not a custom widget because
we won’t be defining new properties for it. However in C++ we will create
a subclass for it as well.</p>

<figure class="highlight"><figcaption>derivedwindow.h</figcaption><pre class="with_line_numbers"><code class="language-cpp" data-lang="cpp"><table class="rouge-table"><tbody><tr><td class="gutter gl"><pre class="lineno">1
2
3
4
5
6
7
8
9
10
11
12
13
14
15
16
17
18
19
20
21
</pre></td><td class="code"><pre><span class="cp">#ifndef DERIVED_WINDOW_H
#define DERIVED_WINDOW_H
</span>
<span class="cp">#include</span> <span class="cpf">"derivedbutton.h"</span><span class="cp">
#include</span> <span class="cpf">&lt;gtkmm.h&gt;</span><span class="cp">
</span>
<span class="k">class</span> <span class="nc">DerivedWindow</span> <span class="o">:</span> <span class="k">public</span> <span class="n">Gtk</span><span class="o">::</span><span class="n">ApplicationWindow</span> <span class="p">{</span>
<span class="nl">public:</span>
  <span class="n">DerivedWindow</span><span class="p">(</span><span class="n">BaseObjectType</span> <span class="o">*</span><span class="n">cobject</span><span class="p">,</span>
                <span class="k">const</span> <span class="n">Glib</span><span class="o">::</span><span class="n">RefPtr</span><span class="o">&lt;</span><span class="n">Gtk</span><span class="o">::</span><span class="n">Builder</span><span class="o">&gt;</span> <span class="o">&amp;</span><span class="n">builder</span><span class="p">);</span>
  <span class="k">virtual</span> <span class="o">~</span><span class="n">DerivedWindow</span><span class="p">();</span>

<span class="nl">protected:</span>
  <span class="c1">// Signal handlers:</span>
  <span class="kt">void</span> <span class="n">on_button_quit</span><span class="p">();</span>

  <span class="n">Glib</span><span class="o">::</span><span class="n">RefPtr</span><span class="o">&lt;</span><span class="n">Gtk</span><span class="o">::</span><span class="n">Builder</span><span class="o">&gt;</span> <span class="n">m_builder</span><span class="p">;</span>
  <span class="n">DerivedButton</span> <span class="o">*</span><span class="n">m_pButton</span><span class="p">;</span>
<span class="p">};</span>

<span class="cp">#endif</span>
</pre></td></tr></tbody></table></code></pre></figure>

<p>Line 9 contains a constructor that again, wraps a GObject instance that
will be created elsewhere. Parameter <code class="language-plaintext highlighter-rouge">builder</code> is a reference to Gtk.Builder
which is an object used to create interfaces from <code class="language-plaintext highlighter-rouge">.ui</code> files.</p>

<figure class="highlight"><figcaption>derivedwindow.cc</figcaption><pre class="with_line_numbers"><code class="language-cpp" data-lang="cpp"><table class="rouge-table"><tbody><tr><td class="gutter gl"><pre class="lineno">1
2
3
4
5
6
7
8
9
10
11
12
13
14
15
16
17
18
19
20
21
22
</pre></td><td class="code"><pre><span class="cp">#include</span> <span class="cpf">"derivedwindow.h"</span><span class="cp">
#include</span> <span class="cpf">&lt;iostream&gt;</span><span class="cp">
</span>
<span class="n">DerivedWindow</span><span class="o">::</span><span class="n">DerivedWindow</span><span class="p">(</span><span class="n">BaseObjectType</span> <span class="o">*</span><span class="n">cobject</span><span class="p">,</span>
                             <span class="k">const</span> <span class="n">Glib</span><span class="o">::</span><span class="n">RefPtr</span><span class="o">&lt;</span><span class="n">Gtk</span><span class="o">::</span><span class="n">Builder</span><span class="o">&gt;</span> <span class="o">&amp;</span><span class="n">builder</span><span class="p">)</span>
    <span class="o">:</span> <span class="n">Gtk</span><span class="o">::</span><span class="n">ApplicationWindow</span><span class="p">(</span><span class="n">cobject</span><span class="p">),</span> <span class="n">m_builder</span><span class="p">(</span><span class="n">builder</span><span class="p">),</span>
      <span class="n">m_pButton</span><span class="p">(</span><span class="nb">nullptr</span><span class="p">)</span> <span class="p">{</span>
  <span class="c1">// Get the Gtk.Builder-instantiated Button, and connect a signal handler:</span>
  <span class="n">m_pButton</span> <span class="o">=</span> <span class="n">Gtk</span><span class="o">::</span><span class="n">Builder</span><span class="o">::</span><span class="n">get_widget_derived</span><span class="o">&lt;</span><span class="n">DerivedButton</span><span class="o">&gt;</span><span class="p">(</span><span class="n">m_builder</span><span class="p">,</span>
                                                              <span class="s">"quit_button"</span><span class="p">);</span>
  <span class="k">if</span> <span class="p">(</span><span class="n">m_pButton</span><span class="p">)</span> <span class="p">{</span>
    <span class="n">m_pButton</span><span class="o">-&gt;</span><span class="n">signal_clicked</span><span class="p">().</span><span class="n">connect</span><span class="p">(</span>
        <span class="n">sigc</span><span class="o">::</span><span class="n">mem_fun</span><span class="p">(</span><span class="o">*</span><span class="k">this</span><span class="p">,</span> <span class="o">&amp;</span><span class="n">DerivedWindow</span><span class="o">::</span><span class="n">on_button_quit</span><span class="p">));</span>
  <span class="p">}</span>
<span class="p">}</span>

<span class="n">DerivedWindow</span><span class="o">::~</span><span class="n">DerivedWindow</span><span class="p">()</span> <span class="p">{}</span>

<span class="kt">void</span> <span class="n">DerivedWindow</span><span class="o">::</span><span class="n">on_button_quit</span><span class="p">()</span> <span class="p">{</span>
  <span class="c1">// set_visible(false) will cause Gtk::Application::run() to end.</span>
  <span class="n">set_visible</span><span class="p">(</span><span class="nb">false</span><span class="p">);</span>
<span class="p">}</span>
</pre></td></tr></tbody></table></code></pre></figure>

<p>The implementation is pretty straightforward, we wrap the created gobject
and we keep a reference to the Gtk.Builder we receive. Then we use the builder
instance to obtain our derived button. If all goes well we connect the <code class="language-plaintext highlighter-rouge">clicked</code>
signal so it hides the dialog. We will use this later to quit the application.</p>

<h2>Main application</h2>

<p>The only last piece remaining is the entry point to our application.</p>

<figure class="highlight"><figcaption>main.cc</figcaption><pre class="with_line_numbers"><code class="language-cpp" data-lang="cpp"><table class="rouge-table"><tbody><tr><td class="gutter gl"><pre class="lineno">1
2
3
4
5
6
7
8
9
10
11
12
13
14
15
16
17
18
19
20
21
22
23
24
25
26
27
28
29
30
31
32
33
34
35
36
37
38
39
40
41
42
43
44
45
46
47
48
49
50
51
52
53
54
</pre></td><td class="code"><pre><span class="cp">#include</span> <span class="cpf">"derivedwindow.h"</span><span class="cp">
#include</span> <span class="cpf">&lt;cstring&gt;</span><span class="cp">
#include</span> <span class="cpf">&lt;iostream&gt;</span><span class="cp">
</span>
<span class="k">namespace</span> <span class="p">{</span>

<span class="n">DerivedWindow</span> <span class="o">*</span><span class="n">pWindow</span> <span class="o">=</span> <span class="nb">nullptr</span><span class="p">;</span>
<span class="n">Glib</span><span class="o">::</span><span class="n">RefPtr</span><span class="o">&lt;</span><span class="n">Gtk</span><span class="o">::</span><span class="n">Application</span><span class="o">&gt;</span> <span class="n">app</span><span class="p">;</span>

<span class="kt">void</span> <span class="n">on_app_activate</span><span class="p">()</span> <span class="p">{</span>
  <span class="c1">// Create a dummy instance before the call to refBuilder-&gt;add_from_file().</span>
  <span class="c1">// This creation registers DerivedButton's class in the GObject type system.</span>
  <span class="c1">// This is necessary because DerivedButton contains user-defined properties</span>
  <span class="c1">// (Glib::Property) and is created by Gtk::Builder.</span>
  <span class="k">static_cast</span><span class="o">&lt;</span><span class="kt">void</span><span class="o">&gt;</span><span class="p">(</span><span class="n">DerivedButton</span><span class="p">());</span>

  <span class="c1">// Load the GtkBuilder file and instantiate its widgets:</span>
  <span class="k">auto</span> <span class="n">refBuilder</span> <span class="o">=</span> <span class="n">Gtk</span><span class="o">::</span><span class="n">Builder</span><span class="o">::</span><span class="n">create</span><span class="p">();</span>
  <span class="k">try</span> <span class="p">{</span>
    <span class="n">refBuilder</span><span class="o">-&gt;</span><span class="n">add_from_file</span><span class="p">(</span><span class="s">"derived.ui"</span><span class="p">);</span>
  <span class="p">}</span> <span class="k">catch</span> <span class="p">(...)</span> <span class="p">{</span>
    <span class="n">std</span><span class="o">::</span><span class="n">cerr</span> <span class="o">&lt;&lt;</span> <span class="s">"Error while loading .ui file</span><span class="se">\n</span><span class="s">"</span><span class="p">;</span>
    <span class="k">return</span><span class="p">;</span>
  <span class="p">}</span>

  <span class="c1">// Get the GtkBuilder-instantiated dialog:</span>
  <span class="n">pWindow</span> <span class="o">=</span> <span class="n">Gtk</span><span class="o">::</span><span class="n">Builder</span><span class="o">::</span><span class="n">get_widget_derived</span><span class="o">&lt;</span><span class="n">DerivedWindow</span><span class="o">&gt;</span><span class="p">(</span><span class="n">refBuilder</span><span class="p">,</span>
      <span class="s">"WindowDerived"</span><span class="p">);</span>

  <span class="k">if</span> <span class="p">(</span><span class="o">!</span><span class="n">pWindow</span><span class="p">)</span> <span class="p">{</span>
    <span class="n">std</span><span class="o">::</span><span class="n">cerr</span> <span class="o">&lt;&lt;</span> <span class="s">"Could not get the dialog"</span> <span class="o">&lt;&lt;</span> <span class="n">std</span><span class="o">::</span><span class="n">endl</span><span class="p">;</span>
    <span class="k">return</span><span class="p">;</span>
  <span class="p">}</span>

  <span class="c1">// It's not possible to delete widgets after app-&gt;run() has returned.</span>
  <span class="c1">// Delete the dialog with its child widgets before app-&gt;run() returns.</span>
  <span class="n">pWindow</span><span class="o">-&gt;</span><span class="n">signal_hide</span><span class="p">().</span><span class="n">connect</span><span class="p">([]()</span> <span class="p">{</span> <span class="k">delete</span> <span class="n">pWindow</span><span class="p">;</span> <span class="p">});</span>

  <span class="n">app</span><span class="o">-&gt;</span><span class="n">add_window</span><span class="p">(</span><span class="o">*</span><span class="n">pWindow</span><span class="p">);</span>
  <span class="n">pWindow</span><span class="o">-&gt;</span><span class="n">set_visible</span><span class="p">(</span><span class="nb">true</span><span class="p">);</span>
<span class="p">}</span>
<span class="p">}</span> <span class="c1">// anonymous namespace</span>

<span class="kt">int</span> <span class="n">main</span><span class="p">(</span><span class="kt">int</span> <span class="n">argc</span><span class="p">,</span> <span class="kt">char</span> <span class="o">**</span><span class="n">argv</span><span class="p">)</span> <span class="p">{</span>
  <span class="n">app</span> <span class="o">=</span> <span class="n">Gtk</span><span class="o">::</span><span class="n">Application</span><span class="o">::</span><span class="n">create</span><span class="p">(</span><span class="s">"org.gtkmm.example"</span><span class="p">);</span>

  <span class="c1">// Instantiate a dialog when the application has been activated.</span>
  <span class="c1">// This can only be done after the application has been registered.</span>
  <span class="c1">// It's possible to call app-&gt;register_application() explicitly, but</span>
  <span class="c1">// usually it's easier to let app-&gt;run() do it for you.</span>
  <span class="n">app</span><span class="o">-&gt;</span><span class="n">signal_activate</span><span class="p">().</span><span class="n">connect</span><span class="p">([]()</span> <span class="p">{</span> <span class="n">on_app_activate</span><span class="p">();</span> <span class="p">});</span>

  <span class="k">return</span> <span class="n">app</span><span class="o">-&gt;</span><span class="n">run</span><span class="p">(</span><span class="n">argc</span><span class="p">,</span> <span class="n">argv</span><span class="p">);</span>
<span class="p">}</span>
</pre></td></tr></tbody></table></code></pre></figure>

<p>Our program will start its execution at line 45. We create a <code class="language-plaintext highlighter-rouge">Gtk::Application</code>
with a proper <code class="language-plaintext highlighter-rouge">app-id</code> and then we connect the <code class="language-plaintext highlighter-rouge">activate</code> signal in line 51. Then
we run the application in line 53.</p>

<p>The activation signal is connected to the function <code class="language-plaintext highlighter-rouge">on_app_activate</code> at line 10.
One first thing it does is to ensure that our custom GObject class type is
registered. This class will be called <code class="language-plaintext highlighter-rouge">gtkmm__CustomObject_MyButton</code> inside the
GObject type system, and this is the name we used above in our XML file. As I
mentioned above, because glibmm combines class registration and object
instantiation in a single process, we need to create a dummy object (that will
be immediately destroyed) before Gtk.Builder instantiates an object of class
<code class="language-plaintext highlighter-rouge">gtkmm__CustomObject_MyButton</code>. If you remove line 15, line 20 will fail
because it will not be able to instantiate our custom GObject class.</p>

<p>The rest is more or less straightforward: we get the window instance from the
<code class="language-plaintext highlighter-rouge">.ui</code> file and we connect the <code class="language-plaintext highlighter-rouge">hide</code> signal so we destroy the window upon
returning. Recall that in the constructor of <code class="language-plaintext highlighter-rouge">DerivedWindow</code> we made our
button to hide the window, so it quits the application. We finally make
the window visible.</p>

<h2>Discussion</h2>

<p>This is the suggested approach in glibmm. I think its bigger advantage is that
it does not require a lot of additional machinery. However, due to the way
glibmm works internally, we need to remember to create a fake instance that
registers our class type in GObject. This requires a dummy default constructor
(which might be a problem when extending a class that does not have one) in
addition to the usual wrapping constructor used by Gtk::Builder. All the
constructors we want to have will have to be synchronised (though C++ can
mitigate this thanks to forwarding constructors and non-static data member
initialisers).</p>

<p>Let’s see if we can do something a bit more predictable. While the approach
used by glibmm is reasonable, registering a class type as a side effect of
creating an instance for me breaks the principle of least surprise.  In fact,
the ability of glibmm to hide the concept of the GObject class is so successful
that unless one starts reading glibmm’s code, it may be difficult to understand
how all the pieces fit. Leaving a user of the library with that “magic” feeling
that suddenly turns to unease when we cannot really explain how it all works.</p>

<h1>Manual approach</h1>

<p>Let’s follow a more manual approach, inspired by what <code class="language-plaintext highlighter-rouge">gmmproc</code> does. <code class="language-plaintext highlighter-rouge">gmmproc</code>
is the wrapping machinery that can be used to wrap GObject-based libraries. I will
do this with the <code class="language-plaintext highlighter-rouge">DerivedButton</code> class (though a similar approach can be used
with <code class="language-plaintext highlighter-rouge">DerivedWindow</code> if wanted).</p>

<p>One big downside of this approach is that we need some amount of boilerplate
(which <code class="language-plaintext highlighter-rouge">gmmproc</code> does for this when wrapping existing GObject-based libraries).</p>

<h2>Custom class helper</h2>

<p>We will have to define the GObject class class and the GObject instance class.
To define the class we will use a custom class that we will use to sidestep
some of the glibmm defaults.</p>

<figure class="highlight"><figcaption>customclass.h</figcaption><pre class="with_line_numbers"><code class="language-cpp" data-lang="cpp"><table class="rouge-table"><tbody><tr><td class="gutter gl"><pre class="lineno">1
2
3
4
5
6
7
8
9
10
11
12
13
14
15
16
17
18
19
20
21
22
23
</pre></td><td class="code"><pre><span class="cp">#ifndef GLIBMM_CUSTOMCLASS_H
#define GLIBMM_CUSTOMCLASS_H
</span>
<span class="cp">#include</span> <span class="cpf">&lt;glibmm/class.h&gt;</span><span class="cp">
</span>
<span class="k">namespace</span> <span class="n">Glib</span> <span class="p">{</span>
<span class="k">class</span> <span class="nc">CustomClass</span> <span class="o">:</span> <span class="k">public</span> <span class="n">Class</span> <span class="p">{</span>
<span class="nl">public:</span>
  <span class="c1">// Inherit constructors;</span>
  <span class="k">using</span> <span class="n">Class</span><span class="o">::</span><span class="n">Class</span><span class="p">;</span>

  <span class="c1">// Reintroduce existing overloads.</span>
  <span class="k">using</span> <span class="n">Class</span><span class="o">::</span><span class="n">register_derived_type</span><span class="p">;</span>
  <span class="c1">// Our new overload.</span>
  <span class="kt">void</span> <span class="n">register_derived_type</span><span class="p">(</span><span class="n">GType</span> <span class="n">base_type</span><span class="p">,</span>
                             <span class="n">GInstanceInitFunc</span> <span class="n">instance_init</span> <span class="o">=</span> <span class="nb">nullptr</span><span class="p">,</span>
                             <span class="k">const</span> <span class="kt">char</span> <span class="o">*</span><span class="n">type_name</span> <span class="o">=</span> <span class="nb">nullptr</span><span class="p">,</span>
                             <span class="n">GTypeModule</span> <span class="o">*</span><span class="n">module</span> <span class="o">=</span> <span class="nb">nullptr</span><span class="p">);</span>
<span class="p">};</span>

<span class="p">}</span> <span class="c1">// namespace Glib</span>

<span class="cp">#endif // GLIBMM_CUSTOMCLASS_H</span>
</pre></td></tr></tbody></table></code></pre></figure>

<p>The implementation class is a bit longer but basically repeats what
<code class="language-plaintext highlighter-rouge">Glib::Class</code> does but allowing us to specify a name.</p>

<figure class="highlight"><figcaption>customclass.cc</figcaption><pre class="with_line_numbers"><code class="language-cpp" data-lang="cpp"><table class="rouge-table"><tbody><tr><td class="gutter gl"><pre class="lineno">1
2
3
4
5
6
7
8
9
10
11
12
13
14
15
16
17
18
19
20
21
22
23
24
25
26
27
28
29
30
31
32
33
34
35
36
37
38
39
40
41
42
43
44
45
46
47
48
49
50
51
52
53
54
55
56
57
58
59
60
61
62
63
64
65
66
67
68
69
70
71
72
73
74
</pre></td><td class="code"><pre><span class="cp">#include</span> <span class="cpf">"customclass.h"</span><span class="cp">
</span>
<span class="k">namespace</span> <span class="n">Glib</span> <span class="p">{</span>

<span class="kt">void</span> <span class="n">CustomClass</span><span class="o">::</span><span class="n">register_derived_type</span><span class="p">(</span><span class="n">GType</span> <span class="n">base_type</span><span class="p">,</span>
                                        <span class="n">GInstanceInitFunc</span> <span class="n">instance_init</span><span class="p">,</span>
                                        <span class="k">const</span> <span class="kt">char</span> <span class="o">*</span><span class="n">type_name</span><span class="p">,</span>
                                        <span class="n">GTypeModule</span> <span class="o">*</span><span class="n">module</span><span class="p">)</span> <span class="p">{</span>
  <span class="k">if</span> <span class="p">(</span><span class="n">gtype_</span><span class="p">)</span>
    <span class="k">return</span><span class="p">;</span> <span class="c1">// already initialized</span>

  <span class="c1">// 0 is not a valid GType.</span>
  <span class="c1">// It would lead to a crash later.</span>
  <span class="c1">// We allow this, failing silently, to make life easier for gstreamermm.</span>
  <span class="k">if</span> <span class="p">(</span><span class="n">base_type</span> <span class="o">==</span> <span class="mi">0</span><span class="p">)</span>
    <span class="k">return</span><span class="p">;</span> <span class="c1">// already initialized</span>

<span class="cp">#if GLIB_CHECK_VERSION(2, 70, 0)
</span>  <span class="c1">// Don't derive a type if the base type is a final type.</span>
  <span class="k">if</span> <span class="p">(</span><span class="n">G_TYPE_IS_FINAL</span><span class="p">(</span><span class="n">base_type</span><span class="p">))</span> <span class="p">{</span>
    <span class="n">gtype_</span> <span class="o">=</span> <span class="n">base_type</span><span class="p">;</span>
    <span class="k">return</span><span class="p">;</span>
  <span class="p">}</span>
<span class="cp">#endif
</span>
  <span class="n">GTypeQuery</span> <span class="n">base_query</span> <span class="o">=</span> <span class="p">{</span>
      <span class="mi">0</span><span class="p">,</span>
      <span class="nb">nullptr</span><span class="p">,</span>
      <span class="mi">0</span><span class="p">,</span>
      <span class="mi">0</span><span class="p">,</span>
  <span class="p">};</span>
  <span class="n">g_type_query</span><span class="p">(</span><span class="n">base_type</span><span class="p">,</span> <span class="o">&amp;</span><span class="n">base_query</span><span class="p">);</span>

  <span class="c1">// GTypeQuery::class_size is guint but GTypeInfo::class_size is guint16.</span>
  <span class="k">const</span> <span class="n">guint16</span> <span class="n">class_size</span> <span class="o">=</span> <span class="p">(</span><span class="n">guint16</span><span class="p">)</span><span class="n">base_query</span><span class="p">.</span><span class="n">class_size</span><span class="p">;</span>

  <span class="c1">// GTypeQuery::instance_size is guint but GTypeInfo::instance_size is</span>
  <span class="c1">// guint16.</span>
  <span class="k">const</span> <span class="n">guint16</span> <span class="n">instance_size</span> <span class="o">=</span> <span class="p">(</span><span class="n">guint16</span><span class="p">)</span><span class="n">base_query</span><span class="p">.</span><span class="n">instance_size</span><span class="p">;</span>

  <span class="k">const</span> <span class="n">GTypeInfo</span> <span class="n">derived_info</span> <span class="o">=</span> <span class="p">{</span>
      <span class="n">class_size</span><span class="p">,</span>
      <span class="nb">nullptr</span><span class="p">,</span>          <span class="c1">// base_init</span>
      <span class="nb">nullptr</span><span class="p">,</span>          <span class="c1">// base_finalize</span>
      <span class="n">class_init_func_</span><span class="p">,</span> <span class="c1">// Set by the caller ( *_Class::init() ).</span>
      <span class="nb">nullptr</span><span class="p">,</span>          <span class="c1">// class_finalize</span>
      <span class="nb">nullptr</span><span class="p">,</span>          <span class="c1">// class_data</span>
      <span class="n">instance_size</span><span class="p">,</span>
      <span class="mi">0</span><span class="p">,</span> <span class="c1">// n_preallocs</span>
      <span class="n">instance_init</span><span class="p">,</span>
      <span class="nb">nullptr</span><span class="p">,</span> <span class="c1">// value_table</span>
  <span class="p">};</span>

  <span class="k">if</span> <span class="p">(</span><span class="o">!</span><span class="p">(</span><span class="n">base_query</span><span class="p">.</span><span class="n">type_name</span><span class="p">))</span> <span class="p">{</span>
    <span class="n">g_critical</span><span class="p">(</span><span class="s">"Class::register_derived_type(): base_query.type_name is NULL."</span><span class="p">);</span>
    <span class="k">return</span><span class="p">;</span>
  <span class="p">}</span>

  <span class="n">gchar</span> <span class="o">*</span><span class="n">derived_name</span> <span class="o">=</span>
      <span class="p">(</span><span class="n">type_name</span> <span class="o">&amp;&amp;</span> <span class="o">*</span><span class="n">type_name</span> <span class="o">!=</span> <span class="sc">'\0'</span><span class="p">)</span>
          <span class="o">?</span> <span class="n">g_strdup</span><span class="p">(</span><span class="n">type_name</span><span class="p">)</span>
          <span class="o">:</span> <span class="n">g_strconcat</span><span class="p">(</span><span class="s">"gtkmm__"</span><span class="p">,</span> <span class="n">base_query</span><span class="p">.</span><span class="n">type_name</span><span class="p">,</span> <span class="nb">nullptr</span><span class="p">);</span>

  <span class="k">if</span> <span class="p">(</span><span class="n">module</span><span class="p">)</span>
    <span class="n">gtype_</span> <span class="o">=</span> <span class="n">g_type_module_register_type</span><span class="p">(</span><span class="n">module</span><span class="p">,</span> <span class="n">base_type</span><span class="p">,</span> <span class="n">derived_name</span><span class="p">,</span>
                                         <span class="o">&amp;</span><span class="n">derived_info</span><span class="p">,</span> <span class="n">GTypeFlags</span><span class="p">(</span><span class="mi">0</span><span class="p">));</span>
  <span class="k">else</span>
    <span class="n">gtype_</span> <span class="o">=</span> <span class="n">g_type_register_static</span><span class="p">(</span><span class="n">base_type</span><span class="p">,</span> <span class="n">derived_name</span><span class="p">,</span> <span class="o">&amp;</span><span class="n">derived_info</span><span class="p">,</span>
                                    <span class="n">GTypeFlags</span><span class="p">(</span><span class="mi">0</span><span class="p">));</span>

  <span class="n">g_free</span><span class="p">(</span><span class="n">derived_name</span><span class="p">);</span>
<span class="p">}</span>

<span class="p">}</span> <span class="c1">// namespace Glib</span>
</pre></td></tr></tbody></table></code></pre></figure>

<h2>Header</h2>

<p>With this first piece of boilerplate done, we can focus on manually deriving
our button.</p>

<figure class="highlight"><figcaption>derivedbutton.h</figcaption><pre class="with_line_numbers"><code class="language-cpp" data-lang="cpp"><table class="rouge-table"><tbody><tr><td class="gutter gl"><pre class="lineno">1
2
3
4
5
6
7
8
9
10
11
</pre></td><td class="code"><pre><span class="cp">#ifndef GTKMM_EXAMPLE_DERIVED_BUTTON_H
#define GTKMM_EXAMPLE_DERIVED_BUTTON_H
</span>
<span class="cp">#include</span> <span class="cpf">"customclass.h"</span><span class="cp">
#include</span> <span class="cpf">&lt;gtkmm.h&gt;</span><span class="cp">
</span>
<span class="k">extern</span> <span class="s">"C"</span> <span class="p">{</span>
<span class="c1">// C types</span>
<span class="k">struct</span> <span class="nc">ExampleDerivedButton</span><span class="p">;</span>
<span class="k">struct</span> <span class="nc">ExampleDerivedButton_Class</span><span class="p">;</span>
<span class="p">}</span>
</pre></td></tr></tbody></table></code></pre></figure>

<p>We will first define two opaque types as if they were the original C types for
our GObject. We will use those later.</p>

<p>We will first make a forward declaration to the C++ class that represents
the GObject class and then we can define the C++ class that represents
the GObject instances.</p>

<figure class="highlight"><figcaption>derivedbutton.h</figcaption><pre class="with_line_numbers"><code class="language-cpp" data-lang="cpp"><table class="rouge-table"><tbody><tr><td class="gutter gl"><pre class="lineno">28
29
30
31
32
33
34
35
36
37
38
39
40
41
42
43
44
45
46
47
48
49
50
51
52
53
54
55
56
57
58
59
60
61
62
63
64
65
66
67
68
69
</pre></td><td class="code"><pre><span class="k">class</span> <span class="nc">DerivedButton_Class</span><span class="p">;</span>

<span class="k">class</span> <span class="nc">DerivedButton</span> <span class="o">:</span> <span class="k">public</span> <span class="n">Gtk</span><span class="o">::</span><span class="n">Button</span> <span class="p">{</span>
<span class="nl">public:</span>
  <span class="n">DerivedButton</span><span class="p">(</span><span class="n">ExampleDerivedButton</span> <span class="o">*</span><span class="n">object</span><span class="p">);</span>
  <span class="n">DerivedButton</span><span class="p">(</span><span class="n">BaseObjectType</span> <span class="o">*</span><span class="n">cobject</span><span class="p">,</span> <span class="k">const</span> <span class="n">Glib</span><span class="o">::</span><span class="n">RefPtr</span><span class="o">&lt;</span><span class="n">Gtk</span><span class="o">::</span><span class="n">Builder</span><span class="o">&gt;</span> <span class="o">&amp;</span><span class="p">);</span>
  <span class="k">virtual</span> <span class="o">~</span><span class="n">DerivedButton</span><span class="p">();</span>

  <span class="k">static</span> <span class="n">GType</span> <span class="n">get_type</span><span class="p">();</span>
  <span class="k">static</span> <span class="n">GType</span> <span class="n">get_base_type</span><span class="p">();</span>

  <span class="n">ExampleDerivedButton</span> <span class="o">*</span><span class="n">gobj</span><span class="p">()</span> <span class="k">const</span> <span class="p">{</span>
    <span class="k">return</span> <span class="k">reinterpret_cast</span><span class="o">&lt;</span><span class="n">ExampleDerivedButton</span> <span class="o">*&gt;</span><span class="p">(</span><span class="n">gobject_</span><span class="p">);</span>
  <span class="p">}</span>

  <span class="n">Glib</span><span class="o">::</span><span class="n">PropertyProxy</span><span class="o">&lt;</span><span class="n">Glib</span><span class="o">::</span><span class="n">ustring</span><span class="o">&gt;</span> <span class="n">property_ustring</span><span class="p">()</span> <span class="p">{</span>
    <span class="k">return</span> <span class="n">Glib</span><span class="o">::</span><span class="n">PropertyProxy</span><span class="o">&lt;</span><span class="n">Glib</span><span class="o">::</span><span class="n">ustring</span><span class="o">&gt;</span><span class="p">(</span><span class="k">this</span><span class="p">,</span> <span class="s">"button-ustring"</span><span class="p">);</span>
  <span class="p">}</span>
  <span class="n">Glib</span><span class="o">::</span><span class="n">PropertyProxy</span><span class="o">&lt;</span><span class="kt">int</span><span class="o">&gt;</span> <span class="n">property_int</span><span class="p">()</span> <span class="p">{</span>
    <span class="k">return</span> <span class="n">Glib</span><span class="o">::</span><span class="n">PropertyProxy</span><span class="o">&lt;</span><span class="kt">int</span><span class="o">&gt;</span><span class="p">(</span><span class="k">this</span><span class="p">,</span> <span class="s">"button-int"</span><span class="p">);</span>
  <span class="p">}</span>

  <span class="k">static</span> <span class="n">DerivedButton</span> <span class="o">*</span><span class="n">wrap</span><span class="p">(</span><span class="n">GObject</span> <span class="o">*</span><span class="n">object</span><span class="p">,</span> <span class="kt">bool</span> <span class="n">take_copy</span> <span class="o">=</span> <span class="nb">false</span><span class="p">);</span>

<span class="nl">private:</span>
  <span class="k">friend</span> <span class="n">DerivedButton_Class</span><span class="p">;</span>
  <span class="k">static</span> <span class="n">DerivedButton_Class</span> <span class="n">derived_button_class</span><span class="p">;</span>

  <span class="k">static</span> <span class="kt">void</span> <span class="n">instance_init_function</span><span class="p">(</span><span class="n">GTypeInstance</span> <span class="o">*</span><span class="n">instance</span><span class="p">,</span> <span class="kt">void</span> <span class="o">*</span><span class="n">g_class</span><span class="p">);</span>

  <span class="kt">void</span> <span class="n">on_ustring_changed</span><span class="p">();</span>
  <span class="kt">void</span> <span class="n">on_int_changed</span><span class="p">();</span>

  <span class="k">static</span> <span class="kt">void</span> <span class="n">set_property</span><span class="p">(</span><span class="n">GObject</span> <span class="o">*</span><span class="n">object</span><span class="p">,</span> <span class="n">guint</span> <span class="n">property_id</span><span class="p">,</span>
                           <span class="k">const</span> <span class="n">GValue</span> <span class="o">*</span><span class="n">value</span><span class="p">,</span> <span class="n">GParamSpec</span> <span class="o">*</span><span class="n">pspec</span><span class="p">);</span>
  <span class="k">static</span> <span class="kt">void</span> <span class="n">get_property</span><span class="p">(</span><span class="n">GObject</span> <span class="o">*</span><span class="n">object</span><span class="p">,</span> <span class="n">guint</span> <span class="n">property_id</span><span class="p">,</span> <span class="n">GValue</span> <span class="o">*</span><span class="n">value</span><span class="p">,</span>
                           <span class="n">GParamSpec</span> <span class="o">*</span><span class="n">pspec</span><span class="p">);</span>

  <span class="n">Glib</span><span class="o">::</span><span class="n">ustring</span> <span class="n">button_ustring</span><span class="p">;</span>

  <span class="kt">int</span> <span class="n">button_int</span><span class="p">;</span>
<span class="p">};</span>
</pre></td></tr></tbody></table></code></pre></figure>

<p>Now the class.</p>

<figure class="highlight"><figcaption>derivedbutton.h</figcaption><pre class="with_line_numbers"><code class="language-cpp" data-lang="cpp"><table class="rouge-table"><tbody><tr><td class="gutter gl"><pre class="lineno">71
72
73
74
75
76
77
78
79
80
81
</pre></td><td class="code"><pre><span class="k">class</span> <span class="nc">DerivedButton_Class</span> <span class="o">:</span> <span class="k">public</span> <span class="n">Glib</span><span class="o">::</span><span class="n">CustomClass</span> <span class="p">{</span>
<span class="nl">private:</span>
<span class="nl">public:</span>
  <span class="k">friend</span> <span class="k">class</span> <span class="nc">DerivedButton</span><span class="p">;</span>
  <span class="k">const</span> <span class="n">Glib</span><span class="o">::</span><span class="n">Class</span> <span class="o">&amp;</span><span class="n">init</span><span class="p">();</span>
  <span class="k">static</span> <span class="kt">void</span> <span class="n">class_init_function</span><span class="p">(</span><span class="kt">void</span> <span class="o">*</span><span class="n">g_class</span><span class="p">,</span> <span class="kt">void</span> <span class="o">*</span><span class="n">class_data</span><span class="p">);</span>

  <span class="k">static</span> <span class="n">Glib</span><span class="o">::</span><span class="n">ObjectBase</span> <span class="o">*</span><span class="n">wrap_new</span><span class="p">(</span><span class="n">GObject</span> <span class="o">*</span><span class="n">object</span><span class="p">);</span>
<span class="p">};</span>

<span class="cp">#endif // GTKMM_EXAMPLE_DERIVED_BUTTON_H</span>
</pre></td></tr></tbody></table></code></pre></figure>

<h2><code class="language-plaintext highlighter-rouge">DerivedButton_Class</code> implementation</h2>

<p>There is a lot to unpack in the header above. I think, however that it is
easier to start from the class <code class="language-plaintext highlighter-rouge">DerivedButton_Class</code>. First note the static
data member <code class="language-plaintext highlighter-rouge">derived_button_class</code> in line 54 of <code class="language-plaintext highlighter-rouge">DerivedButton</code> class. This
will represent the GObject class and it will be used by <code class="language-plaintext highlighter-rouge">DerivedButton</code> to
register the type. This happens because we will obtain a reference of a
<code class="language-plaintext highlighter-rouge">Glib::Class</code> via the <code class="language-plaintext highlighter-rouge">DerivedButton_Class::init</code>.</p>

<figure class="highlight"><figcaption>derivedbutton.cc</figcaption><pre class="with_line_numbers"><code class="language-cpp" data-lang="cpp"><table class="rouge-table"><tbody><tr><td class="gutter gl"><pre class="lineno">135
136
137
138
139
140
141
142
143
144
</pre></td><td class="code"><pre><span class="k">const</span> <span class="n">Glib</span><span class="o">::</span><span class="n">Class</span> <span class="o">&amp;</span><span class="n">DerivedButton_Class</span><span class="o">::</span><span class="n">init</span><span class="p">()</span> <span class="p">{</span>
  <span class="k">if</span> <span class="p">(</span><span class="o">!</span><span class="n">gtype_</span><span class="p">)</span> <span class="p">{</span>
    <span class="n">class_init_func_</span> <span class="o">=</span> <span class="n">DerivedButton_Class</span><span class="o">::</span><span class="n">class_init_function</span><span class="p">;</span>
    <span class="n">register_derived_type</span><span class="p">(</span><span class="n">DerivedButton</span><span class="o">::</span><span class="n">get_base_type</span><span class="p">(),</span>
                          <span class="n">DerivedButton</span><span class="o">::</span><span class="n">instance_init_function</span><span class="p">,</span> <span class="s">"MyButton"</span><span class="p">);</span>
    <span class="n">Glib</span><span class="o">::</span><span class="n">init</span><span class="p">();</span>
    <span class="n">Glib</span><span class="o">::</span><span class="n">wrap_register</span><span class="p">(</span><span class="n">gtype_</span><span class="p">,</span> <span class="o">&amp;</span><span class="n">wrap_new</span><span class="p">);</span>
  <span class="p">}</span>
  <span class="k">return</span> <span class="o">*</span><span class="k">this</span><span class="p">;</span>
<span class="p">}</span>
</pre></td></tr></tbody></table></code></pre></figure>

<p><code class="language-plaintext highlighter-rouge">gtype_</code> is a data-member inherited from <code class="language-plaintext highlighter-rouge">Glib::Class</code>. If zero it means the
class needs registration, so we do this. We set
<code class="language-plaintext highlighter-rouge">DerivedButton_Class::class_init_function</code> as the class initialisation function
(field <code class="language-plaintext highlighter-rouge">class_init_func_</code> is also inherited and used in our
<code class="language-plaintext highlighter-rouge">CustomClass::register_derived_type</code> defined earlier). For simplicity of the
implementation, though this could be done better we invoke <code class="language-plaintext highlighter-rouge">Glib::init</code> that will
initialise all the internal machinery from <code class="language-plaintext highlighter-rouge">glibmm</code> and then we link this
new type with <code class="language-plaintext highlighter-rouge">DerivedButton_Class::wrap_new</code>. Recall that glibmm wraps
GObjects with a C++ object so it needs to link both, here we link this type
with the creation function. The creation function looks like this</p>

<figure class="highlight"><figcaption>derivedbutton.cc</figcaption><pre class="with_line_numbers"><code class="language-cpp" data-lang="cpp"><table class="rouge-table"><tbody><tr><td class="gutter gl"><pre class="lineno">146
147
148
</pre></td><td class="code"><pre><span class="n">Glib</span><span class="o">::</span><span class="n">ObjectBase</span> <span class="o">*</span><span class="n">DerivedButton_Class</span><span class="o">::</span><span class="n">wrap_new</span><span class="p">(</span><span class="n">GObject</span> <span class="o">*</span><span class="n">object</span><span class="p">)</span> <span class="p">{</span>
  <span class="k">return</span> <span class="k">new</span> <span class="n">DerivedButton</span><span class="p">((</span><span class="n">ExampleDerivedButton</span> <span class="o">*</span><span class="p">)</span><span class="n">object</span><span class="p">);</span>
<span class="p">}</span>
</pre></td></tr></tbody></table></code></pre></figure>

<p>Finally when an object of the class is instantiated for the first time
our class initialisation function (<code class="language-plaintext highlighter-rouge">DerivedButton_Class::class_init_function</code>) will
be invoked. It looks like this.</p>

<figure class="highlight"><figcaption>derivedbutton.cc</figcaption><pre class="with_line_numbers"><code class="language-cpp" data-lang="cpp"><table class="rouge-table"><tbody><tr><td class="gutter gl"><pre class="lineno">151
152
153
154
155
156
157
158
159
160
161
162
163
164
165
166
167
168
169
170
171
</pre></td><td class="code"><pre><span class="kt">void</span> <span class="n">DerivedButton_Class</span><span class="o">::</span><span class="n">class_init_function</span><span class="p">(</span><span class="kt">void</span> <span class="o">*</span><span class="n">g_class</span><span class="p">,</span> <span class="kt">void</span> <span class="o">*</span><span class="n">class_data</span><span class="p">)</span> <span class="p">{</span>
  <span class="n">g_print</span><span class="p">(</span><span class="s">"%s</span><span class="se">\n</span><span class="s">"</span><span class="p">,</span> <span class="n">__PRETTY_FUNCTION__</span><span class="p">);</span>
  <span class="k">auto</span> <span class="o">*</span><span class="k">const</span> <span class="n">gobject_class</span> <span class="o">=</span> <span class="k">static_cast</span><span class="o">&lt;</span><span class="n">GObjectClass</span> <span class="o">*&gt;</span><span class="p">(</span><span class="n">g_class</span><span class="p">);</span>

  <span class="n">gobject_class</span><span class="o">-&gt;</span><span class="n">get_property</span> <span class="o">=</span> <span class="n">DerivedButton</span><span class="o">::</span><span class="n">get_property</span><span class="p">;</span>
  <span class="n">gobject_class</span><span class="o">-&gt;</span><span class="n">set_property</span> <span class="o">=</span> <span class="n">DerivedButton</span><span class="o">::</span><span class="n">set_property</span><span class="p">;</span>

  <span class="n">g_object_class_install_property</span><span class="p">(</span>
      <span class="n">gobject_class</span><span class="p">,</span> <span class="n">PROPERTY_INT</span><span class="p">,</span>
      <span class="n">g_param_spec_int</span><span class="p">(</span>
          <span class="s">"button-int"</span><span class="p">,</span> <span class="s">""</span><span class="p">,</span> <span class="s">""</span><span class="p">,</span> <span class="n">G_MININT</span><span class="p">,</span> <span class="n">G_MAXINT</span><span class="p">,</span> <span class="mi">0</span><span class="p">,</span>
          <span class="k">static_cast</span><span class="o">&lt;</span><span class="n">GParamFlags</span><span class="o">&gt;</span><span class="p">(</span><span class="n">G_PARAM_READWRITE</span> <span class="o">|</span> <span class="n">G_PARAM_CONSTRUCT</span><span class="p">)));</span>
  <span class="n">g_object_class_install_property</span><span class="p">(</span>
      <span class="n">gobject_class</span><span class="p">,</span> <span class="n">PROPERTY_STRING</span><span class="p">,</span>
      <span class="n">g_param_spec_string</span><span class="p">(</span>
          <span class="s">"button-ustring"</span><span class="p">,</span> <span class="s">""</span><span class="p">,</span> <span class="s">""</span><span class="p">,</span> <span class="s">""</span><span class="p">,</span>
          <span class="k">static_cast</span><span class="o">&lt;</span><span class="n">GParamFlags</span><span class="o">&gt;</span><span class="p">(</span><span class="n">G_PARAM_READWRITE</span> <span class="o">|</span> <span class="n">G_PARAM_CONSTRUCT</span><span class="p">)));</span>

  <span class="k">const</span> <span class="k">auto</span> <span class="n">cpp_class</span> <span class="o">=</span> <span class="k">static_cast</span><span class="o">&lt;</span><span class="n">Gtk</span><span class="o">::</span><span class="n">Button_Class</span> <span class="o">*&gt;</span><span class="p">(</span><span class="n">g_class</span><span class="p">);</span>
  <span class="n">Gtk</span><span class="o">::</span><span class="n">Button_Class</span><span class="o">::</span><span class="n">class_init_function</span><span class="p">(</span><span class="n">cpp_class</span><span class="p">,</span> <span class="n">class_data</span><span class="p">);</span>
<span class="p">}</span>
</pre></td></tr></tbody></table></code></pre></figure>

<p>We basically install a couple of properties (using the C API, I don’t think we
can do much better here) and then we proceed to initialise the base class, in
our case <code class="language-plaintext highlighter-rouge">Gtk::Button</code>. <code class="language-plaintext highlighter-rouge">PROPERTY_INT</code> and <code class="language-plaintext highlighter-rouge">PROPERTY_STRING</code> are a couple of
enumerators that we use to identify these properties in this class.</p>

<figure class="highlight"><figcaption>derivedbutton.cc</figcaption><pre class="with_line_numbers"><code class="language-cpp" data-lang="cpp"><table class="rouge-table"><tbody><tr><td class="gutter gl"><pre class="lineno">66
67
68
69
70
</pre></td><td class="code"><pre><span class="k">enum</span> <span class="n">PropertyId</span> <span class="p">{</span>
  <span class="n">INVALID_PROPERTY</span><span class="p">,</span>
  <span class="n">PROPERTY_INT</span><span class="p">,</span>
  <span class="n">PROPERTY_STRING</span><span class="p">,</span>
<span class="p">};</span>
</pre></td></tr></tbody></table></code></pre></figure>

<p>This completes our implementation of the class. Note that we mention
a couple of functons in <code class="language-plaintext highlighter-rouge">DerivedButton</code> to access the properties that we
have just installed.</p>

<h2><code class="language-plaintext highlighter-rouge">DerivedButton</code> implementation</h2>

<p>I’m going to list here only the functions that have changes.</p>

<figure class="highlight"><figcaption>derivedbutton.cc</figcaption><pre class="with_line_numbers"><code class="language-cpp" data-lang="cpp"><table class="rouge-table"><tbody><tr><td class="gutter gl"><pre class="lineno">32
33
34
35
36
37
38
39
</pre></td><td class="code"><pre><span class="n">DerivedButton</span><span class="o">::</span><span class="n">DerivedButton</span><span class="p">(</span><span class="n">BaseObjectType</span> <span class="o">*</span><span class="n">cobject</span><span class="p">,</span>
                             <span class="k">const</span> <span class="n">Glib</span><span class="o">::</span><span class="n">RefPtr</span><span class="o">&lt;</span><span class="n">Gtk</span><span class="o">::</span><span class="n">Builder</span><span class="o">&gt;</span> <span class="o">&amp;</span><span class="p">)</span>
    <span class="o">:</span> <span class="n">Gtk</span><span class="o">::</span><span class="n">Button</span><span class="p">(</span><span class="n">cobject</span><span class="p">)</span> <span class="p">{</span>
  <span class="n">property_ustring</span><span class="p">().</span><span class="n">signal_changed</span><span class="p">().</span><span class="n">connect</span><span class="p">(</span>
      <span class="n">sigc</span><span class="o">::</span><span class="n">mem_fun</span><span class="p">(</span><span class="o">*</span><span class="k">this</span><span class="p">,</span> <span class="o">&amp;</span><span class="n">DerivedButton</span><span class="o">::</span><span class="n">on_ustring_changed</span><span class="p">));</span>
  <span class="n">property_int</span><span class="p">().</span><span class="n">signal_changed</span><span class="p">().</span><span class="n">connect</span><span class="p">(</span>
      <span class="n">sigc</span><span class="o">::</span><span class="n">mem_fun</span><span class="p">(</span><span class="o">*</span><span class="k">this</span><span class="p">,</span> <span class="o">&amp;</span><span class="n">DerivedButton</span><span class="o">::</span><span class="n">on_int_changed</span><span class="p">));</span>
<span class="p">}</span>
</pre></td></tr></tbody></table></code></pre></figure>

<p>The constructor that can be invoked by the builder is almost the same,
it does not have to invoke the constructor of <code class="language-plaintext highlighter-rouge">ObjectBase</code> in any special way.</p>

<p>Ideally we would use this constructor, but it turns out that we may build
the wrapping C++ object earlier. So let’s add one constructor for this case.</p>

<figure class="highlight"><figcaption>derivedbutton.cc</figcaption><pre class="with_line_numbers"><code class="language-cpp" data-lang="cpp"><table class="rouge-table"><tbody><tr><td class="gutter gl"><pre class="lineno">41
42
43
44
45
46
47
</pre></td><td class="code"><pre><span class="n">DerivedButton</span><span class="o">::</span><span class="n">DerivedButton</span><span class="p">(</span><span class="n">ExampleDerivedButton</span> <span class="o">*</span><span class="n">obj</span><span class="p">)</span>
    <span class="o">:</span> <span class="n">Gtk</span><span class="o">::</span><span class="n">Button</span><span class="p">((</span><span class="n">GtkButton</span> <span class="o">*</span><span class="p">)</span><span class="n">obj</span><span class="p">)</span> <span class="p">{</span>
  <span class="n">property_ustring</span><span class="p">().</span><span class="n">signal_changed</span><span class="p">().</span><span class="n">connect</span><span class="p">(</span>
      <span class="n">sigc</span><span class="o">::</span><span class="n">mem_fun</span><span class="p">(</span><span class="o">*</span><span class="k">this</span><span class="p">,</span> <span class="o">&amp;</span><span class="n">DerivedButton</span><span class="o">::</span><span class="n">on_ustring_changed</span><span class="p">));</span>
  <span class="n">property_int</span><span class="p">().</span><span class="n">signal_changed</span><span class="p">().</span><span class="n">connect</span><span class="p">(</span>
      <span class="n">sigc</span><span class="o">::</span><span class="n">mem_fun</span><span class="p">(</span><span class="o">*</span><span class="k">this</span><span class="p">,</span> <span class="o">&amp;</span><span class="n">DerivedButton</span><span class="o">::</span><span class="n">on_int_changed</span><span class="p">));</span>
<span class="p">}</span>
</pre></td></tr></tbody></table></code></pre></figure>

<p>Needless to say that, even if I did not do here, we can factor out the body of
the constructor.</p>

<p>One of the functions that GObject requires is an instance initialisation function
but ours does not have to do anything special because we will keep the state
in the C++ object and not in the GObject itself.</p>

<figure class="highlight"><figcaption>derivedbutton.cc</figcaption><pre class="with_line_numbers"><code class="language-cpp" data-lang="cpp"><table class="rouge-table"><tbody><tr><td class="gutter gl"><pre class="lineno">51
52
53
54
</pre></td><td class="code"><pre><span class="kt">void</span> <span class="n">DerivedButton</span><span class="o">::</span><span class="n">instance_init_function</span><span class="p">(</span><span class="n">GTypeInstance</span> <span class="o">*</span><span class="n">instance</span><span class="p">,</span>
                                           <span class="kt">void</span> <span class="o">*</span> <span class="cm">/* g_class */</span><span class="p">)</span> <span class="p">{</span>
  <span class="c1">// Does nothing.</span>
<span class="p">}</span>
</pre></td></tr></tbody></table></code></pre></figure>

<p>There are two functions used when registering the GObject class in
<code class="language-plaintext highlighter-rouge">DerivedButton_Class</code>. Those return <code class="language-plaintext highlighter-rouge">GType</code>s which is the way GObject uses to
identify types (they are just integer handles). We need one for the current class
(<code class="language-plaintext highlighter-rouge">MyButton</code>) and one for the base (<code class="language-plaintext highlighter-rouge">GtkButton</code>).</p>

<figure class="highlight"><figcaption>derivedbutton.cc</figcaption><pre class="with_line_numbers"><code class="language-cpp" data-lang="cpp"><table class="rouge-table"><tbody><tr><td class="gutter gl"><pre class="lineno">56
57
58
59
60
</pre></td><td class="code"><pre><span class="n">GType</span> <span class="n">DerivedButton</span><span class="o">::</span><span class="n">get_type</span><span class="p">()</span> <span class="p">{</span>
  <span class="k">return</span> <span class="n">derived_button_class</span><span class="p">.</span><span class="n">init</span><span class="p">().</span><span class="n">get_type</span><span class="p">();</span>
<span class="p">}</span>

<span class="n">GType</span> <span class="n">DerivedButton</span><span class="o">::</span><span class="n">get_base_type</span><span class="p">()</span> <span class="p">{</span> <span class="k">return</span> <span class="n">GTK_TYPE_BUTTON</span><span class="p">;</span> <span class="p">}</span>
</pre></td></tr></tbody></table></code></pre></figure>

<p>When requesting the curerent type, this will register the type using
the <code class="language-plaintext highlighter-rouge">init</code> member function of <code class="language-plaintext highlighter-rouge">DerivedButton_Class</code>.</p>

<p>Finally we need a function that knows how to wrap a C GObject representing our
class (not the C++ one) into a C++ object, creating one if needed. This is done
using <code class="language-plaintext highlighter-rouge">Glib::wrap_auto</code>. This function will invoke, if there is no C++ wrapper
object for the GObject, the function <code class="language-plaintext highlighter-rouge">DerivedButton_Class::wrap_new</code> shown
earlier and that we registered in glibmm when registering the new GObject class
type.</p>

<figure class="highlight"><figcaption>derivedbutton.cc</figcaption><pre class="with_line_numbers"><code class="language-cpp" data-lang="cpp"><table class="rouge-table"><tbody><tr><td class="gutter gl"><pre class="lineno">62
63
64
</pre></td><td class="code"><pre><span class="n">DerivedButton</span> <span class="o">*</span><span class="n">DerivedButton</span><span class="o">::</span><span class="n">wrap</span><span class="p">(</span><span class="n">GObject</span> <span class="o">*</span><span class="n">object</span><span class="p">,</span> <span class="kt">bool</span> <span class="n">take_copy</span><span class="p">)</span> <span class="p">{</span>
  <span class="k">return</span> <span class="k">dynamic_cast</span><span class="o">&lt;</span><span class="n">DerivedButton</span> <span class="o">*&gt;</span><span class="p">(</span><span class="n">Glib</span><span class="o">::</span><span class="n">wrap_auto</span><span class="p">(</span><span class="n">object</span><span class="p">,</span> <span class="n">take_copy</span><span class="p">));</span>
<span class="p">}</span>
</pre></td></tr></tbody></table></code></pre></figure>

<p>I mentioned earlier that we need a couple of functions to access the properties.
We still need to implement them. Those functions are basically C interfaces
but we can still use most of the time the glibmm wrappers.</p>

<figure class="highlight"><figcaption>derivedbutton.cc</figcaption><pre class="with_line_numbers"><code class="language-cpp" data-lang="cpp"><table class="rouge-table"><tbody><tr><td class="gutter gl"><pre class="lineno">72
73
74
75
76
77
78
79
80
81
82
83
84
85
86
87
88
89
90
91
92
93
94
95
96
97
98
99
100
101
102
103
104
105
106
107
108
109
110
111
112
113
114
115
116
117
118
119
120
121
122
123
124
125
126
127
128
129
130
</pre></td><td class="code"><pre><span class="kt">void</span> <span class="n">DerivedButton</span><span class="o">::</span><span class="n">set_property</span><span class="p">(</span><span class="n">GObject</span> <span class="o">*</span><span class="n">object</span><span class="p">,</span> <span class="n">guint</span> <span class="n">property_id</span><span class="p">,</span>
                                 <span class="k">const</span> <span class="n">GValue</span> <span class="o">*</span><span class="n">value</span><span class="p">,</span> <span class="n">GParamSpec</span> <span class="o">*</span><span class="n">pspec</span><span class="p">)</span> <span class="p">{</span>
  <span class="n">DerivedButton</span> <span class="o">*</span><span class="n">this_</span> <span class="o">=</span> <span class="n">DerivedButton</span><span class="o">::</span><span class="n">wrap</span><span class="p">(</span><span class="n">object</span><span class="p">);</span>
  <span class="n">g_assert</span><span class="p">(</span><span class="n">this_</span><span class="p">);</span>

  <span class="k">switch</span> <span class="p">(</span><span class="n">property_id</span><span class="p">)</span> <span class="p">{</span>
  <span class="k">case</span> <span class="n">PROPERTY_INT</span><span class="p">:</span> <span class="p">{</span>
    <span class="n">Glib</span><span class="o">::</span><span class="n">Value</span><span class="o">&lt;</span><span class="kt">int</span><span class="o">&gt;</span> <span class="n">v</span><span class="p">;</span>
    <span class="n">v</span><span class="p">.</span><span class="n">init</span><span class="p">(</span><span class="n">value</span><span class="p">);</span>
    <span class="kt">int</span> <span class="n">new_val</span> <span class="o">=</span> <span class="n">v</span><span class="p">.</span><span class="n">get</span><span class="p">();</span>
    <span class="k">if</span> <span class="p">(</span><span class="n">new_val</span> <span class="o">!=</span> <span class="n">this_</span><span class="o">-&gt;</span><span class="n">button_int</span><span class="p">)</span> <span class="p">{</span>
      <span class="n">this_</span><span class="o">-&gt;</span><span class="n">button_int</span> <span class="o">=</span> <span class="n">new_val</span><span class="p">;</span>
      <span class="n">g_object_notify_by_pspec</span><span class="p">(</span><span class="n">object</span><span class="p">,</span> <span class="n">pspec</span><span class="p">);</span>
    <span class="p">}</span>
    <span class="k">break</span><span class="p">;</span>
  <span class="p">}</span>
  <span class="k">case</span> <span class="n">PROPERTY_STRING</span><span class="p">:</span> <span class="p">{</span>
    <span class="n">Glib</span><span class="o">::</span><span class="n">Value</span><span class="o">&lt;</span><span class="n">Glib</span><span class="o">::</span><span class="n">ustring</span><span class="o">&gt;</span> <span class="n">v</span><span class="p">;</span>
    <span class="n">v</span><span class="p">.</span><span class="n">init</span><span class="p">(</span><span class="n">value</span><span class="p">);</span>
    <span class="n">Glib</span><span class="o">::</span><span class="n">ustring</span> <span class="n">new_val</span> <span class="o">=</span> <span class="n">v</span><span class="p">.</span><span class="n">get</span><span class="p">();</span>
    <span class="k">if</span> <span class="p">(</span><span class="n">new_val</span> <span class="o">!=</span> <span class="n">this_</span><span class="o">-&gt;</span><span class="n">button_ustring</span><span class="p">)</span> <span class="p">{</span>
      <span class="n">this_</span><span class="o">-&gt;</span><span class="n">button_ustring</span> <span class="o">=</span> <span class="n">v</span><span class="p">.</span><span class="n">get</span><span class="p">();</span>
      <span class="n">g_object_notify_by_pspec</span><span class="p">(</span><span class="n">object</span><span class="p">,</span> <span class="n">pspec</span><span class="p">);</span>
    <span class="p">}</span>
    <span class="k">break</span><span class="p">;</span>
  <span class="p">}</span>
  <span class="nl">default:</span> <span class="p">{</span>
    <span class="n">G_OBJECT_WARN_INVALID_PROPERTY_ID</span><span class="p">(</span><span class="n">object</span><span class="p">,</span> <span class="n">property_id</span><span class="p">,</span> <span class="n">pspec</span><span class="p">);</span>
    <span class="k">break</span><span class="p">;</span>
  <span class="p">}</span>
  <span class="p">}</span>
<span class="p">}</span>

<span class="kt">void</span> <span class="n">DerivedButton</span><span class="o">::</span><span class="n">get_property</span><span class="p">(</span><span class="n">GObject</span> <span class="o">*</span><span class="n">object</span><span class="p">,</span> <span class="n">guint</span> <span class="n">property_id</span><span class="p">,</span>
                                 <span class="n">GValue</span> <span class="o">*</span><span class="n">value</span><span class="p">,</span> <span class="n">GParamSpec</span> <span class="o">*</span><span class="n">pspec</span><span class="p">)</span> <span class="p">{</span>
  <span class="n">DerivedButton</span> <span class="o">*</span><span class="n">this_</span> <span class="o">=</span> <span class="n">DerivedButton</span><span class="o">::</span><span class="n">wrap</span><span class="p">(</span><span class="n">object</span><span class="p">);</span>
  <span class="n">g_assert</span><span class="p">(</span><span class="n">this_</span><span class="p">);</span>

  <span class="k">switch</span> <span class="p">(</span><span class="n">property_id</span><span class="p">)</span> <span class="p">{</span>
  <span class="k">case</span> <span class="n">PROPERTY_INT</span><span class="p">:</span> <span class="p">{</span>
    <span class="n">Glib</span><span class="o">::</span><span class="n">Value</span><span class="o">&lt;</span><span class="kt">int</span><span class="o">&gt;</span> <span class="n">v</span><span class="p">;</span>
    <span class="n">v</span><span class="p">.</span><span class="n">init</span><span class="p">(</span><span class="n">v</span><span class="p">.</span><span class="n">value_type</span><span class="p">());</span>
    <span class="n">v</span><span class="p">.</span><span class="n">set</span><span class="p">(</span><span class="n">this_</span><span class="o">-&gt;</span><span class="n">button_int</span><span class="p">);</span>
    <span class="n">g_value_copy</span><span class="p">(</span><span class="n">v</span><span class="p">.</span><span class="n">gobj</span><span class="p">(),</span> <span class="n">value</span><span class="p">);</span>
    <span class="k">break</span><span class="p">;</span>
  <span class="p">}</span>
  <span class="k">case</span> <span class="n">PROPERTY_STRING</span><span class="p">:</span> <span class="p">{</span>
    <span class="n">Glib</span><span class="o">::</span><span class="n">Value</span><span class="o">&lt;</span><span class="n">Glib</span><span class="o">::</span><span class="n">ustring</span><span class="o">&gt;</span> <span class="n">v</span><span class="p">;</span>
    <span class="n">v</span><span class="p">.</span><span class="n">init</span><span class="p">(</span><span class="n">v</span><span class="p">.</span><span class="n">value_type</span><span class="p">());</span>
    <span class="n">v</span><span class="p">.</span><span class="n">set</span><span class="p">(</span><span class="n">this_</span><span class="o">-&gt;</span><span class="n">button_ustring</span><span class="p">);</span>
    <span class="n">g_value_copy</span><span class="p">(</span><span class="n">v</span><span class="p">.</span><span class="n">gobj</span><span class="p">(),</span> <span class="n">value</span><span class="p">);</span>
    <span class="k">break</span><span class="p">;</span>
  <span class="p">}</span>
  <span class="nl">default:</span> <span class="p">{</span>
    <span class="n">G_OBJECT_WARN_INVALID_PROPERTY_ID</span><span class="p">(</span><span class="n">object</span><span class="p">,</span> <span class="n">property_id</span><span class="p">,</span> <span class="n">pspec</span><span class="p">);</span>
    <span class="k">break</span><span class="p">;</span>
  <span class="p">}</span>
  <span class="p">}</span>
<span class="p">}</span>
</pre></td></tr></tbody></table></code></pre></figure>

<p>There is an interesting trivia fact here, is that <code class="language-plaintext highlighter-rouge">Glib::Property&lt;T&gt;</code> as provided
by glibmm installs the properties when creating of the object wrapper while
we have installed them when creating the class.</p>

<p>Another difference, is that glibmm’s generic function to get and set properties
will always notify about changes even if the property is set to the previous
value it held. We show a simple way to implement a more precise mechanism here.</p>

<p>Another interesting fact that happens here, is that the call to
<code class="language-plaintext highlighter-rouge">DerivedButton::wrap</code> happens while initialising the GObject via <code class="language-plaintext highlighter-rouge">Gtk.Builder</code>,
this means that we will invoke the new constructor we added and that the
previous one we had, will not be invoked because when the <code class="language-plaintext highlighter-rouge">DerivedWindow</code> class
tries to obtain the derived button, the wrapper object will exist already, so
the constructor we had will not actually run.</p>

<h2>Registering the type</h2>

<p>Finally we need to make sure the type exists. We do that by registering it at
the beginning of the application, in the same place were before we had to
create a dummy instance instead.</p>

<figure class="highlight"><figcaption>main.cc</figcaption><pre class="with_line_numbers"><code class="language-cpp" data-lang="cpp"><table class="rouge-table"><tbody><tr><td class="gutter gl"><pre class="lineno">28
29
30
31
32
</pre></td><td class="code"><pre><span class="kt">void</span> <span class="nf">on_app_activate</span><span class="p">()</span> <span class="p">{</span>
  <span class="c1">// Make sure the type has been registered.</span>
  <span class="n">g_type_ensure</span><span class="p">(</span><span class="n">DerivedButton</span><span class="o">::</span><span class="n">get_type</span><span class="p">());</span>
  <span class="c1">// ...</span>
<span class="p">}</span>
</pre></td></tr></tbody></table></code></pre></figure>

<h2>Discussion</h2>

<p>When writing the wrapper manually, we need a moderate amount of boilerplate.
In defense of gtkmm, though, the boilerplate is more or less at the level of
what one usually needs when implementing GObjects in C. Also a few things
cannot be done in C++ (because glibmm does not wrap much on the side of the
classes) so we end invoking C interfaces.</p>

<p>One interesting thing we have not addressed are signals, unfortunately signals
require the creation of a function that marshalls correctly the parameters. I
think some C++ template pixie dust can help here, but the function must exist.
Adding new signals is, thus, not trivial.</p>

<p>Finally, one thing that may not be obvious, is that the GObject will always
entail the existence of a C++ wrapper. This is a fundamental aspect of glibmm,
so while we can implement a full-fledged GObject, it will always require its
C++ counterpart around.</p>

<h1>Conclusion</h1>

<p>Given the seamless integration between C and C++, it is relatively
straightforward to fully write a new GObject using C++. The recommended
approach in the gtkmm documentation has the downside it requires a default
constructor (imposing this requirement to the base class) and creating
a dummy object that will cause the registration of the new GObject class.</p>

<p>When written manually, the amount of boilerplace is significant and given that
glibmm does not wrap much the C API for classes itself, we find ourselves forced
to use GObject C interfaces.</p>

<p>All in all, I believe the recommended approach is more reasonable as long as
we understand the nuance with the registration of the derived GObject class.</p>]]></content><author><name>Roger Ferrer Ibáñez</name></author><category term="gtk" /><category term="gobject" /><category term="gnome" /><category term="cpp" /><category term="cplusplus" /><summary type="html"><![CDATA[In the last post I discussed about how glibmm, the wrapper of the GLib library exposes GObjects and we finished about a rationale about why one would want to write full-fledged GObjects in C++. Today we are exploring this venue and observing some of the pain points we are going to face.]]></summary></entry><entry><title type="html">Wrapping GObjects in C++</title><link href="https://thinkingeek.com/2023/01/15/wrapping-gobjects-in-cpp/" rel="alternate" type="text/html" title="Wrapping GObjects in C++" /><published>2023-01-15T06:55:00+00:00</published><updated>2023-01-15T06:55:00+00:00</updated><id>https://thinkingeek.com/2023/01/15/wrapping-gobjects-in-cpp</id><content type="html" xml:base="https://thinkingeek.com/2023/01/15/wrapping-gobjects-in-cpp/"><![CDATA[<p><a href="https://docs.gtk.org/gobject/">GObject</a> is the foundational dynamic type
system implemented on top of the C language that is used by many other
libraries like GLib, GTK and many other components, most of them part of the
<a href="https://www.gnome.org/">GNOME desktop</a> environment stack.</p>

<p><a href="https://github.com/rofirrim/libadwaitamm">I’ve been lately wrapping</a> a <a href="https://gnome.pages.gitlab.gnome.org/libadwaita/doc/1.2/">C
library</a> that uses
GObject for C++ and I learned about some of the challenges.</p>

<!--more-->

<h1>GObject</h1>

<p>Any general programming language can be used under the Object Oriented
Programming (OOP) paradigm, and the difference between them is whether the
language offers built-in support for that or not. So, when we say that Java is
OOP we basically mean that the language has concepts which are meant to support
this paradigm out of the box.</p>

<p>C is not one of those languages.</p>

<p>For reasons lost in the mist of time, related to the origins of the <a href="https://www.gimp.org/about/ancient_history.html">GNU Image
Manipulation Program</a>, the
<a href="https://www.gtk.org/">GTK toolkit</a>, a GUI toolkit, was written in C. And its
foundations are built on top of a library called GLib. GLib provides GObject: a
library based OOP type system built on top of C. GTK and other libraries, part
of the GNOME Desktop software stack, are built on top of GObject.</p>

<p>Now, GObject is powerful (<a href="https://docs.gtk.org/gobject/concepts.html">just read about
it</a> but it also acknowledges the
fact that there are more programming languages than just C, even if C serves as
the common denominator here.</p>

<p>This is also the current reality: C these days can be seen as an interoperable
layer between programming languages. Most foreign-function interfaces (foreign
as in “written in another programming language”) target C as the interoperable
layer. There are technical reasons for that fact, which are out of scope of
this blog.</p>

<p>C++ is not, strictly, a superset of C but it can interoperate with C very, very
easily (the C heritage in C++ enables this and also fuels many pain points
of C++ itself). And C++, even if it has been dubbed as “multi paradigm”, has
reasonable support for OOP.</p>

<p>So it makes sense to provide a C++ interface to GObject.</p>

<h1>Wrapping on top of glibmm</h1>

<p>GLib is the library that contains GObject and there already exists a C++ version
of it called <a href="https://gitlab.gnome.org/GNOME/glibmm">glibmm</a>.</p>

<p>glibmm, along with another component called mm-common, allows systematically
wrapping GObject-based C libraries in a consistent and coherent way. This is
achieved using a tool called <code class="language-plaintext highlighter-rouge">gmmproc</code>. I used this approach for <a href="https://github.com/rofirrim/libadwaitamm">my wrap of
libadwaitamm</a>.</p>

<p>There are some design decisions made by glibmm that permeate and impact
the wrappers.</p>

<h2>Classes and objects</h2>

<p>Because GObject is actually a library and implements an OOP type system, all
the concepts of such system must exist as entities of the program. When working
on a typical OOP language like C++ or Java, the concept of “class” is a concept
provided and supported by the language itself.</p>

<p>This is not the case in GObject. Classes are entities represented in the memory
of the program like regular data.</p>

<p>In fact when reading the <a href="https://docs.gtk.org/gobject/tutorial.html">GObject
tutorial</a> you will identify lots of
steps required to register (or bring up) a class in GObject. GObject programmers
identify that some of those steps are annoying and feel like boilerplate. To
ease the pain they use C macros so the GObject classes can be declared
and defined in a more convenient way.</p>

<div style="display: flow-root; background-color: #efe; padding: 15px; padding-bottom: 0px; margin-bottom: 15px;">
  <p>Toshio Sekiya made this excellent
<a href="https://toshiocp.github.io/Gobject-tutorial">GObject tutorial</a> in C that is worth
checking.</p>
</div>

<p>Once a class has been registered in GObject, we can instantiate it.</p>

<p>glibmm tries to make the use of GObject instances as convenient as regular C++
objects so it combines the class registration in GObject with the instantiation
of a GObject class.</p>

<p>This works most of the time but complicates the process because classes
themselves do not have a “constructor” method in C++ (only instances do). These
“class constructors” are used to register class-level attributes like signals
and properties.</p>

<p>glibmm solves this problem by using a secondary class, which is automatically
generated by the wrapping machinery, that represents the class itself. This
class object is used as a singleton of the application and it is
initialised upon the creation of the first instance of a GObject class. This
initialisation can then invoke a function that can register properties,
signals and interfaces implementations.</p>

<h2>Signals</h2>

<p>Signals in GObject are close to what in other programming languages (like C# or
Java) are called delegates or listeners. It is possible to connect to a signal
so a piece of code, as a callback, is executed when something happens. Signals
can be arbitrarily defined by a GObject class so the GObject instance can emit
those signals as needed.</p>

<p>glibmm was written in a pre-C++11 world and back then it used the
<a href="https://libsigcplusplus.github.io/libsigcplusplus/">libsigc++</a> library to
ensure type-safety in the callbacks (something that C can’t do and it is
sometimes [ab]used by the C libraries). This library is still very useful these
days, but in a post-C++11 world some of the heavy lifting can be delegated to
the C++ standard library itself.</p>

<p>libsigc++ provides two concepts: signals (something that can be emitted) and
slots (something that can be connected to a signal and will be invoked when the
signal is emitted). Because libsigc++ is generic and not tied to glibmm (even
if it is, maybe, one of its biggest users), the glibmm wrapping machinery has
to translate a signal callback (a C callback) into a proper libsigc++ slot.
Luckily, almost all callbacks in GObject are closures that receive a <code class="language-plaintext highlighter-rouge">void*</code>
argument where anything related to the context can be passed to the callback.
This way, when wrapping a GObject implemented in C, the wrapping machinery
connects the existing (GObject’s) signals to a callback (a free function,
typically generated) that unwraps the context pointer into libsigc++’s slots
for that libsigc++ signal.</p>

<h2>Properties</h2>

<p>Many OOP programming languages (like C# or Object Pascal) have the concept of
“properties”. They look like object attributes (fields) but can invoke a
function when reading or writing the attribute.</p>

<p>GObject properties follow this philosophy and introduce a couple of extra
features: properties have a (GObject) signal associated to them that can be
used to signal updates to the property and can be generically read and written
using GObject generic mechanisms. These two features allow properties to be
bound to other properties and build expressive GUIs with reasonable effort.</p>

<p>For instance, if we have a hypothetical list widget with a property
<code class="language-plaintext highlighter-rouge">number-of-elements</code>, we can bind this property to the <code class="language-plaintext highlighter-rouge">sensitive</code> property of
a <a href="https://docs.gtk.org/gtk4/class.Button.html">Gtk.Button</a> intended to clear
that list widget. This way, we can enable or disable the button based on
whether the list widget contains items. More complex scenarios are possible
using <a href="https://docs.gtk.org/gtk4/class.Expression.html">Gtk.Expression</a>.</p>

<p>Properties are implemented in GObject with two callbacks that
are invoked when a property is read or written, respectively.</p>

<h1>The challenge of subclassing</h1>

<p>Now, if our goal was to only wrap existing GObjects, a scenario that all
the machinery of glibmm supports very well, we would be done.</p>

<p>Although the GObject type system allows to introduce <a href="https://docs.gtk.org/gobject/concepts.html#non-instantiatable-non-classed-fundamental-types">new fundamental
types</a>
(which are mostly meant to represent built-in language types such as <code class="language-plaintext highlighter-rouge">int</code> or
<code class="language-plaintext highlighter-rouge">double</code>), most of the new types defined by a library or application are
created by means of subclassing (if indirectly) the
<a href="https://docs.gtk.org/gobject/class.Object.html">GObject.Object</a> class type
itself.</p>

<p>Now, subclassing a class in GObject means registering a class and letting the
registration procedure know the parent class (GObject, like Java or C# but in
contrast to C++, allows only single base class). This process would be
burdensome given that the additional class that represents the class is a bit
of a pain to write. The glibmm mechanism of a separate class that represents
the class entity in GObject is not super convenient to write manually.</p>

<p>So in that line glibmm devised a convenient mechanism in which by using the
regular C++ inheritance one could create a new class almost transparently.</p>

<h2>Subclassing is magic</h2>

<p>Consider that you want to subclass <code class="language-plaintext highlighter-rouge">Gtk::Button</code>.</p>

<p>You can just do</p>

<div class="language-cpp highlighter-rouge"><div class="highlight"><pre class="highlight"><code><span class="k">class</span> <span class="nc">MyButton</span> <span class="o">:</span> <span class="k">public</span> <span class="n">Gtk</span><span class="o">::</span><span class="n">Button</span> <span class="p">{</span>
 <span class="nl">public:</span>
  <span class="n">MyButton</span><span class="p">(</span><span class="k">const</span> <span class="n">Glib</span><span class="o">::</span><span class="n">ustring</span> <span class="o">&amp;</span><span class="n">label</span><span class="p">)</span> <span class="o">:</span> <span class="n">Gtk</span><span class="o">::</span><span class="n">Button</span><span class="p">(</span><span class="n">label</span><span class="p">)</span> <span class="p">{}</span>
  <span class="c1">// ...</span>
<span class="p">};</span>
</code></pre></div></div>

<p>And that’s it. No need for a separate <code class="language-plaintext highlighter-rouge">MyButton_Class</code> or the likes that
represents the GObject class itself. Cool, but how does this work?</p>

<p><code class="language-plaintext highlighter-rouge">gmmproc</code>-wrapped classes always register a derived class that just clones the
original wrapped class. In the case of Gtk::Button, the original C class is
<code class="language-plaintext highlighter-rouge">GtkButton</code>. The wrapped code registers (just once) a <code class="language-plaintext highlighter-rouge">gtkmm__GtkButton</code> class
in the GObject typesystem and makes it a subclass of <code class="language-plaintext highlighter-rouge">GtkButton</code>. The reason
why this is done is in order to allow implementing a virtual method mechanism,
explained below.</p>

<p>Note, however, that no class is registered in GObject for <code class="language-plaintext highlighter-rouge">MyButton</code>. At
the eyes of GObject any instance of <code class="language-plaintext highlighter-rouge">MyButton</code> is just a
<code class="language-plaintext highlighter-rouge">gtkmm__GtkButton</code>.</p>

<h2>Virtual methods</h2>

<p>GObject would not be a complete OOP mechanism if it did not support
polymorphism via virtual table classes. In the C implementation, virtual methods
are implemented as pointers to functions and those are overriden explicitly
by subclasses in the “class constructor” by setting them to point to specific
functions.</p>

<p>Virtual methods are exposed as a convenience in <code class="language-plaintext highlighter-rouge">gmmproc</code>-wrapped classes as
regular C++ virtual methods. To make this work, however, the class must have
had to overriden the GObject virtual method so it ultimately calls the C++
virtual method. This can only happen in the “class constructor”. By subclassing
with a wrapper that introduces no extra data, gmmproc-wrapped classes can
override GObject virtual methods at will.</p>

<p>This is exactly what happens with <code class="language-plaintext highlighter-rouge">Gtk.Button.clicked</code> virtual method. When
initialising the class <code class="language-plaintext highlighter-rouge">gtkmm__GtkButton</code> this virtual method is made to invoke
a C++ virtual method (generated by <code class="language-plaintext highlighter-rouge">gmmproc</code>) called <code class="language-plaintext highlighter-rouge">on_clicked</code>. If the method
is not actually overridden in the subclass, gmmproc calls the current virtual
method implementation (if any).</p>

<div class="language-cpp highlighter-rouge"><div class="highlight"><pre class="highlight"><code><span class="k">class</span> <span class="nc">MyButton</span> <span class="o">:</span> <span class="k">public</span> <span class="n">Gtk</span><span class="o">::</span><span class="n">Button</span> <span class="p">{</span>
 <span class="nl">public:</span>
  <span class="n">MyButton</span><span class="p">(</span><span class="k">const</span> <span class="n">Glib</span><span class="o">::</span><span class="n">ustring</span> <span class="o">&amp;</span><span class="n">label</span><span class="p">)</span> <span class="o">:</span> <span class="n">Gtk</span><span class="o">::</span><span class="n">Button</span><span class="p">(</span><span class="n">label</span><span class="p">)</span> <span class="p">{}</span>

  <span class="k">virtual</span> <span class="n">on_clicked</span><span class="p">()</span> <span class="k">override</span> <span class="p">{</span>
    <span class="c1">// ...</span>
  <span class="p">}</span>
<span class="p">};</span>
</code></pre></div></div>

<h2>Properties</h2>

<p>But if we did not create a new GObject class to represent <code class="language-plaintext highlighter-rouge">MyButton</code> and
we’re just using C++ owns mechanism for virtual methods, what about new signals
or properties we might want to add?</p>

<p>This is where this convenient scheme of inheriting, one that does not require a
description of the class, starts showing its limits.</p>

<p>First we need to make sure the new class is actually a new one. This can be
achieved using a different constructor of <code class="language-plaintext highlighter-rouge">Glib::ObjectBase</code>. While the root
of the hierarchy is <code class="language-plaintext highlighter-rouge">Glib::Object</code> (it wraps <code class="language-plaintext highlighter-rouge">GObject.Object</code>), <code class="language-plaintext highlighter-rouge">Glib::ObjectBase</code>
is a virtual base of <code class="language-plaintext highlighter-rouge">Glib::Object</code> that is used to change some of the behaviour
when creating <code class="language-plaintext highlighter-rouge">Glib::Object</code>. <code class="language-plaintext highlighter-rouge">Glib::ObjectBase</code> has a constructor where you can
specify a class name.</p>

<div class="language-cpp highlighter-rouge"><div class="highlight"><pre class="highlight"><code><span class="k">class</span> <span class="nc">MyButton</span> <span class="o">:</span> <span class="k">public</span> <span class="n">Gtk</span><span class="o">::</span><span class="n">Button</span>
<span class="p">{</span>
 <span class="nl">public:</span>
  <span class="n">MyButton</span><span class="p">(</span><span class="k">const</span> <span class="n">Glib</span><span class="o">::</span><span class="n">ustring</span> <span class="o">&amp;</span><span class="n">label</span><span class="p">)</span> <span class="o">:</span>
    <span class="n">Glib</span><span class="o">::</span><span class="n">ObjectBase</span><span class="p">(</span><span class="s">"MyButton"</span><span class="p">),</span>
    <span class="n">Gtk</span><span class="o">::</span><span class="n">Button</span><span class="p">(</span><span class="n">label</span><span class="p">)</span> <span class="p">{}</span>
  <span class="c1">// ...</span>
<span class="p">};</span>
</code></pre></div></div>

<p>When using this constructor, glibmm will register a new class
<code class="language-plaintext highlighter-rouge">gtkmm__CustomObject_MyButton</code>. And this allow us to define properties.</p>

<div class="language-cpp highlighter-rouge"><div class="highlight"><pre class="highlight"><code><span class="k">class</span> <span class="nc">MyButton</span> <span class="o">:</span> <span class="k">public</span> <span class="n">Gtk</span><span class="o">::</span><span class="n">Button</span> <span class="p">{</span>
 <span class="nl">public:</span>
  <span class="n">MyButton</span><span class="p">(</span><span class="k">const</span> <span class="n">Glib</span><span class="o">::</span><span class="n">ustring</span> <span class="o">&amp;</span><span class="n">label</span><span class="p">)</span>
      <span class="o">:</span> <span class="n">Glib</span><span class="o">::</span><span class="n">ObjectBase</span><span class="p">(</span><span class="s">"MyButton"</span><span class="p">),</span> <span class="n">Gtk</span><span class="o">::</span><span class="n">Button</span><span class="p">(</span><span class="n">str</span><span class="p">)</span> <span class="p">{}</span>

  <span class="n">Glib</span><span class="o">::</span><span class="n">Property</span><span class="o">&lt;</span><span class="kt">int</span><span class="o">&gt;</span> <span class="n">my_value</span><span class="p">{</span><span class="o">*</span><span class="k">this</span><span class="p">,</span> <span class="s">"my-value"</span><span class="p">,</span> <span class="mi">0</span><span class="p">};</span>
<span class="p">};</span>
</code></pre></div></div>

<p>Now, properties are class-level attributes so ideally those should be
registered (installed) in the class constructor, which we cannot access.
However, GObject allows installing properties later and this is what happens
when executing the constructor of the property <code class="language-plaintext highlighter-rouge">my_value</code> that is run as part
of the constructor of <code class="language-plaintext highlighter-rouge">MyButton</code>.</p>

<h2>Signals</h2>

<p>What about signals?  Unfortunately, as far as I can tell, there is no
straightforward way to install new custom GObject signals.</p>

<p>Note that libsigc++ can be used in some signalling scenarios as an alternative
to GObject signals. This is because, in contrast to properties, GObject signals
do not seem to be composable between them. So we may only need a thing that
acts like a wrapped signal even if it is not a proper GObject signal.</p>

<p>If we do want a GObject signal, one thing we can do is using
<a href="https://gnome.pages.gitlab.gnome.org/glibmm/classGlib_1_1ExtraClassInit.html"><code class="language-plaintext highlighter-rouge">Glib::ExtraClassInit</code></a>
which allows us to define our own class initialisation function. But note that
this will be executed the first time we instantiate our class. This fragile (at
least to me) behaviour is again part the price we pay for not decoupling the
C++ class that represents instances from the C++ class that represents the
GObject class itself.</p>

<h1>Why would we want to use C++ to write a GObject?</h1>

<p>If we look at the wrapper libraries as a mean to write C++, one might think
that we only need the minimal wrapping surface and then be able to use C++,
outside of GObject, to develop the rest of the functionality.</p>

<p>While I do not think is super essential to be able to write a GObject in C++ so
it can be called from outside C++ (this would force us to provide a C interface
anyways), I think it is useful to be able to bring up a GObject in C++ so it
can be used in some of the convenient machinery that GTK provides: mainly
<code class="language-plaintext highlighter-rouge">.ui</code> files and <a href="https://docs.gtk.org/gtk4/class.Builder.html">Gtk.Builder</a>.</p>

<p>Now, <code class="language-plaintext highlighter-rouge">.ui</code> files are very powerful and can do lots of things for us in a
convenient way. But this can only happen if the GTK library sees a full-fledged
GObject. The class type must have been registered in GObject and its
properties, signals and interfaces must have been registered during class
initialisationn (not later, like glibmm allows us to do).</p>

<p>And I would like to use C++ to do that, as much as possible. So in a next
post I will explore some approaches I have been using in my projects.</p>]]></content><author><name>Roger Ferrer Ibáñez</name></author><category term="gtk" /><category term="gobject" /><category term="gnome" /><category term="cpp" /><category term="cplusplus" /><summary type="html"><![CDATA[GObject is the foundational dynamic type system implemented on top of the C language that is used by many other libraries like GLib, GTK and many other components, most of them part of the GNOME desktop environment stack. I’ve been lately wrapping a C library that uses GObject for C++ and I learned about some of the challenges.]]></summary></entry><entry><title type="html">Bisecting flaky tests with rspec and GitHub Actions</title><link href="https://thinkingeek.com/2022/08/04/rspec-bisect-github-actions/" rel="alternate" type="text/html" title="Bisecting flaky tests with rspec and GitHub Actions" /><published>2022-08-04T00:00:00+00:00</published><updated>2022-08-04T00:00:00+00:00</updated><id>https://thinkingeek.com/2022/08/04/rspec-bisect-github-actions</id><content type="html" xml:base="https://thinkingeek.com/2022/08/04/rspec-bisect-github-actions/"><![CDATA[<p>Ah, those good, old flaky test suites! Sooner or later you’ll encounter one of them. They are test suites that sometimes pass, sometimes fail, depending on certain environmental conditions. A lot has been written about flaky tests and what causes them, but in this post I’d like to discuss a specific type of flaky test –order dependant test failures–, and how to help debug them using GitHub Actions as part of your CI/CD pipelines.</p>

<!--more-->

<h2>Order dependant test failures</h2>

<p>An order dependant test failure is one that happens when:</p>

<ul>
  <li>There is more than one test being run as part of the suite.</li>
  <li>One of the test fails only when the suite is run in a specific order.</li>
</ul>

<p>Let’s simplify things and assume you have a very small test suite consisting of two tests: Test A and Test B. This post will assume we’re using ruby as our language of choice, and rspec as our testing framework, however the fundamentals apply to any other language and good testing framework. In this case, we might be dealing with a situation like this:</p>

<ol>
  <li>When we run Test A, it passes.</li>
  <li>When we run Test B, it passes.</li>
  <li>When we run Test A and Test B, they both pass.</li>
  <li>When we run Test B and Test A, Test B passes but Test A fails.</li>
</ol>

<p><img src="/assets/images/bisect-small.png" alt="Test scenarios" title="Test scenarios. Green/Solid node represents a passing test, red/dotted note represents a failing test" class="centered" /></p>

<p>If using rspec in its default configuration, you are probably running your test suite in a random order. This makes rspec generate a random seed and use that seed to determine in which order tests should be run. When running the above test suite using rspec in a random order, you can expect your suite to break roughly 50% of the times.</p>

<p>However, order dependant test failures can be very pernicious because they are introduced silently, they can make your test suite fail only occasionally, which leads to developers being lazy and use the <em>retry the tests until they pass</em> technique. The bogus test doesn’t get dealt with until it’s too late: the test suite now fails <em>often</em>, causing delays in releases, frustration, or even panic situations when the need for a quick release arises: there’s nothing worse than having to hotfix a production issue quickly and not being able to because your test suite keeps failing.</p>

<h2>Bisect to the rescue</h2>

<p>One of the features of rspec is the ability to run a <a href="https://relishapp.com/rspec/rspec-core/docs/command-line/bisect">bisect</a>. Once you discover an order dependant failure and can consistently reproduce it with a fixed seed, it can still be difficult to determine which test is causing the issue. In our example we only have 2 tests, but in bigger test suites the failing test might be executed after other hundreds of tests, making it hard to determine which one of them is the bad apple. Bisect solves that problem by consistently running all your tests to try and determine <em>the minimal set of examples that reproduce the same failures</em>.  The way rou run bisect is by providing rspec with the exact same options and seed that caused the order dependant failure, and adding the <code class="language-plaintext highlighter-rouge">--bisect</code>flag to the CLI. Interally <a href="https://en.wikipedia.org/wiki/Bisection_method">bisect</a> will split tests into two chunks, run those tests, discard the chunk that does not fail, and carry on recursively until the smallest failing number of tests is found.</p>

<h2>Our example</h2>

<p>I have created a proof of concept gem with a test suite that has an order dependant failure. The repository can be checked at <a href="https://github.com/brafales/flaky_specs_poc">brafales/flaky_specs_poc</a>.</p>

<p>If you’re not interested in the nitty gritty of why this particular test suite is problematic and are only interested in the GitHub Actions Workflow file, please skip this section.</p>

<p>The problematic spec in this gem is <a href="https://github.com/brafales/flaky_specs_poc/blob/main/spec/flaky_specs_poc/job_two_spec.rb">spec/flaky_specs_poc/job_two_spec.rb</a>. This proof of concept uses Sidekiq to show a common testing issue with this popular background job processing framework.</p>

<p>Sidekiq works on the basis of jobs, which get pushed into a queue, and then picked up by a worker process. Sidekiq will use a backend to store jobs, for example a redis instance; however, when running your tests you might not want to have to mess around with having a redis instance available for use. For this reason, Sidekiq in test mode uses a virtual backend which will queue jobs in memory, and doesn’t process them by default.</p>

<p>If you want to test a bit of code that queues a Sidekiq job, you do it like this:</p>

<div class="language-ruby highlighter-rouge"><div class="highlight"><pre class="highlight"><code><span class="c1"># frozen_string_literal: true</span>

<span class="nb">require</span> <span class="s2">"sidekiq/testing"</span>

<span class="no">RSpec</span><span class="p">.</span><span class="nf">describe</span> <span class="no">FlakySpecsPoc</span><span class="o">::</span><span class="no">JobOne</span> <span class="k">do</span>
  <span class="n">it</span> <span class="s2">"queues an HttpJob"</span> <span class="k">do</span>
    <span class="n">expect</span> <span class="k">do</span>
      <span class="n">subject</span><span class="p">.</span><span class="nf">perform</span>
    <span class="k">end</span><span class="p">.</span><span class="nf">to</span> <span class="n">change</span><span class="p">(</span><span class="no">FlakySpecsPoc</span><span class="o">::</span><span class="no">HttpJob</span><span class="p">.</span><span class="nf">jobs</span><span class="p">,</span> <span class="ss">:size</span><span class="p">).</span><span class="nf">by</span><span class="p">(</span><span class="mi">1</span><span class="p">)</span>
  <span class="k">end</span>
<span class="k">end</span>
</code></pre></div></div>

<p>This is a good way to check that your code did the right thing (queue a job) without having to worry about the specifics about what that job does. It’s essentially the same as mocking a third party HTTP request.</p>

<p>However, sometimes you <em>might</em> want to know not only that a job was queued, but also  that a certain side effect of that job having run took place. One might argue that this is a bad test since we should not be testing for side effects, but the reality is these kind of tests (especially feature or end to end tests) are ubiquitous. For this, Sidekiq provides a <a href="https://github.com/mperham/sidekiq/wiki/Testing">special method</a> that allows you to run jobs that get queued immediately, in an in-line fashion. This method can be used in two ways:</p>

<ul>
  <li>With a block, where inline test mode will be enabled for the code that runs inside the block, and disabled once the code in the block has been executed.</li>
  <li>Without a block, which enables inline testing <em>globally</em>.</li>
</ul>

<p>And it’s very easy to do something like this in a spec where you want your Sidekiq jobs to run inline:</p>

<div class="language-ruby highlighter-rouge"><div class="highlight"><pre class="highlight"><code><span class="c1"># frozen_string_literal: true</span>

<span class="nb">require</span> <span class="s2">"sidekiq/testing"</span>

<span class="no">RSpec</span><span class="p">.</span><span class="nf">describe</span> <span class="no">FlakySpecsPoc</span><span class="o">::</span><span class="no">JobOne</span> <span class="k">do</span>
  <span class="n">before</span> <span class="k">do</span>
    <span class="no">Sidekiq</span><span class="o">::</span><span class="no">Testing</span><span class="p">.</span><span class="nf">inline!</span>
  <span class="k">end</span>

  <span class="n">it</span> <span class="s2">"checks something done by the HttpJob"</span> <span class="k">do</span>
    <span class="no">VCR</span><span class="p">.</span><span class="nf">use_cassette</span><span class="p">(</span><span class="s2">"job_one"</span><span class="p">)</span> <span class="k">do</span>
      <span class="n">subject</span><span class="p">.</span><span class="nf">perform</span>
    <span class="k">end</span>
    <span class="n">expect</span><span class="p">(</span><span class="kp">true</span><span class="p">).</span><span class="nf">to</span> <span class="n">eq</span><span class="p">(</span><span class="kp">true</span><span class="p">)</span>
  <span class="k">end</span>
<span class="k">end</span>
</code></pre></div></div>

<p>What the code above will do when run is to enable Sidekiq inline testing and <em>leaving it on for the rest of the test suite execution</em>. The problem with this is that if another test after this runs and queues a Sidekiq job, that job will be run inline instead of being queued in memory. If that test does not expect that, it’ll fail <em>only if run after the first test</em>.</p>

<p>I’ve recreated this scenario in my gem by having a spec that tests that a job is queued, then having a spec that mistakenly enables inline testing for Sidekiq globally, and finally by having the Sidekiq job that gets queued make an HTTP request. I’m using VCR to record and then mock external HTTP calls.</p>

<p>So what happens is the following:</p>

<ul>
  <li>If the test that checks if a job is queued runs first, it passes, because no external HTTP calls are made, since the Sidekiq job simply gets queued in memory, but never executed inline.</li>
  <li>If the test that sets inline testing runs first, then when the other test runs after it, the Sidekiq job <em>will run, make an HTTP call and cause a failure since VCR does not expect that external call to be made</em>.</li>
</ul>

<p>For reference, this is what a correct way to write this spec is:</p>

<div class="language-ruby highlighter-rouge"><div class="highlight"><pre class="highlight"><code><span class="c1"># frozen_string_literal: true</span>

<span class="nb">require</span> <span class="s2">"sidekiq/testing"</span>

<span class="no">RSpec</span><span class="p">.</span><span class="nf">describe</span> <span class="no">FlakySpecsPoc</span><span class="o">::</span><span class="no">JobOne</span> <span class="k">do</span>
  <span class="n">around</span> <span class="k">do</span> <span class="o">|</span><span class="n">spec</span><span class="o">|</span>
    <span class="no">Sidekiq</span><span class="o">::</span><span class="no">Testing</span><span class="p">.</span><span class="nf">inline!</span> <span class="k">do</span>
      <span class="n">spec</span><span class="p">.</span><span class="nf">call</span>
    <span class="k">end</span>
  <span class="k">end</span>

  <span class="n">it</span> <span class="s2">"checks something done by the HttpJob"</span> <span class="k">do</span>
    <span class="no">VCR</span><span class="p">.</span><span class="nf">use_cassette</span><span class="p">(</span><span class="s2">"job_one"</span><span class="p">)</span> <span class="k">do</span>
      <span class="n">subject</span><span class="p">.</span><span class="nf">perform</span>
    <span class="k">end</span>
    <span class="n">expect</span><span class="p">(</span><span class="kp">true</span><span class="p">).</span><span class="nf">to</span> <span class="n">eq</span><span class="p">(</span><span class="kp">true</span><span class="p">)</span>
  <span class="k">end</span>
<span class="k">end</span>
</code></pre></div></div>

<p>You can easily recreate this by running the following command on the gem source code:</p>

<div class="language-bash highlighter-rouge"><div class="highlight"><pre class="highlight"><code>bundle <span class="nb">exec </span>rspec <span class="nt">--order</span><span class="o">=</span>rand <span class="nt">--seed</span><span class="o">=</span>55702
</code></pre></div></div>

<p>Which should give you this output:</p>

<div class="language-text highlighter-rouge"><div class="highlight"><pre class="highlight"><code>
Randomized with seed 55702

FlakySpecsPoc::JobOne
  checks something done by the HttpJob

FlakySpecsPoc::HttpJob
  gets a response from a server

FlakySpecsPoc::JobOne
  queues an HttpJob (FAILED - 1)

Failures:

  1) FlakySpecsPoc::JobOne queues an HttpJob
     Failure/Error: res = Net::HTTP.get_response(uri)

     VCR::Errors::UnhandledHTTPRequestError:


       ================================================================================
       An HTTP request has been made that VCR does not know how to handle:
         GET https://reqbin.com/echo/get/json

       There is currently no cassette in use. There are a few ways
       you can configure VCR to handle this request:

         * If you're surprised VCR is raising this error
           and want insight about how VCR attempted to handle the request,
           you can use the debug_logger configuration option to log more details [1].
         * If you want VCR to record this request and play it back during future test
           runs, you should wrap your test (or this portion of your test) in a
           `VCR.use_cassette` block [2].
         * If you only want VCR to handle requests made while a cassette is in use,
           configure `allow_http_connections_when_no_cassette = true`. VCR will
           ignore this request since it is made when there is no cassette [3].
         * If you want VCR to ignore this request (and others like it), you can
           set an `ignore_request` callback [4].

       [1] https://www.relishapp.com/vcr/vcr/v/6-1-0/docs/configuration/debug-logging
       [2] https://www.relishapp.com/vcr/vcr/v/6-1-0/docs/getting-started
       [3] https://www.relishapp.com/vcr/vcr/v/6-1-0/docs/configuration/allow-http-connections-when-no-cassette
       [4] https://www.relishapp.com/vcr/vcr/v/6-1-0/docs/configuration/ignore-request
       ================================================================================
     # ./lib/flaky_specs_poc/http_job.rb:13:in `perform'
     # ./lib/flaky_specs_poc/job_one.rb:10:in `perform'
     # ./spec/flaky_specs_poc/job_one_spec.rb:8:in `block (3 levels) in &lt;top (required)&gt;'
     # ./spec/flaky_specs_poc/job_one_spec.rb:7:in `block (2 levels) in &lt;top (required)&gt;'

Finished in 0.03305 seconds (files took 0.85052 seconds to load)
3 examples, 1 failure

Failed examples:

rspec ./spec/flaky_specs_poc/job_one_spec.rb:6 # FlakySpecsPoc::JobOne queues an HttpJob

Randomized with seed 55702
</code></pre></div></div>

<p>Run the same test suite with a different seed though:</p>

<div class="language-bash highlighter-rouge"><div class="highlight"><pre class="highlight"><code>bundle <span class="nb">exec </span>rspec <span class="nt">--order</span><span class="o">=</span>rand <span class="nt">--seed</span><span class="o">=</span>3164
</code></pre></div></div>

<p>And everything’s good:</p>

<div class="language-text highlighter-rouge"><div class="highlight"><pre class="highlight"><code>Randomized with seed 3164

FlakySpecsPoc::HttpJob
  gets a response from a server

FlakySpecsPoc::JobOne
  queues an HttpJob

FlakySpecsPoc::JobOne
  checks something done by the HttpJob

Finished in 0.02717 seconds (files took 0.39785 seconds to load)
3 examples, 0 failures

Randomized with seed 3164
</code></pre></div></div>

<p>In this case, given we have very little tests, this could be relatively easy to debug manually, but with a bigger test suite we can use rspect bisect:</p>

<div class="language-bash highlighter-rouge"><div class="highlight"><pre class="highlight"><code>bundle <span class="nb">exec </span>rspec <span class="nt">--order</span><span class="o">=</span>rand <span class="nt">--seed</span><span class="o">=</span>55702 <span class="nt">--bisect</span>
</code></pre></div></div>

<p>Which will give us the following:</p>

<div class="language-text highlighter-rouge"><div class="highlight"><pre class="highlight"><code>Bisect started using options: "--order=rand --seed=55702"
Running suite to find failures... (0.10595 seconds)
Starting bisect with 1 failing example and 2 non-failing examples.
Checking that failure(s) are order-dependent... failure appears to be order-dependent

Round 1: bisecting over non-failing examples 1-2 .. ignoring example 2 (0.19095 seconds)
Bisect complete! Reduced necessary non-failing examples from 2 to 1 in 0.25318 seconds.

The minimal reproduction command is:
  rspec './spec/flaky_specs_poc/job_one_spec.rb[1:1]' './spec/flaky_specs_poc/job_two_spec.rb[1:1]' --order=rand --seed=55702
</code></pre></div></div>

<p>And now we know how to consistently reproduce the error with the minimum number of tests, which will make pinpointing the sneaky bogus test easier.</p>

<h2>Automating bisects</h2>

<p>The next step is clear: automate it! I’m going to show you a GitHub Actions Workflow that will automatically run a bisect on a failing test suite.</p>

<p>First of all a couple of disclaimers:</p>

<ul>
  <li>This has not been productionised, so as usual, use at your own risk ;)</li>
  <li>This flow does a bisect on failing test suites. This will make your test pipeline slower, since a bunch of failing tests will be run twice, <em>including failures which are not caused by flaky tests!</em></li>
</ul>

<p>Here’s the complete flow:</p>

<div class="language-yaml highlighter-rouge"><div class="highlight"><pre class="highlight"><code><span class="na">name</span><span class="pi">:</span> <span class="s">Ruby</span>

<span class="na">on</span><span class="pi">:</span>
  <span class="na">push</span><span class="pi">:</span>
    <span class="na">branches</span><span class="pi">:</span>
      <span class="pi">-</span> <span class="s">main</span>

  <span class="na">pull_request</span><span class="pi">:</span>

<span class="na">jobs</span><span class="pi">:</span>
  <span class="na">RunTests</span><span class="pi">:</span>
    <span class="na">runs-on</span><span class="pi">:</span> <span class="s">ubuntu-latest</span>
    <span class="na">steps</span><span class="pi">:</span>
    <span class="pi">-</span> <span class="na">uses</span><span class="pi">:</span> <span class="s">actions/checkout@v2</span>
    <span class="pi">-</span> <span class="na">name</span><span class="pi">:</span> <span class="s">Set up Ruby</span>
      <span class="na">uses</span><span class="pi">:</span> <span class="s">ruby/setup-ruby@v1</span>
      <span class="na">with</span><span class="pi">:</span>
        <span class="na">bundler-cache</span><span class="pi">:</span> <span class="no">true</span>
    <span class="pi">-</span> <span class="na">name</span><span class="pi">:</span> <span class="s">Run the tests</span>
      <span class="na">id</span><span class="pi">:</span> <span class="s">tests</span>
      <span class="na">continue-on-error</span><span class="pi">:</span> <span class="no">true</span>
      <span class="na">run</span><span class="pi">:</span> <span class="s">bundle exec rspec --order=rand -f j -o tmp/rspec_results.json</span>
    <span class="pi">-</span> <span class="na">name</span><span class="pi">:</span> <span class="s">Bisect flaky specs</span>
      <span class="na">if</span><span class="pi">:</span> <span class="s">steps.tests.outcome != 'success'</span>
      <span class="na">run</span><span class="pi">:</span> <span class="s">bundle exec rspec --order=rand --seed $(cat tmp/rspec_results.json | jq '.seed') --bisect</span>
</code></pre></div></div>

<p>The first bit of the flow is a pretty standard way of doing things. The bits that interest us are the <code class="language-plaintext highlighter-rouge">Run the tests</code>and <code class="language-plaintext highlighter-rouge">Bisect flaky specs</code> steps.</p>

<p>This step will run our tests:</p>

<div class="language-yaml highlighter-rouge"><div class="highlight"><pre class="highlight"><code><span class="pi">-</span> <span class="na">name</span><span class="pi">:</span> <span class="s">Run the tests</span>
  <span class="na">id</span><span class="pi">:</span> <span class="s">tests</span>
  <span class="na">continue-on-error</span><span class="pi">:</span> <span class="no">true</span>
  <span class="na">run</span><span class="pi">:</span> <span class="s">bundle exec rspec --order=rand -f j -o tmp/rspec_results.json</span>
</code></pre></div></div>

<ul>
  <li><code class="language-plaintext highlighter-rouge">--order=rand</code> will ensure the suite is run in random order.</li>
  <li><code class="language-plaintext highlighter-rouge">-f j</code> will make sure the output of the tests is in JSON format. This is important since we need to be able to parse the test results easily.</li>
  <li><code class="language-plaintext highlighter-rouge">-o tmp/rspec_results.json</code> sends the results into a file instead of <code class="language-plaintext highlighter-rouge">STDOUT</code>.</li>
  <li>We also use <code class="language-plaintext highlighter-rouge">continue-on-error: true</code> to tell GitHub Actions that when the tests fail, the rest of the steps will still be executed, otherwise on a test failure the flow would immediately end.</li>
</ul>

<p>And this is the step that will run a bisect:</p>

<div class="language-yml highlighter-rouge"><div class="highlight"><pre class="highlight"><code><span class="pi">-</span> <span class="na">name</span><span class="pi">:</span> <span class="s">Bisect flaky specs</span>
  <span class="na">if</span><span class="pi">:</span> <span class="s">steps.tests.outcome != 'success'</span>
  <span class="na">run</span><span class="pi">:</span> <span class="s">bundle exec rspec --order=rand --seed $(cat tmp/rspec_results.json | jq '.seed') --bisect</span>
</code></pre></div></div>

<p>A few noteworthy bits:</p>

<ul>
  <li><code class="language-plaintext highlighter-rouge">if: steps.tests.outcome != 'success'</code> will ensure this step is only run if the original test suite failed.</li>
  <li>We use <code class="language-plaintext highlighter-rouge">cat tmp/rspec_results.json | jq '.seed'</code> to get the seed that was originally used to run the tests, so we can pass it to the bisect.</li>
</ul>

<p>For reference, this is what an rspec result in JSON format looks like:</p>

<div class="language-json highlighter-rouge"><div class="highlight"><pre class="highlight"><code><span class="p">{</span><span class="w">
    </span><span class="nl">"version"</span><span class="p">:</span><span class="w"> </span><span class="s2">"3.11.0"</span><span class="p">,</span><span class="w">
    </span><span class="nl">"seed"</span><span class="p">:</span><span class="w"> </span><span class="mi">55702</span><span class="p">,</span><span class="w">
    </span><span class="nl">"examples"</span><span class="p">:</span><span class="w"> </span><span class="p">[</span><span class="w">
        </span><span class="p">{</span><span class="w">
            </span><span class="nl">"id"</span><span class="p">:</span><span class="w"> </span><span class="s2">"./spec/flaky_specs_poc/job_two_spec.rb[1:1]"</span><span class="p">,</span><span class="w">
            </span><span class="nl">"description"</span><span class="p">:</span><span class="w"> </span><span class="s2">"checks something done by the HttpJob"</span><span class="p">,</span><span class="w">
            </span><span class="nl">"full_description"</span><span class="p">:</span><span class="w"> </span><span class="s2">"FlakySpecsPoc::JobOne checks something done by the HttpJob"</span><span class="p">,</span><span class="w">
            </span><span class="nl">"status"</span><span class="p">:</span><span class="w"> </span><span class="s2">"passed"</span><span class="p">,</span><span class="w">
            </span><span class="nl">"file_path"</span><span class="p">:</span><span class="w"> </span><span class="s2">"./spec/flaky_specs_poc/job_two_spec.rb"</span><span class="p">,</span><span class="w">
            </span><span class="nl">"line_number"</span><span class="p">:</span><span class="w"> </span><span class="mi">16</span><span class="p">,</span><span class="w">
            </span><span class="nl">"run_time"</span><span class="p">:</span><span class="w"> </span><span class="mf">0.009731</span><span class="p">,</span><span class="w">
            </span><span class="nl">"pending_message"</span><span class="p">:</span><span class="w"> </span><span class="kc">null</span><span class="w">
        </span><span class="p">},</span><span class="w">
        </span><span class="p">{</span><span class="w">
            </span><span class="nl">"id"</span><span class="p">:</span><span class="w"> </span><span class="s2">"./spec/flaky_specs_poc/http_job_spec.rb[1:1]"</span><span class="p">,</span><span class="w">
            </span><span class="nl">"description"</span><span class="p">:</span><span class="w"> </span><span class="s2">"gets a response from a server"</span><span class="p">,</span><span class="w">
            </span><span class="nl">"full_description"</span><span class="p">:</span><span class="w"> </span><span class="s2">"FlakySpecsPoc::HttpJob gets a response from a server"</span><span class="p">,</span><span class="w">
            </span><span class="nl">"status"</span><span class="p">:</span><span class="w"> </span><span class="s2">"passed"</span><span class="p">,</span><span class="w">
            </span><span class="nl">"file_path"</span><span class="p">:</span><span class="w"> </span><span class="s2">"./spec/flaky_specs_poc/http_job_spec.rb"</span><span class="p">,</span><span class="w">
            </span><span class="nl">"line_number"</span><span class="p">:</span><span class="w"> </span><span class="mi">4</span><span class="p">,</span><span class="w">
            </span><span class="nl">"run_time"</span><span class="p">:</span><span class="w"> </span><span class="mf">0.003383</span><span class="p">,</span><span class="w">
            </span><span class="nl">"pending_message"</span><span class="p">:</span><span class="w"> </span><span class="kc">null</span><span class="w">
        </span><span class="p">},</span><span class="w">
        </span><span class="p">{</span><span class="w">
            </span><span class="nl">"id"</span><span class="p">:</span><span class="w"> </span><span class="s2">"./spec/flaky_specs_poc/job_one_spec.rb[1:1]"</span><span class="p">,</span><span class="w">
            </span><span class="nl">"description"</span><span class="p">:</span><span class="w"> </span><span class="s2">"queues an HttpJob"</span><span class="p">,</span><span class="w">
            </span><span class="nl">"full_description"</span><span class="p">:</span><span class="w"> </span><span class="s2">"FlakySpecsPoc::JobOne queues an HttpJob"</span><span class="p">,</span><span class="w">
            </span><span class="nl">"status"</span><span class="p">:</span><span class="w"> </span><span class="s2">"failed"</span><span class="p">,</span><span class="w">
            </span><span class="nl">"file_path"</span><span class="p">:</span><span class="w"> </span><span class="s2">"./spec/flaky_specs_poc/job_one_spec.rb"</span><span class="p">,</span><span class="w">
            </span><span class="nl">"line_number"</span><span class="p">:</span><span class="w"> </span><span class="mi">6</span><span class="p">,</span><span class="w">
            </span><span class="nl">"run_time"</span><span class="p">:</span><span class="w"> </span><span class="mf">0.021981</span><span class="p">,</span><span class="w">
            </span><span class="nl">"pending_message"</span><span class="p">:</span><span class="w"> </span><span class="kc">null</span><span class="p">,</span><span class="w">
            </span><span class="nl">"exception"</span><span class="p">:</span><span class="w"> </span><span class="p">{</span><span class="w">
                </span><span class="nl">"class"</span><span class="p">:</span><span class="w"> </span><span class="s2">"VCR::Errors::UnhandledHTTPRequestError"</span><span class="p">,</span><span class="w">
                </span><span class="nl">"message"</span><span class="p">:</span><span class="w"> </span><span class="s2">"</span><span class="se">\n\n</span><span class="s2">================================================================================</span><span class="se">\n</span><span class="s2">An HTTP request has been made that VCR does not know how to handle:</span><span class="se">\n</span><span class="s2">  GET https://reqbin.com/echo/get/json</span><span class="se">\n\n</span><span class="s2">There is currently no cassette in use. There are a few ways</span><span class="se">\n</span><span class="s2">you can configure VCR to handle this request:</span><span class="se">\n\n</span><span class="s2">  * If you're surprised VCR is raising this error</span><span class="se">\n</span><span class="s2">    and want insight about how VCR attempted to handle the request,</span><span class="se">\n</span><span class="s2">    you can use the debug_logger configuration option to log more details [1].</span><span class="se">\n</span><span class="s2">  * If you want VCR to record this request and play it back during future test</span><span class="se">\n</span><span class="s2">    runs, you should wrap your test (or this portion of your test) in a</span><span class="se">\n</span><span class="s2">    `VCR.use_cassette` block [2].</span><span class="se">\n</span><span class="s2">  * If you only want VCR to handle requests made while a cassette is in use,</span><span class="se">\n</span><span class="s2">    configure `allow_http_connections_when_no_cassette = true`. VCR will</span><span class="se">\n</span><span class="s2">    ignore this request since it is made when there is no cassette [3].</span><span class="se">\n</span><span class="s2">  * If you want VCR to ignore this request (and others like it), you can</span><span class="se">\n</span><span class="s2">    set an `ignore_request` callback [4].</span><span class="se">\n\n</span><span class="s2">[1] https://www.relishapp.com/vcr/vcr/v/6-1-0/docs/configuration/debug-logging</span><span class="se">\n</span><span class="s2">[2] https://www.relishapp.com/vcr/vcr/v/6-1-0/docs/getting-started</span><span class="se">\n</span><span class="s2">[3] https://www.relishapp.com/vcr/vcr/v/6-1-0/docs/configuration/allow-http-connections-when-no-cassette</span><span class="se">\n</span><span class="s2">[4] https://www.relishapp.com/vcr/vcr/v/6-1-0/docs/configuration/ignore-request</span><span class="se">\n</span><span class="s2">================================================================================</span><span class="se">\n\n</span><span class="s2">"</span><span class="p">,</span><span class="w">
                </span><span class="nl">"backtrace"</span><span class="p">:</span><span class="w"> </span><span class="p">[</span><span class="w">
                    </span><span class="s2">"REDACTED FOR LEGIBILITY"</span><span class="w">
                </span><span class="p">]</span><span class="w">
            </span><span class="p">}</span><span class="w">
        </span><span class="p">}</span><span class="w">
    </span><span class="p">],</span><span class="w">
    </span><span class="nl">"summary"</span><span class="p">:</span><span class="w"> </span><span class="p">{</span><span class="w">
        </span><span class="nl">"duration"</span><span class="p">:</span><span class="w"> </span><span class="mf">0.037856</span><span class="p">,</span><span class="w">
        </span><span class="nl">"example_count"</span><span class="p">:</span><span class="w"> </span><span class="mi">3</span><span class="p">,</span><span class="w">
        </span><span class="nl">"failure_count"</span><span class="p">:</span><span class="w"> </span><span class="mi">1</span><span class="p">,</span><span class="w">
        </span><span class="nl">"pending_count"</span><span class="p">:</span><span class="w"> </span><span class="mi">0</span><span class="p">,</span><span class="w">
        </span><span class="nl">"errors_outside_of_examples_count"</span><span class="p">:</span><span class="w"> </span><span class="mi">0</span><span class="w">
    </span><span class="p">},</span><span class="w">
    </span><span class="nl">"summary_line"</span><span class="p">:</span><span class="w"> </span><span class="s2">"3 examples, 1 failure"</span><span class="w">
</span><span class="p">}</span><span class="w">
</span></code></pre></div></div>

<p>What we do with this file is send it to the <a href="https://stedolan.github.io/jq/">jq</a> tool for parsing, and telling it to get us the value for top level key <code class="language-plaintext highlighter-rouge">seed</code>. jq is a really useful and powerful tool so I suggest you check it out if you’re unfamiliar with it.</p>

<p>Below you can see a screenshot of this flow successfully bisecting our example test suite.</p>

<p><img src="/assets/images/github-actions-bisect.png" alt="GitHub Actions Workflow" title="GitHub Actions Workflow" class="centered" /></p>

<h2>Conclusions</h2>

<p>In this post we have learned about a specific, pernicious test failure that manifests itself when a test suite is run in a specific order. We have then seen how a technique called bisecting can help determine what test of potentially many is causing te failure. Last but not least, we have shown a GitHub Actions Workflow that will automatically run the bisect task when a test suite fails to execute.</p>

<p>This is a very small, toy example of how to make this work. Your real life test suites are probably a lot more complex, bigger, and so this example might not work for you, but the fundamentals should be the same.</p>]]></content><author><name>Bernat Ràfales</name></author><category term="ruby" /><category term="testing" /><category term="github-actions" /><category term="rspec" /><summary type="html"><![CDATA[Ah, those good, old flaky test suites! Sooner or later you’ll encounter one of them. They are test suites that sometimes pass, sometimes fail, depending on certain environmental conditions. A lot has been written about flaky tests and what causes them, but in this post I’d like to discuss a specific type of flaky test –order dependant test failures–, and how to help debug them using GitHub Actions as part of your CI/CD pipelines.]]></summary></entry><entry><title type="html">OpenSSH as a SOCKS server</title><link href="https://thinkingeek.com/2022/01/03/ssh-and-socks/" rel="alternate" type="text/html" title="OpenSSH as a SOCKS server" /><published>2022-01-03T22:03:00+00:00</published><updated>2022-01-03T22:03:00+00:00</updated><id>https://thinkingeek.com/2022/01/03/ssh-and-socks</id><content type="html" xml:base="https://thinkingeek.com/2022/01/03/ssh-and-socks/"><![CDATA[<p>Sometimes we are given access via ssh to nodes that do not have, for policy or
technical reasons, access to the internet (i.e. they cannot make outbound
connections).  Depending on the policies, we may be able to open reverse SSH
tunnels, so things are not so bad.</p>

<p>Recently I discovered that OpenSSH comes with a SOCKS proxy server integrated.
This is probably a well known feature of OpenSSH but I thought it was
interesting to share how it can be used.</p>

<!--more-->

<h2>SOCKS</h2>

<p>Nowadays, access to the Internet is ubiquitous and most of the time assumed as
a fact. However, in some circumstances, direct access to the internet is not
available or not desirable. In those cases we can resort on proxy servers that
act as intermediaries between the Internet and the node without direct access.</p>

<p>Many tools used commonly assume one is connected to the Internet: package
managers such as <code class="language-plaintext highlighter-rouge">pip</code> and <code class="language-plaintext highlighter-rouge">cargo</code> can automatically download the files
required to install a package. If no outbound connection is possible,
software deployment and installation becomes complicated.</p>

<p>However, most of the time, those tools only require HTTP/HTTPS support. So
a proxy that only forwards HTTP and HTTPS requests is enough. Examples
of these kind of proxies are <a href="http://tinyproxy.github.io/">tinyproxy</a> and
<a href="http://www.squid-cache.org/">squid</a>.</p>

<p><a href="https://en.wikipedia.org/wiki/SOCKS">SOCKS</a>, is a general proxy protocol that
can be used for any TCP connection, not only those for HTTP/HTTPS. An
interesting thing is that <code class="language-plaintext highlighter-rouge">ssh</code> comes with an integrated SOCKS proxy which is
relatively easy to use. Often most tools that can use a HTTP/HTTPS proxy can
also use a SOCKS proxy so this is a handy option to consider.</p>

<h2>Example: Installing Rust through a proxy</h2>

<p>If we try to install <a href="https://www.rust-lang.org/learn/get-started">Rust</a> on a
machine that does not allow outbound connections, this is what happens. (Let’s
ignore the question whether piping a download directly to the shell is a
reasonable thing to do).</p>

<div class="language-bash highlighter-rouge"><div class="highlight"><pre class="highlight"><code>user@no-internet<span class="nv">$ </span>curl <span class="nt">--proto</span> <span class="s1">'=https'</span> <span class="nt">--tlsv1</span>.2 <span class="nt">-sSf</span> https://sh.rustup.rs | sh
</code></pre></div></div>

<p>This command will likely time out after a long time because outbound
connections are silently dropped and the installation will fail.</p>

<h3>Set up proxy server</h3>

<p>To address this, let’s first open a SOCKS proxy using <code class="language-plaintext highlighter-rouge">ssh</code> on our local machine
(<code class="language-plaintext highlighter-rouge">with-internet</code>). This machine <strong>must</strong> have internet access (change <code class="language-plaintext highlighter-rouge">user</code> to
your username). <code class="language-plaintext highlighter-rouge">ssh</code> will request you to authenticate (via password or ssh
key).</p>

<div class="language-bash highlighter-rouge"><div class="highlight"><pre class="highlight"><code>user@with-internet<span class="nv">$ </span>ssh <span class="nt">-N</span> <span class="nt">-D</span> 127.0.0.1:12345 user@localhost
</code></pre></div></div>

<p>The flag <code class="language-plaintext highlighter-rouge">-N</code> means not to execute a command and <code class="language-plaintext highlighter-rouge">-D interface:port</code> means to
open the <code class="language-plaintext highlighter-rouge">port</code> bound to the <code class="language-plaintext highlighter-rouge">interface</code>. This is the SOCKS proxy. In this
example we are opening port 12345 and binding it to the 127.0.0.1 (localhost)
interface. We are using the same machine as the proxy, hence <code class="language-plaintext highlighter-rouge">user@localhost</code>
(it is possible to use another node, but we don’t have to given that
<code class="language-plaintext highlighter-rouge">with-internet</code> already can connect to the internet). This must stay running so
you will have to open another terminal and set up the reverse tunnel.</p>

<p>To set up the reverse tunnel do the following.</p>

<div class="language-bash highlighter-rouge"><div class="highlight"><pre class="highlight"><code>user@with-internet<span class="nv">$ </span>ssh <span class="nt">-R</span> 127.0.0.1:9999:127.0.0.1:12345 <span class="nt">-N</span> user@no-internet
</code></pre></div></div>

<p>This opens the port 9999 in the host without internet (<code class="language-plaintext highlighter-rouge">no-internet</code>) and binds
it to its localhost (i.e. the <code class="language-plaintext highlighter-rouge">localhost</code> of <code class="language-plaintext highlighter-rouge">no-internet</code>) then it tunnels it
to the port 12345 bound to the interface <code class="language-plaintext highlighter-rouge">127.0.0.1</code> of our local node
(<code class="language-plaintext highlighter-rouge">with-internet</code>). Again this will not run any command (due to <code class="language-plaintext highlighter-rouge">-N</code>) and the
syntax of -R is <code class="language-plaintext highlighter-rouge">-R remote-interface:remote-port:local-interface:local-port</code>.
Keep this command running.</p>

<p><strong>Note:</strong> Because we are using an unprivileged port on <code class="language-plaintext highlighter-rouge">no-internet</code> and the
<code class="language-plaintext highlighter-rouge">-D</code> option does not allow setting authentication, anyone in <code class="language-plaintext highlighter-rouge">no-internet</code>
could proxy connections through <code class="language-plaintext highlighter-rouge">with-internet</code>. Do this only on a
<code class="language-plaintext highlighter-rouge">no-internet</code> host you trust.</p>

<h3>Proxy configuration</h3>

<p>Now we can setup <code class="language-plaintext highlighter-rouge">curl</code> to use a socks proxy. We do this with the
<code class="language-plaintext highlighter-rouge">--proxy-option</code>. For convenience we will first download the installation
script into a file.</p>

<div class="language-bash highlighter-rouge"><div class="highlight"><pre class="highlight"><code>user@no-internet<span class="nv">$ </span>curl <span class="nt">--proto</span> <span class="s1">'=https'</span> <span class="nt">--tlsv1</span>.2 <span class="nt">-sSf</span> https://sh.rustup.rs <span class="se">\</span>
                       <span class="nt">--proxy</span> socks5://localhost:9999 <span class="nt">-o</span>  install-rust.sh
</code></pre></div></div>

<p>We can do a quick check that it contains what we expect</p>

<div class="language-bash highlighter-rouge"><div class="highlight"><pre class="highlight"><code>user@no-internet<span class="nv">$ </span><span class="nb">head </span>install-rust.sh 
<span class="c">#!/bin/sh</span>
<span class="c"># shellcheck shell=dash</span>

<span class="c"># This is just a little script that can be downloaded from the internet to</span>
<span class="c"># install rustup. It just does platform detection, downloads the installer</span>
<span class="c"># and runs it.</span>

<span class="c"># It runs on Unix shells like {a,ba,da,k,z}sh. It uses the common `local`</span>
<span class="c"># extension. Note: Most shells limit `local` to 1 var per line, contra bash.</span>
</code></pre></div></div>

<h3>Install Rust</h3>

<p>We can set up <code class="language-plaintext highlighter-rouge">https_proxy</code> environment variable to point to the SOCKS
server so it is used by the installation script.</p>

<div class="language-bash highlighter-rouge"><div class="highlight"><pre class="highlight"><code>user@no-internet<span class="nv">$ </span><span class="nb">export </span><span class="nv">https_proxy</span><span class="o">=</span>socks5://localhost:9999
</code></pre></div></div>

<p>Now we are read to install Rust using the script we downloaded.</p>

<div class="language-bash highlighter-rouge"><div class="highlight"><pre class="highlight"><code>user@no-internet <span class="nv">$ </span>bash install-rust.sh 
</code></pre></div></div>
<div class="language-plaintext highlighter-rouge"><div class="highlight"><pre class="highlight"><code>info: downloading installer

Welcome to Rust!

This will download and install the official compiler for the Rust
programming language, and its package manager, Cargo.

Rustup metadata and toolchains will be installed into the Rustup
home directory, located at:

  /home/user/.rustup

This can be modified with the RUSTUP_HOME environment variable.

The Cargo home directory located at:

  /home/user/.cargo

This can be modified with the CARGO_HOME environment variable.

The cargo, rustc, rustup and other commands will be added to
Cargo's bin directory, located at:

  /home/user/.cargo/bin

This path will then be added to your PATH environment variable by
modifying the profile files located at:

  /home/user/.profile
  /home/user/.zshenv

You can uninstall at any time with rustup self uninstall and
these changes will be reverted.

Current installation options:


   default host triple: x86_64-unknown-linux-gnu
     default toolchain: stable (default)
               profile: default
  modify PATH variable: yes

1) Proceed with installation (default)
2) Customize installation
3) Cancel installation
&gt;1

info: profile set to 'default'
info: default host triple is x86_64-unknown-linux-gnu
info: syncing channel updates for 'stable-x86_64-unknown-linux-gnu'
info: latest update on 2021-12-02, rust version 1.57.0 (f1edd0429 2021-11-29)
info: downloading component 'cargo'
info: downloading component 'clippy'
info: downloading component 'rust-docs'
info: downloading component 'rust-std'
 24.9 MiB /  24.9 MiB (100 %)  19.9 MiB/s in  1s ETA:  0s
info: downloading component 'rustc'
 53.9 MiB /  53.9 MiB (100 %)  20.1 MiB/s in  2s ETA:  0s
info: downloading component 'rustfmt'
info: installing component 'cargo'
info: installing component 'clippy'
info: installing component 'rust-docs'
  5.3 MiB /  17.9 MiB ( 29 %)   1.7 MiB/s in  6s ETA:  7s
...
</code></pre></div></div>

<p>Once Rust is installed, <a href="https://doc.rust-lang.org/cargo/reference/config.html#httpproxy">you can setup <code class="language-plaintext highlighter-rouge">cargo</code> so it always uses this
proxy</a>.</p>

<h2>Example: Using pip using SOCKS</h2>

<p><code class="language-plaintext highlighter-rouge">pip</code> is used to install Python packages. Unfortunately <code class="language-plaintext highlighter-rouge">pip</code> does not support
SOCKS by default. If you try to install <a href="https://github.com/google/yapf">yapf</a>
using the configuration above this happens:</p>

<div class="language-bash highlighter-rouge"><div class="highlight"><pre class="highlight"><code>user@no-internet<span class="nv">$ </span>pip <span class="nb">install</span> <span class="nt">--proxy</span><span class="o">=</span>socks5://localhost:9999 yapf
Collecting yapf
ERROR: Could not <span class="nb">install </span>packages due to an EnvironmentError: Missing dependencies <span class="k">for </span>SOCKS support.
</code></pre></div></div>

<p>Based on <a href="https://stackoverflow.com/a/68745571">this answer from Stack Overflow</a>
we need to first install <code class="language-plaintext highlighter-rouge">pysocks</code>. Now we have a chicken-and-egg situation
that we need to solve: we cannot download <code class="language-plaintext highlighter-rouge">pysocks</code> on the <code class="language-plaintext highlighter-rouge">no-internet</code> machine!
To solve it, download <code class="language-plaintext highlighter-rouge">pysocks</code> locally:</p>

<div class="language-bash highlighter-rouge"><div class="highlight"><pre class="highlight"><code>user@with-internet<span class="nv">$ </span>python3 <span class="nt">-m</span> pip download pysocks
Collecting pysocks
  Downloading PySocks-1.7.1-py3-none-any.whl <span class="o">(</span>16 kB<span class="o">)</span>
Saved ./PySocks-1.7.1-py3-none-any.whl
Successfully downloaded pysocks
</code></pre></div></div>

<p>Copy this <a href="https://pythonwheels.com/">python wheels</a> file to <code class="language-plaintext highlighter-rouge">no-internet</code>, for
instance using <code class="language-plaintext highlighter-rouge">scp</code>.</p>

<div class="language-bash highlighter-rouge"><div class="highlight"><pre class="highlight"><code>user@with-internet<span class="nv">$ </span>scp PySocks-1.7.1-py3-none-any.whl user@no-internet
</code></pre></div></div>

<p>And install it manually there. I’m installing it in the user environment
(<code class="language-plaintext highlighter-rouge">--user</code> flag) because in this machine I don’t have enough permissions, but
your mileage may vary here.</p>

<div class="language-bash highlighter-rouge"><div class="highlight"><pre class="highlight"><code>user@no-internet<span class="nv">$ </span>pip <span class="nb">install</span> <span class="nt">--user</span> PySocks-1.7.1-py3-none-any.whl 
Processing ./PySocks-1.7.1-py3-none-any.whl
Installing collected packages: PySocks
Successfully installed PySocks-1.7.1
</code></pre></div></div>

<p>If we use pip and SOCKS, now we succeed.</p>

<div class="language-bash highlighter-rouge"><div class="highlight"><pre class="highlight"><code>user@no-internet<span class="nv">$ </span>pip <span class="nb">install</span> <span class="nt">--user</span> <span class="nt">--proxy</span><span class="o">=</span>socks5://localhost:9999 yapf
Collecting yapf
  Downloading https://files.pythonhosted.org/packages/47/88/843c2e68f18a5879b4fbf37cb99fbabe1ffc4343b2e63191c8462235c008/yapf-0.32.0-py2.py3-none-any.whl <span class="o">(</span>190kB<span class="o">)</span>
     |████████████████████████████████| 194kB 933kB/s 
Installing collected packages: yapf
Successfully installed yapf-0.32.0
</code></pre></div></div>

<p>Yay!</p>

<h3>Cleanup</h3>

<p>Recall that we have two connections opened: one is the SOCKS proxy (<code class="language-plaintext highlighter-rouge">-D</code>) and
the other the reverse tunnel (<code class="language-plaintext highlighter-rouge">-R</code>). Just end them both with Ctrl-C and you are
done. I’m sure this can be scripted somehow but given that the <code class="language-plaintext highlighter-rouge">ssh</code> commands
may require password input, this is not a trivial thing to do.</p>]]></content><author><name>Roger Ferrer Ibáñez</name></author><category term="SOCKS" /><category term="proxy" /><category term="ssh" /><summary type="html"><![CDATA[Sometimes we are given access via ssh to nodes that do not have, for policy or technical reasons, access to the internet (i.e. they cannot make outbound connections). Depending on the policies, we may be able to open reverse SSH tunnels, so things are not so bad. Recently I discovered that OpenSSH comes with a SOCKS proxy server integrated. This is probably a well known feature of OpenSSH but I thought it was interesting to share how it can be used.]]></summary></entry></feed>